In the modern world it is extremely important to correctlyorganize rest and sleep. As a rule, people often face the problem of poor sound insulation of their living quarters, as a result of which all plans become simply impracticable.  Scheme of noise insulation of the ceiling. This problem concerns both old houses and new high-rise buildings. Moreover, even in your own home, the lack of good noise insulation can negatively affect the emotional state. A key role in insulation matters is the noise insulation of the ceiling. But how to make noise isolation correctly? Unlike the walls, the ceiling is best able to make noise. Especially it concerns apartments. After all, the presence of troubled residents living on the floor above, can poison the mood even the quietest person.
Material selection: sound insulation and sound absorption
Noise insulation of the ceiling in the room shouldcarried out at the repair stage. After all, then it is difficult to do, as it will have to dismantle the finish and re-do everything. But, before starting to work, you must first choose the material that is suitable for insulation best. 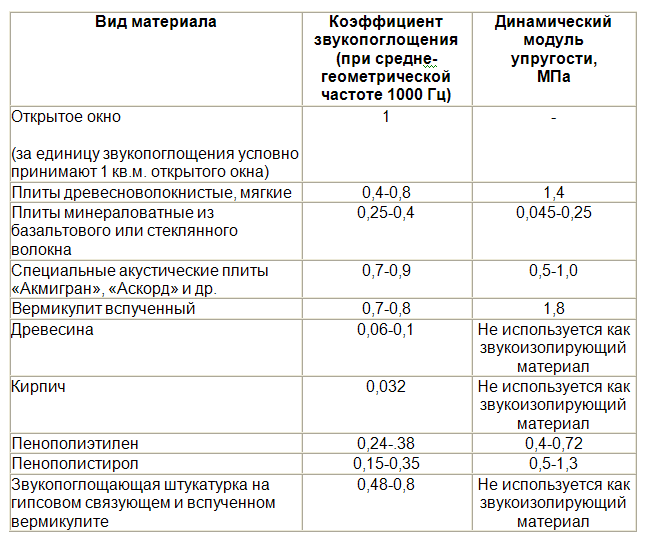 Table of materials for soundproofing. So, experts distinguish two types of material. One is for absorbing sounds, and the other is for isolation from sounds. Therefore, it is useful to learn the main differences between them. Here there are both external characteristics and operational ones. Materials that are designed to soundproof the room, usually very heavy in weight. They should reliably reflect sound waves due to their high degree of density, as a result of which the sound simply will not get inside the room. These materials usually do not have any pores in their composition, but their thickness can vary considerably. Materials for sound absorption include all strong building structures, such as gypsum boards, concrete slabs, bricks, cinder block, plywood and concrete structures of various types. The thicker the material, the better it will reflect the sound waves. Materials for sound absorption in its composition have many pores of various sizes, due to which there is a sound absorption and, accordingly, an obstacle to its penetration into the room. Usually, these are materials from different types of fibers, where absorption takes place in the pores due to friction of sound waves about them. To sound-absorbing materials it is customary to include all types of plates: fiberglass, basalt, mineral and others. The thickness of the plates can also be different. And what thickness to choose the best, depends on the design of the ceiling and the required degree of insulation. Here, to a large extent, the degree of efficiency will depend not on the thickness of the material, but on its porosity and the quality of the fibers used.
  Scheme of installation of sound insulation on the suspended ceiling. Another relatively new material for noise insulation is a coating based on natural cork. This material is indispensable in the event of mechanical noise that occurs primarily on the floor. But from the rest of the sounds you will not get a good defense. Therefore, it is best to use the plug for neighbors from the top for floor insulation. Or you in your home to isolate the lower floor from the top. So, the features you learned. Now is the time to decide which material to choose the best. And here many masters allow in most cases the same mistake, preferring exclusively isolation or absorption. But physics teaches the opposite: during isolation, acoustic waves oscillate, which can create a secondary noise. And you can remove it only by literate absorption. The conclusion is to use both sound insulating and absorbing material at the same time. At the same time, insulating layers should be located from below and from above, and in the middle - fiber to absorb sounds. This type of insulation will be almost ideal. It does not matter what types of materials for the layers are chosen. Here you can already focus exclusively on the future design of the ceiling and the cost. Back to contents</a>
Surface preparation of the ceiling
And now, in fact, about the insulation of the ceiling. The material you have chosen, now is the time to begin preparing the surfaces. To do this, first dismantle the old coating from the ceiling and remove the sprinkled plaster and putty without regretting them. After all, sooner or later they will crumble, which will negatively affect your repair.  Tools for soundproofing installation. Now, with a soft brush, remove the dust from the ceiling and cover the surface well with a primer. After drying, take for sealing holes and cracks. It is better to produce a good putty. But if there are too large deformations, then you can use the concrete solution. But in the end, the ceiling must be plastered in any case. And when the putty dries, apply one more control layer of the primer. Next, proceed to finish the ceiling to achieve protection from noise. As a rule, it is customary to distinguish two types of such finishes: frameless and skeleton. It is best to give preference to wireframe trim, as it is more reliable and durable. Frame noise insulation of the ceiling from penetrating noise is the presence of a special frame, for which the fastening layers of materials. There are three main parameters that determine the quality of such work in the end: it is the correctness of the technology, the reliability of attaching layers and the choice of quality material. And if the last parameter has already been considered above, then the first two should still be considered in more detail. Back to contents</a>
Materials and Tools
Before taking directly to work,you need to stock up on the right amount of materials and all sorts of tools. It's also a good idea to invite an assistant, since working with the ceiling alone is pretty hard. So, for work you need to have:
- building level;
- metal profiles;
- plasterboard sheets;
- pencil and tape measure for markings;
- building knife for metal;
- rubber gaskets;
- screwdriver or punch;
- dowels, screws and screws;
- fibrous material for noise absorption;
- sealant based on acrylic (you can use a special putty).
In this version of the work,how to make noise isolation, where any fibrous material can be used to absorb sound. To reflect it is necessary to apply drywall in the lower part of the ceiling. The upper part of the ceiling remains untouched, since a concrete slab with embedded slots and holes will serve as a kind of layer for reverse reflection. Back to contents</a>
Mounting the frame
 The skeleton of the ceiling. So, how to make noise insulation of the ceiling with your own hands? All work begins with the assembly of the frame. As a rule, any metal frame has an instruction, which requires assembly. At the same time, try to make each joint using rubber gaskets. This will make the mount more reliable. After the assembly, you need to attach the frame to the ceiling. This is done with the help of screws with dowels and a perforator. Only take care of the markup beforehand so that you do not have to wonder where you'd better mount it during work. Attachments should preferably be made at least every 40-50 cm. Note that the frame can be assembled beforehand, then fixed to the ceiling, or gradually assembled directly on the very surface of the ceiling. Here you have the right to choose a more convenient option for yourself. During the fastening of the frame, special attention should be paid to the structures along the perimeter of the ceiling near the wall. Self-tapping screws should be used the largest and most reliable. Some masters advise to carry out also additional fastenings to walls with the help of small metal corners. Such a method will allow not only to fix the frame better, but also will not allow it to deform in the future from changes in temperature and humidity. Just do not forget to restore the top of the wall beforehand, since then it will make it problematic. Back to contents</a>
Formation of pie
Now you need to make noise insulation in the pie fromfiber boards. For this purpose, the distances between the slats in the frame are measured, after which the necessary pieces of fiber plates are cut out (they must necessarily be larger than these intervals so that they can be densely packed into the frame). Then they are densely pushed into the frame. You can make an additional fixation to the ceiling at the corners with the help of the substance "liquid nails". After that, it's time to start the equipment of the reflective layer, in which quality gypsum board will serve. On the sheets are made markings in the places of fastenings, then the material is planted on self-tapping screws, being fixed in the frame. Hats of self-tapping screws should be recessed so that their level coincides with the level of plasterboard. But you can plant and 1-2 mm deeper. Immediately check the smoothness of the construction level. In the case of unevenness, try to correct the deficiencies by more or less deep utaplivaniya. So, how to make noise insulation on the ceiling you now know. Now it remains only putty or sealant to fill the gap between the sheets of gypsum board, and also between plasterboard and walls. If you did everything right, then the neighbors from above will not bother you more.


