Filling the floor with concrete is one of the most important stagesbuilding a house, because the floor must withstand prolonged loads, and the better it copes with its main task, the higher its strength. In addition, a quality potting prepares the surface for topcoats. 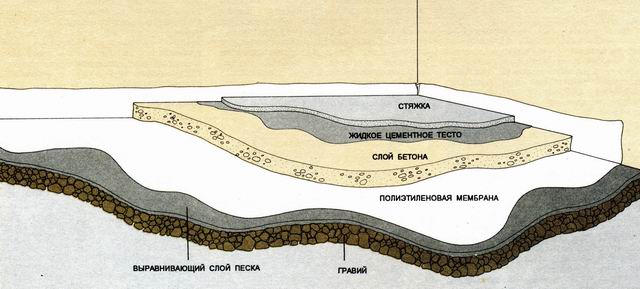 Scheme of concrete floor on the ground. A well-made base allows to achieve the final result with lower costs, besides, the floor, which is quality-filled with concrete, will not require repair for many years. How to fill the floor yourself, so that it can equally easily be used for laying warm floors, ceramic tiles, laminate flooring, plywood or linoleum?
Preparing for concreting on the ground
In the construction of concrete floors with their own hands, there istheir complexities, but they are able to cope with each. The main difficulties are not with the preparation of mortar, but with the need for thorough, even painstaking preparation of the surface for concreting. It is from the quality of the work at the preparatory stage that the extent to which the result will result is largely dependent. Just need to comply with technology. Back to contents</a> The main stages of work When building a newhouses are often directly on the ground. Those who did not try to simplify the process and firmly followed the recommendations will not have any unpleasant surprises when using the floors:  Scheme of compaction, grouting and grinding of concrete floor.
- prepared the soil;
- provided waterproofing;
- laid the heat insulator;
- he ground the base;
- correctly created a horizontal plane for the screed.
The preparation of the soil is as follows:
- removal of the upper loose layer;
- sealing of the surface;
- padding.
You yourself are able to determine to what depththe top layer of soil is removed (experts advise removing a layer as thick as a shovel's bayonet, but the condition of the soil in different regions has significant differences). Once you get to a denser layer, tamp it down additionally. Then you can pour in the clay and compact it. This layer will create additional waterproofing. By the way, it is not recommended on the ground in flooded areas. In addition, subsoil waters should be at least 4-5 meters from the structure. There is one more condition for creating a high-quality base and screed - horizontal movements of the soil under them are not allowed. However, when pouring concrete inside a strip foundation, you do not need to worry about this. Back to the table of contents</a> How to perform a padding?  Floor marking with laser level. After compacting the soil, a layer of gravel with a thickness of at least 10 cm is filled in. The gravel is watered and compacted. A layer of sand of the same thickness is poured onto it. It is moistened and tamped (for this you can use a thick log with nails pinned to it). The last layer of podsypki will be rubble. Its 10 cm layer is compacted, but at the same time it is necessary to make the surface of the undercoat become smoother (the rubble can damage the membrane of the waterproofing). The sand is again poured onto the rubble (a small layer), and the final ramming of the undercoat is carried out. It is desirable to control the horizontality of each layer of padding according to the pegs installed or leveled on the wall of the foundation. It should be added that with a high ribbon foundation (more than 35 cm from the ground level) only sand is poured into the perimeter after removing the top layer of the soil. Back to contents</a>
Stacking of insulation and fittings
Now on podsypku stacked waterproofingmembrane. As a waterproofing agent, it is possible to use roll materials based on bitumen or dense polyethylene. The admission of the insulator to the walls should exceed the thickness of the concrete floor (after pouring excess insulation is simply cut off). Waterproofing is fixed to the wall with an adhesive tape. All sheets of material must be placed in an overlap of not less than 15 cm. All joints are pasted with tape. The edges of the roofing material and similar materials are treated with bituminous mastic. Well, if the floor is equipped and reliable thermal insulation. In this capacity, you can use expanded clay, which must be evenly distributed over the surface and compacted, or tiled materials (expanded polystyrene and expanded polystyrene). 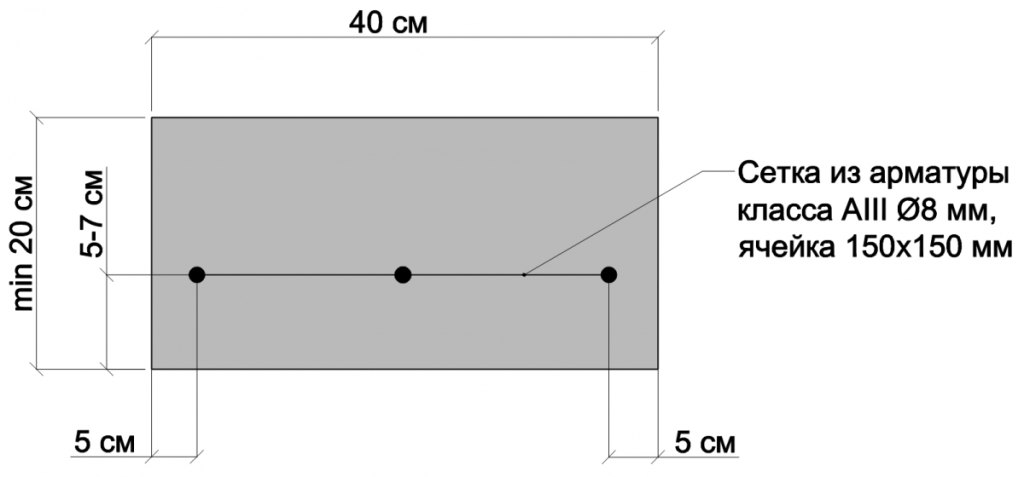 Scheme of reinforcement of the floor. Plates should be stowed in staggered order, so that the joints between the panels on the adjacent rows do not coincide. Quality insulation will be ensured if the panels are closer to each other more densely. All connections must be pasted with tape. Those who pour concrete on the floor with their own hands, especially indoors, often neglect the installation of reinforcement, and it significantly strengthens the structure, helping it withstand high loads and distributing them evenly over the surface. Armature makes the floor much more solid and prevents the formation of cracks. For the reinforcement, gratings of at least 5 mm thickness can be used. The aspect ratio in the grid cells is 100x100 mm. Laying reinforcement of greater thickness can strengthen the load-bearing characteristics of the overlap. It should be remembered that the reinforcing lattice should not be laid directly on the base under the concrete (in this case the reinforcement loses all meaning), but rather away from the heat insulator at some distance. It is best if the reinforcement is recessed into concrete by 1/4 or 2/3 of the thickness of the screed. The grid can be raised above the base by special supports, lining the pieces of reinforcement, plaster or concrete "cakes" under it. Back to contents</a>
Construction of a floor plane and installation of profiles
 Installation of beacons for floor screed. To the floor turned perfectly horizontal, you need to build a plane, which will be its fill. To create it you need:
- water level;
- Pull out cord;
- a piece of chalk;
- roulette;
- dowel-nails;
- synthetic threads;
- beacon profiles;
- gypsum, alabaster or cement mortar.
The process of creating a plane is as follows:
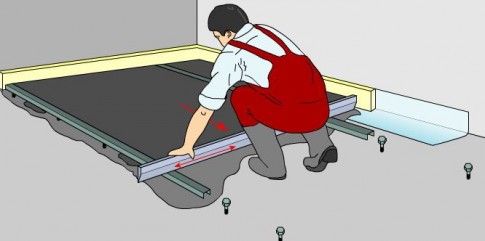
 Scheme of pouring concrete floor. The plane is ready. Now profiles are installed. They should be directed from the opposite wall to the entrance to the room. The profiles are lubricated with oil or other lubricants and are placed on "cakes" of gypsum or concrete. The correctness of setting the beacons is checked by thread. If necessary, the profile is pressed into the gypsum lining, and if it does not reach the thread, plaster or concrete is also placed under it. The distance between the slides from the solution is 25-30 cm. The first and last lighthouses are placed 15 cm from the wall. The distance between the rest should be 20 cm less than the length of the rule. Pouring concrete can begin only after the supports under the lighthouses are frozen. Back to contents</a>
Pour concrete tie
 Scheme of the screed. Before laying the screed along the wall a damper belt is laid, the width corresponding to the thickness of the concrete layer. The pouring begins at the far wall from the entrance to the room. It is desirable that the entire area of the room was flooded at the same time. Concrete is laid between the lighthouse shovel. Ideally, the solution should be sealed with a vibrator, but at home, the removal of air bubbles from the solution is carried out with the same shovel (it resembles a knife cutting test). Then the concrete is leveled by the rule, which is conducted along the profiles from the far wall to the door. Once the concrete is slightly frozen, you need to remove the beacons (if they are not made of aluminum or galvanized steel), so that later on the surface of the floor did not come rusty stains. The resulting cracks are closed with a mortar with a spatula and a half-hook. During hardening, the screed for 3-4 days is wetted with water. Concrete will completely harden only after 4 weeks. In the first week after pouring it should be covered with a plastic wrap. Pouring of mortar on concrete floors is carried out without preliminary pouring, but with obligatory cleaning and repair of the base. Laying of hydro and thermal insulation is a prerequisite for quality work. </ ul>


