There are situations when the owners of smallApartments face the problem of lack of space. And if the family is big, then the need for additional places of storage of things increases. Buying ready-made furniture can not always be a way out of this situation, because it is not always able to fit into the ready-made interior. Yes, and the cost of manufacturing custom-made furniture can be quite high. There is a worthy alternative to traditional furniture - plasterboard cabinets and shelves. To make a cabinet from gypsum cardboard it is quite real independently. Below is an instruction on how to make a cabinet made of gypsum boards.  From GKL and metal profiles it is possible to make an inexpensive and practical cabinet.
Features and benefits of plasterboard cabinets
The main advantages of cabinets made from drywall sheets:
- relatively low cost;
- convenience and practicality;
- the creation of an exclusive cabinet design that perfectly fits into the style of your interior.
- the plasterboard material itself is environmentally friendly, non-toxic, non-radioactive, with good thermal insulation; except for conventional GCR, there are still moisture-resistant and fire-resistant sheets;
- GCR can be painted, plastered, wallpapered and tiled;
- in furniture from GKL it is possible to build in lighting.
 Metal profiles for the installation of plasterboard. One of the rational and practical solutions for creating a cabinet made of drywall is a closet. Such a cabinet has many useful features and in many cases even surpasses cabinets made to order, as their cost goes much higher. When the cabinet from gypsum cardboard is ready, it is enough to order from the masters sliding door-compartment. However, if you decided to make a cabinet made of drywall, it is important to know a number of features of such furniture:
Back to contents</a>
Development of cabinet design
 Tools for working with plasterboard. Work on creating a drywall cabinet begins with the development of a sketch of its appearance, and then the design drawing with all dimensions. For this it is necessary to make measurements of the place where the cabinet is planned to be built in, and on the basis of the dimensions obtained, to develop an accurate design of the structure. For beginners this can be simple rectangular and square shapes. But if you decide on a more original design with curved asymmetrical shapes, then such a cabinet will look much more interesting. Back to contents</a>
Assembling the frame of the cabinet
When the project of a drywall cabinet will becompletely developed, checked and corrected all errors and inaccuracies, you can start assembling its frame. To install a plasterboard cabinet you will need a fairly large number of materials and tools. Materials: 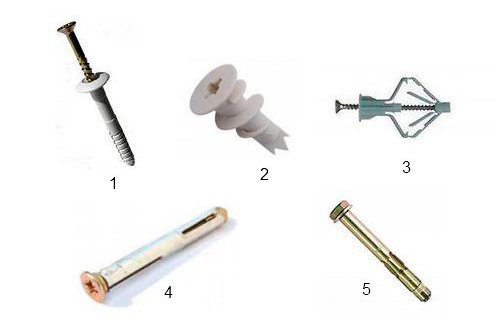 Fasteners for the plasterboard cabinet: 1 dowel-nail, 2-snail, 3-butterfly, 4-anchor screw, 5-anchor bolt.
- GKL is normal or moisture resistant;
- metal profiles UD and CD;
- plastic or metal corners to protect the GCR;
- Self-tapping screws for fastening metal profiles and gypsum boards;
- Painting mesh;
- finishing putty;
- primer;
- Finishing material (paint, decorative plaster, etc.);
- Furniture fittings (if necessary);
- fixtures, switches, sockets and cables for them (if necessary).
Instruments:
- perforator or electric drill;
- Screwdriver;
- Bulgarian;
- scissors for metal;
- paint knife;
- ruler, square, pencil;
- building level;
- edge planer;
- a set of putty knives;
- Grater and sandpaper for grinding;
- paint rolls, brushes;
- containers for solutions.
For the fabrication of the frame, metal profiles are used most often, more rarely - wooden beams. 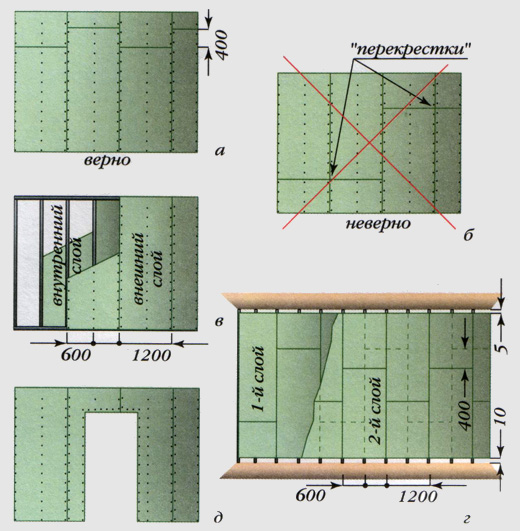 Scheme of proper joining of plasterboard sheets. A wooden frame requires a careful selection of the material, as its quality will affect the final result. If you decide to stay on a frame of a wooden beam, then when choosing it, pay attention to its condition and appearance. The tree must be completely dry, giving full shrinkage. Otherwise, the wooden frame will shrink, which will lead to its deformation. Accordingly, drywall sheets will also be deformed and may even crack. Therefore, it is better to choose metal profiles. Building a metal frame is much easier and easier, especially if you are new to this business. Wooden beams can only be used in places that require increased strength, because in this matter, the wooden beam is stronger than the metal one. Stages of frame assembly:
Back to contents</a>
Gypsum board casing
After the complete assembly of the cabinet frame, you canproceed to the plating of its GKL. Skeleton casing should be made from the outer and inner sides. However, if the cabinet is small, it is possible to do and skin from the outside. It should be remembered that the larger the cabinet, the greater the load will be on its internal shelves and walls. Therefore, it can be sewn and in 2 layers of GCR. The fixing of gypsum boards to the profiles is carried out in a similar way to the installation of GKL in the facing of walls and ceilings: 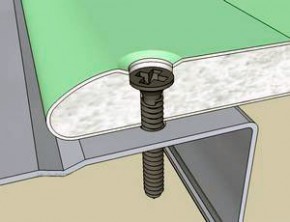 Scheme fixing GKL screws.
Back to contents</a>
Putty and finish of the cabinet
Next is the preparation of the cabinet for finishing -putty plasterboard. Putty all the holes from the screws and the joints between the sheets. For this, a special paint net is glued to the joints, then it is puttyped. After drying the putty, the surface should be sanded and primed. If necessary, apply a second layer of putty and again sand and primer. After the primer has completely dried, the surface is ready for finishing. Plasterboard cabinets are good in that they can be made in the bathroom, using a moisture-resistant plasterboard. In this case, the surface of the shelves and walls of the cabinet can be covered with ceramic tiles or mosaic. For this it is enough just to fill the joints between the sheets of gypsum board, priming all the surfaces of the cabinet and proceeding to laying the tile. </ ul>


