Apartments even in modern buildings are often notdiffer in the spaciousness of the royal chambers, and their inhabitants have to show ingenuity, so that any free space will be of use. The mezzanines, refrigerators under the window and the lifting beds have already firmly taken up positions in small-sized housing, but this has so far not touched the window sills. Few people succeeded in making the idea of turning a window space into a workplace, but the advanced layers of the population are already actively interested in the prospect of how to expand the useful space on their square meters.  Scheme of mounting the window sill. A table in a window opening can be arranged in a room and serve as a sewing or computer corner or in the kitchen, allowing the landlady to profitably increase the working area of the windowsill. The location in the immediate vicinity of the window gives a lot of advantages, ranging from the natural illumination of the workplace, ending with a pleasant warmth for the feet, going in the winter from the central heating battery.
Preparation for the production of window-sills
The most successful moment for making a table with the least expense and hassle is the gap between the finished installation of the plastic window and the installation of the window sill. 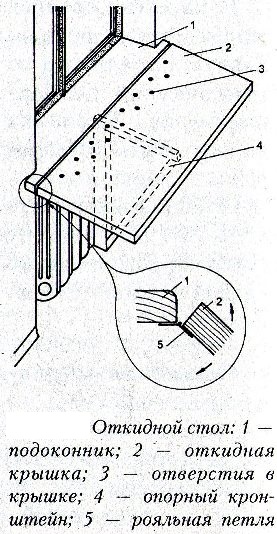 The diagram of the folding table. If in advance to prepare for this period all that is necessary, then the installation will happen quickly and it will only be necessary to put the slopes in order and start using the new embodiment of the window sill by appointment. By removing the necessary dimensions for the calculation, you can begin to compile a list of materials for the acquisition and preparation of the required instrument. So, you will need:
- sheet of MDF;
- a wooden bar;
- chrome-plated metal tubes;
- mounting profile with perforation;
- flange holders and plastic plugs;
- antiseptic for processing;
- self-tapping screws of different sizes;
- silicone sealant;
- a set of sandpaper;
- mounting foam;
- roulette, ruler and pencil;
- electric jig saw;
- Bulgarian;
- a hacksaw with a small tooth;
- drill and feather drill.
For the countertop, you can pick up other material,but the MDF board is the most simple to process and does not have a high price. It has a wide variety of colors and textures, so it's not difficult to find the right variant for a harmonious combination of the table with the room's situation. In addition, in this case, do not need to carry out additional surface treatment, which would require the use of natural wood or chipboard. When designing the project, it must be ensured that too much thickness of the slab does not interfere with the free movement of the window flaps, the depth allowed to reach by the hand to the window, and the height exactly repeated the level of the dismantled window sill. The contours of the shape of the future tabletop are transferred to a sheet of MDF and saw by an electric jigsaw. After that, plan the location of the holes necessary to ensure the warm air from the heating radiator. For a good circulation of air currents, their diameter should be at least 3-3.5 cm, so the drill for this work is better equipped with a perforated drill. Decorative plastic or wooden grilles will later cover their unaesthetic appearance, but do not interfere with the passage of air. If the table top has been cut at home, and not ordered according to the drawing in its finished form on the basis of a sawing and woodworking service, the end edges will need to be processed with a furniture strip using iron and heavy paper for this purpose. Back to contents</a>
Assembling the construction of a window-sill
The support for the countertop from the window side will beserve wooden bars, and with its opposite will hold perforated connectors. The metal profile is bent at an angle of 90 ° and fixes its ends to the wall and edge of the table. The formed emptiness is filled with a mounting foam and after its final setting all the slots are treated with a sealant. After this, you can proceed to install the legs of the table-sill. The chrome-plated metal tube is divided into pieces of the required length and saw off pieces by a Bulgarian. At the upper end of the workpiece, a flange is installed, and the foot is fixed through its holes with screws to the bottom of the table top. The lower part of the legs is equipped with plastic plugs. It remains only to install a screen for the radiator, selected by color and style to the desk-sill, and restore order to the workplace.


