Making Roman blinds with your own hands is quite simplesimple, if you familiarize yourself with the technology and buy everything you need. The most important thing is to make a reliable lifting mechanism, thanks to which you can raise and lower the curtains. The fabric is selected depending on the style, it can be thick or translucent, plain or with a pattern. Everything will depend only on your imagination and wishes. Roman blinds gained their popularity due to their functionality, ease of use and elegance.
Manufacturing of cornices for Roman blinds
You will need:
- wooden strip;
- Furniture stapler;
- staples for 6 mm;
- liquid Nails;
- Velcro tape;
- hooks-self-tapping screws - 3 pcs.;
- fasteners.
Making Roman blinds with your own hands is not that difficult.and difficult. First of all, you need to take measurements of the window opening, its width will be equal to the length of the future cornice if you plan to place the curtain inside the opening. If the Roman blinds will be located above the opening, then you need to add 7-10 cm to the resulting length to cover the walls on both sides.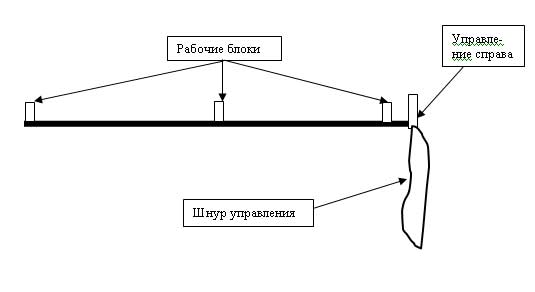 Scheme of a cornice with a lifting mechanism forRoman blinds. The cornice is made from a flat (well-dried) wooden plank. The easiest way is to cover it with the same fabric from which the curtains themselves will be made. To do this, lay the block on the material, cut off all the excess, fold the edges to the wrong side, and staple the fabric with a furniture stapler. If you do not have such a tool in your household, then no problem, you can simply glue the cornice with fabric using PVA glue. You can do it a little differently: paint the wooden plank with acrylic paint or cover it with stain and varnish. It is important not to leave the wood untreated, otherwise the cornice may deform under the influence of the environment. This is especially true for rooms with high humidity. Velcro tape is glued to the front side of the cornice using liquid nails. For greater reliability, you can additionally fix the Velcro in the center and at the edges with a construction stapler. Take the hooks-screws, using pliers squeeze them into rings, screw them into the lower end of the cornice (2 - at the edges, 1 - in the center). Metal corners are most often used as fasteners, they are attached either on top (if the curtains are located above the opening) or on the sides (when the cornice will be attached inside the window opening). Sometimes dowel-nails are used to attach the cornice. Return to the table of contents</a>
Roman blinds with their own hands: sewing
You will need: Tools and materials for making Roman blinds: stapler, strips, fabric, threads, glue, knife.
- fabric for curtains;
- tape with plastic rings;
- cord;
- chalk or a piece of soap;
- pins;
- wooden strip for weighting agent;
- glazing beads or metal rods;
- curtain tape;
- sewing machine;
- iron.
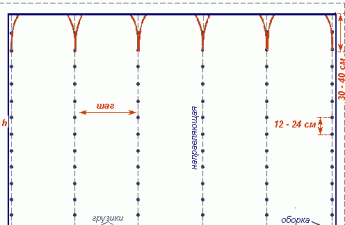
quite simple, but only on one conditioncompliance with precise technology. First of all, you need to measure the window, add about 20 cm to the length (depending on the width of the weighting agent and seam allowances), to the width - 5 cm (seam allowances). If you use natural fabrics to make the curtain, they must be heat treated: moisten with a spray bottle, then iron, then the finished product will not shrink. Cut out 2 identical pieces of fabric, fold them with the right sides inward, pin them, and then stitch along the bottom edge and side seams. Turn the resulting cover inside out, iron it, and stitch along the edges (you can stitch 2 lines).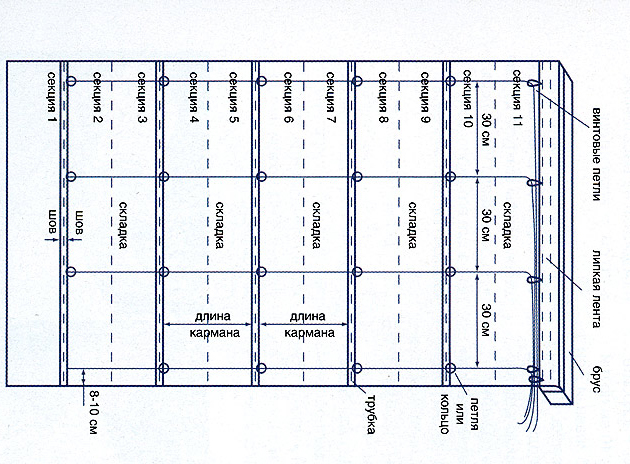 Roman blind pattern.In order for Roman blinds to hold their shape, it is necessary to insert a weight along the bottom of the product. Measure the wooden strip, then take the curtain, fold the bottom inside out (to the resulting width), and stitch. Make the pocket so that the strip can be easily inserted and removed, but does not fall out. Important: the weight and inserted rods should be 2 cm shorter than the curtain, then the product will look neat. Next, make markings for the inserted strips, the width between the rods can vary from 20 to 30 cm (depending on the length of the curtain). So, if the length of the product is 150 cm, then you should get 7 folds with a distance of 20 cm between the strips. Roman blinds 230 cm long will have 8 folds with a distance of 27 cm between the rods. Sew a narrow curtain tape or braid according to the markings so that a pocket is formed. Instead of tape, you can use strips of fabric. In this case, you need to fold and iron the edges of each strip, then pin them along the markings, and then sew them to the product. After all the pockets for the rods are ready, proceed to processing the top. Fold the edges inward of the curtain, iron them, then stitch, simultaneously sewing on the Velcro tape. Next, take a Roman blind and manually sew a transparent tape with plastic rings in the center and sides of the product. The rings should be located directly on the bar. If you did not find such a tape on sale, then no problem, you can just use plastic rings. In this case, you must first make markings so that the rings are sewn exactly along the line, otherwise the curtain will be skewed. It is better not to use metal fittings, as rust can transfer to the fabric.
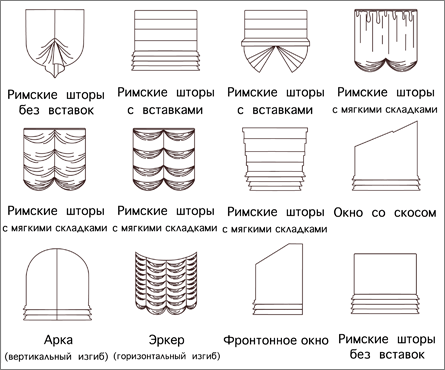 Types of Roman blinds.Next, take the cord, fold it in half, fasten it through the resulting loop on the bottom ring, and then thread it through all the others (without tying). Do the same with the other two rows of rings. You should have 3 double cords brought out to the top of the curtain. Then each cord is threaded through the self-tapping rings on the cornice, brought out to the right or left side (depending on which side you want to make the lifting mechanism). The cord is braided into a pigtail, a knot is tied at the end or a bead is attached. Return to contents</a>
Roman curtains from a mat
You will need:
- wooden lath for eaves;
- glue gun;
- Velcro tape;
- building stapler;
- plastic rings;
- self-tapping hooks;
- hemp rope;
- metal corners for fixing the cornice.
Make curtains with your own hands from ready-mademats are easy. You won't need a sewing machine for this, as all the work is done by hand. First, make a cornice from a wooden plank: paint it, glue the Velcro tape, screw in the hooks at the bottom, screw the screws, previously clamped with pliers into rings, and screw on the metal corners for fastening.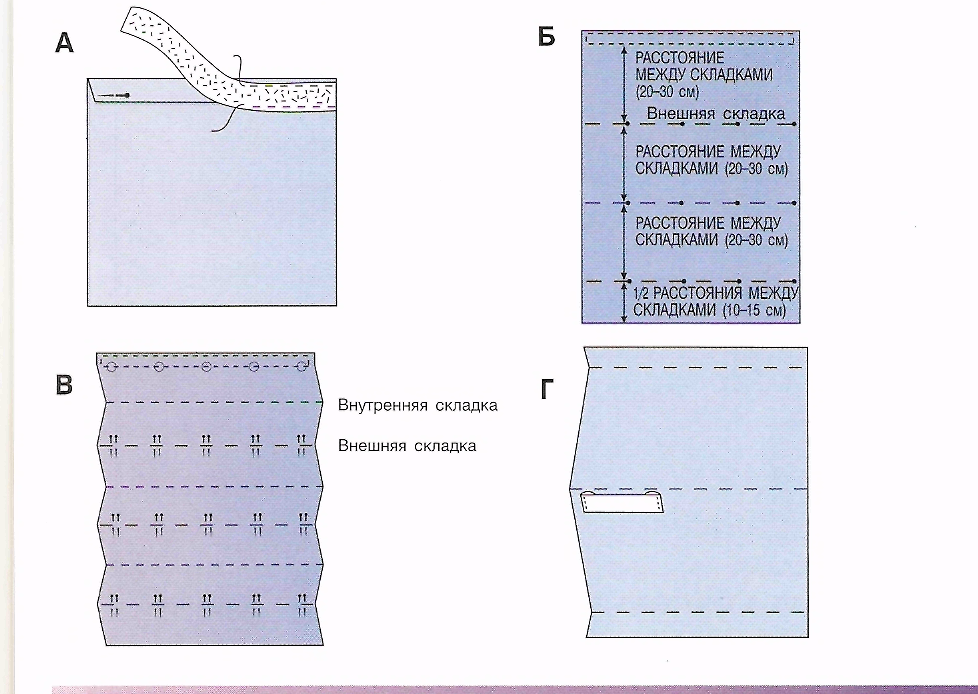 Scheme for making a Roman blind.After the cornice is ready, they begin to make the Roman blind. On top of the canvas (from the back side) they glue the Velcro tape with a glue gun or sew it on with hidden stitches. Then they mark the rings. For a wide Roman blind, you need to make 3 rows of rings (in the center and at the edges). In this case, the distance between the rings in a row should be from 20 to 30 cm. The fittings are sewn on either with hidden stitches, hooking 2 weaving threads, or in such a way that a pattern is obtained on the front side, for example, a cross or a strip, but in this case you need to use beautiful embroidery threads or iris. Hemp or any other rope made of natural materials is tied to the lower rings, threaded through all the rings in the row (to the very top), the mat is attached to the cornice with Velcro tape. After that, all the ropes are brought out to the right side (through the self-tapping rings on the cornice). In order for the rope of the lifting mechanism to look neat, it must be braided or decorated with wooden beads. The manufacture of the curtain with your own hands has come to an end, all that remains is to hang it on the window and admire the result of your work. Return to the table of contents</a>
Roman blinds from old blinds
You will need:
- old blinds;
- dense fabric;
- Edge band;
- marker;
- building adhesive PVA (glue gun).
Making curtains with your own hands from old blinds is notwill not be difficult. The work is not very difficult, but it requires precision and accuracy. First of all, you need to remove the blinds, measure their width and length (without the lifting mechanism). Using the data obtained, cut the fabric, adding 1.5-2 cm on each side for allowances. Iron the material, iron the allowances, process them with edging tape. After that, you need to decide on the width of the folds, it can vary within 20-30 cm. First, make marks on the fabric, then glue the canvas to the top bar of the blinds. For this, you can use PVA construction glue, a glue gun or special glue for decoupage on fabric, thin double-sided tape. Start gluing the material from the middle, gradually smoothing out to the edges, leave until completely dry. Hang the blinds on the window, then take a marker, mark the bars that will be opposite the marks on the fabric, then remove the curtain. Place it on a flat surface, glue the fabric to the marked strips. Either leave the bottom of the curtain free or glue it to the last strip. If desired, you can decorate the lifting mechanism with the remains of the fabric. After everything dries, hang the product on the window. DIY curtains from old blinds are a great idea, thanks to which you can update the interior with minimal material costs.