Laminate is a popular floor covering thathas high performance characteristics. The external data of this material is also beyond praise. Therefore, many use it when finishing the floor. But it is important to know how to lay laminate. Then the quality of the finished coating will exceed all your expectations. 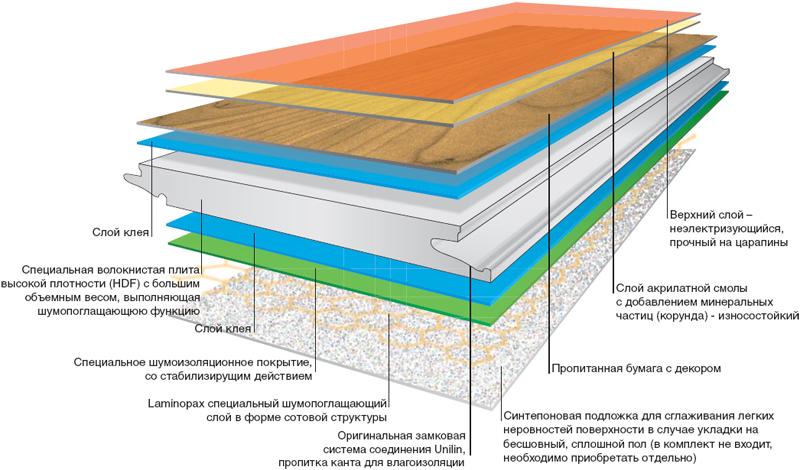 Layout of the laminate.
Preparation of a surface for a laminate
Before, it is important to prepare for itsurface. It should be perfectly flat, as this is the main requirement when installing this material. If there are irregularities on the finished pavement, this will cause an incorrect distribution of loads. All this will lead to rapid wear of the laminate. As a result, you will need to re-install it. If you have a wooden floor in your house or apartment, make sure it is horizontal. For these purposes, you can use the building level. On the surface, differences of 2-3 mm are allowed. If the irregularities are more than these parameters, then they will need to be removed. To do this, level the floor with a sander. In addition, you will need to check the strength of the wooden floor. If some boards bend under the weight of a person, then they are replaced with new ones. If the laminate is planned to be laid on a concrete base, then it is also necessary to make sure that it is horizontal. Here, too, you can use the building level. If differences of more than 3 mm are found, then a new screed will need to be poured. Its thickness should be done within 15-20 mm. Back to the table of contents</a> Substrate and waterproofing for laminate 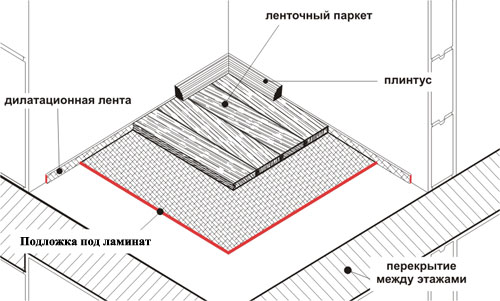 Layout of the substrate under the laminate. Before laying the laminate, it is necessary to coat the base with a waterproofing layer. For this, conventional polyethylene is suitable, but if possible, it is better to use a film waterproofing material. The waterproofing sheets are spread over the entire surface of the floor. It is necessary to make wall blanks in 15-20 cm. Between the canvases of the film must be provided overlapping up to 15 cm. It must be fixed with adhesive tape. On the waterproofing layer, it is necessary to put a substrate. As it can be used foam polyethylene. It is laid in the same way as the film. Polyethylene can be replaced with polystyrene sheets. They need to be laid "uncontrolled", and all joints are connected with adhesive tape. Back to contents</a>
Laminate installation: detailed instructions
Before you start laying the laminate yourself, you need to prepare the following tools and additional materials:
- roulette;
- a hammer;
- saw or jigsaw;
- pegs;
- pencil;
- Wooden plank (length 15-20 cm).
When a solid base is created and a backing is made,you can go to the direct. You can start it from any corner of the room, at your discretion. In this case, all laying schemes provide for the further continuation of the installation of the panels strictly from left to right. It is also recommended to take into account the direction of the light. It is better to lay the panels along the rays of the sun, then the joints on the finished surface will be barely noticeable. 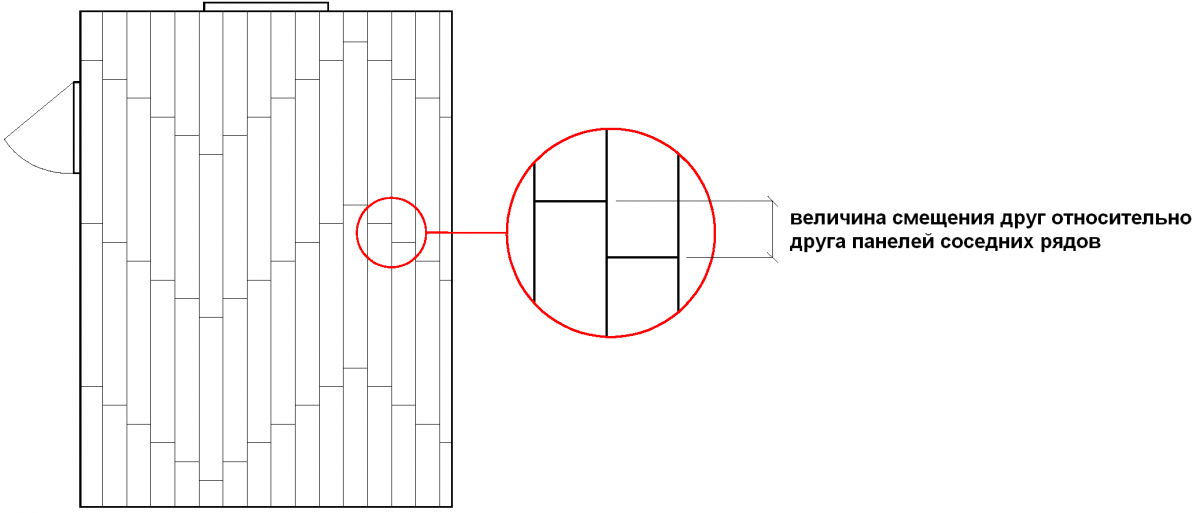 Layout of laminate flooring. Panels of laminate have the ability to narrow and expand at temperature changes. Accordingly, to avoid blistering, it is necessary to provide a gap of 8-10 mm between the material and the wall. To ensure it during installation, you will need to use pegs. Before you put the laminate yourself, you need to calculate the correct number of rows of panels. Since if it turns out that the last row should have a width of less than 5 cm, then you need to prune the first. Begin to lay the laminate in the first row with a spike to the wall, and they must first be cut with a jig saw. Then the panels will be tightly adhered. All their ends on the narrow side snap into the lock joint, which is provided for them. In this case, the studs of the panels must be inserted into the grooves at a small angle, necessarily pressing the material to the floor. When laying the second row, it will be necessary to provide for the displacement of the panels in 25-30 cm. Therefore, you need to take the finishing material, cut off a small part of it, lay it against the wall and attach to it a whole panel and so on until the row is completely laid out. The same scheme applies the rest of the laminate. At the same time, the last panel in the final row is fitted with a strip to obtain an ideal smooth finished coating. Back to contents</a> General Tips for Working with a Laminate Afteryou opened the packs with a laminate, be sure to visually inspect the material. If you find defects on some panels and broken edges, then take them back to the store. After all, they can not be used for masonry. It is recommended that the laminate is not installed immediately. Leave it for a few days indoors. This will allow him to acclimate. As a result, when working with it, there will be no problems. To increase the service life of the laminate, it is recommended to cover its crests with a special waterproof paste.


