Do-it-yourself water floor make enougheasy thanks to modern materials and fixtures. Many argue about the need to install such floors indoors, especially in private houses. However, if you are not familiar with construction activities, you can make a lot of mistakes in the work. Before installation, you should familiarize yourself with the types of such a system, its advantages and disadvantages. Why is it not recommended in apartments? Because it is not profitable, as you will have to obtain permission from the relevant authorities, which will take time. Also 4 times a year your floors will stay cold due to the fact that they are connected to the central heating system. Thus, their presence in an apartment of a multi-storey building becomes useless.  Scheme of a concrete screed of a warm floor.
Water floors by own hands: types of systems and their features
The water floor is set by the hands tosave on house maintenance. A person who intends to do the installation on their own will be able to reduce the costs of installing floors and further exploitation. Water floors have many advantages, due to which they become leaders among sales. The main advantage is the uniform heating of the base along the entire perimeter. Now you do not have to worry about the fact that the interior has deteriorated due to different heating appliances and their additional elements - the water floor will solve this problem with your own hands. Benefits - the main plus installation of such floors, as with small expenses, large areas of the premises are heated. In this case, you need to invest money only when installing, further payment for heating will be minimal. Thus, you get excellent technical characteristics and a long service life when installing the water floor.  Schemes laying the water-heated floor. There are 2 technologies for installing water-based floors. One of them is concrete, characterized by a special arrangement of the system. As a rule, it is installed under a monolithic screed and is accompanied by a temporary cost. By the way, such work requires a lot of work: the final coating is made only after the concrete screed has dried completely. In this case, the drying time depends on the thickness of the layer of this screed. The approximate period is 28 days, sometimes a month. Why so long? The fact is that concrete requires time to strengthen, compact. However, despite the laborious work, this method of installation is in demand. The floors made on the flooring technology, you will use for many years, since this method is different in quality and reliability. Stacking should be done using the finished material, which greatly speeds up and simplifies the work process. The disadvantage of this method is that it takes a lot of financial expenditure for the required amount of flooring materials. This technology, in turn, is divided into several subgroups, depending on the type of material: wooden system, modular and rack type. The last version of the water floor is wooden technology. It consists in laying the system on the floor, which is covered by wood. Back to contents</a>
Water floors with own hands: step by step instruction
Back to contents</a> Necessary tools and materials 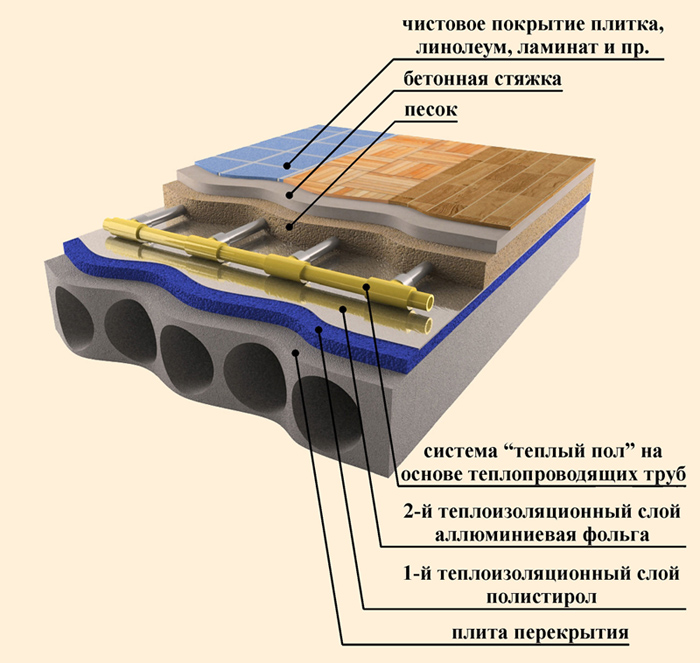 Structure of a warm water floor. So, the tools you need to work:
- apparatus for welding;
- saw;
- chisel;
- A stapler;
- a set of tools for installation work;
- screwdriver;
- building level.
Of the devices you will find useful:
- self-tapping screws;
- metal-plastic pipes;
- waterproofing;
- heater;
- foil (roll);
- metal corners.
Who needs to install such a system? First, people who live on the first and last floors; secondly, those who have a large amount of glazing (balcony, for example). Also it is worth considering the installation of insulated floors for those who do not have a warm enough room due to the construction of the whole building (thin walls). It would be wise to make water-based floors for those who want to create a marble or granite flooring. Now that you have decided on the system, you can begin editing. The first stage of the work is to prepare the foundation. To do this, you should clean the base of the floor from the old covering. Remember that the surface should be flat. If irregularities are found on the floor, then the base can only be raised by 5 mm, in case the level is exceeded, an equalization with a special screed is carried out.  Kinds of warm floors. It must be done to avoid problems with pipes and their operation. Depending on the technology, installation is done. The water floor itself with the help of the technology of concrete laying is done in several stages. After you have cleared the surface, it is necessary to lay a layer of thermal insulation. This way you prevent the heat from leaving the room in an unnecessary direction. How to choose the right thermal insulation material? First of all, you need to focus on its thickness, which should not be less than 30 mm. Pay attention to the density (not less than 35 kg / m³). Experts recommend choosing foam or polystyrene, they have good technical characteristics. In addition, manufacturers simplify installation work, suggesting the use of finished mats. They have special fixatives, but are expensive. The thickness of the thermal insulation layer depends on the heat load. The next step is to attach the damper tape. It is attached around the perimeter of the room and, as a rule, compensates for the thermal expansion of the installed screed, which you made of concrete. Now, when the heat-insulating layer is ready, put a polyethylene film on top of it. The third stage of installation will be the installation of a reinforcing mesh. The pipe must be attached to it with the help of clamps made of plastic. Using corrugated pipes, you protect the seams. The reinforcing mesh makes the construction of the floor more durable, so its use is necessary. The water floor with its own hands fits in the form of a snake or spiral. That is, for every square meter of the area of the room you will spend 5 m of pipe with the condition that the gap between them will be 20 cm. You can also arrange the loops in the computer program. If the room is large, then laying the pipes is done according to a different scheme, using several separate loops.
 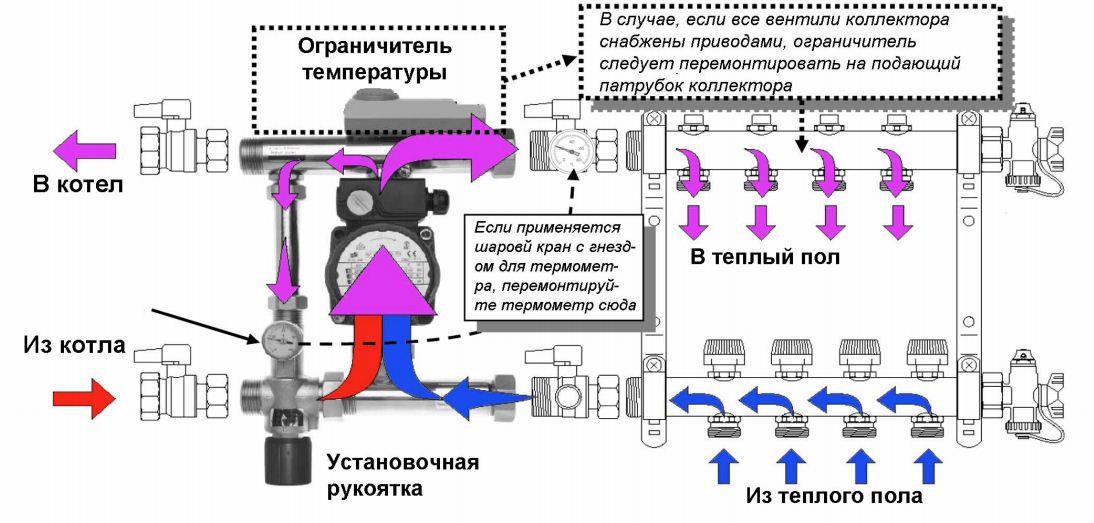 Scheme of a warm floor with a collector wiringcontours. Now you need to test. It is especially necessary for those who are installing themselves. First of all, it is necessary for reinsurance. You should check the installed pipes for strength and tightness, so as not to cause problems in the future. Before you fill the screed, you can eliminate all the imperfections that you could tolerate when installing pipes and replace them if you find any damage. The test is carried out hydraulically for 24 hours under a certain pressure (3-4 bars). After the pipes have successfully passed the tests, you can start pouring screeds of concrete onto the finished floor surface. Remember that its thickness should be above the pipes by a few cm (from 3 to 15 cm). To ensure evenness of the screed, use beacons. On them you can smooth the surface with the help of the rule. The finished screed should be left for 28 days until it dries completely. In this case, you can not include warm water floors. Then, after passing the required time, turn on the system. Increase the temperature gradually. The work is completed by laying the floor with a coating (laminate, parquet). Installation of water floors will take you a lot of time and effort, while allowing you to save on funds. In the exact observance of the instructions, even the beginner can perform the installation work. Water floor with your hands - a practical solution for warming the house. </ ul>


