Wallpapering is the most important steprepair of the premises. But it is not enough to simply stick them on. It is important that the process is done efficiently, then you will get a reliable wall covering that will serve you for many years and will not cause any problems. How to stick wallpaper on a wall correctly? Before you start gluing the wallpaper, you need to make sure that they are all from the same batch and that there is enough of them to cover the entire area.
Tools and materials
It's not difficult at all to do everything yourself, andeven pleasant and interesting. But before you get down to work, you need to stock up on the necessary tools and materials. Keep in mind that wallpapering also involves preparing the walls for it. So, you will definitely need: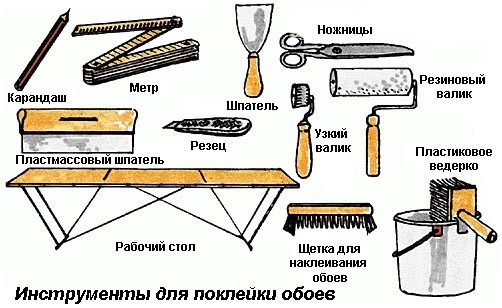 Wallpaper pasting tools.
- soft cloth;
- foam rubber roller;
- Brushes for applying glue;
- trowel and spatula;
- mixture for dilution of solution for plastering;
- water;
- adhesive for wallpaper;
- putty;
- primer;
- sandpaper;
- pencil and long ruler;
- wallpaper knife.
Return to Contents</a>
Surface preparation
Return to Contents</a>Removing old coatings So, it all starts withcareful preparation of the walls. First, remove the old wallpaper completely. For this, use a regular spatula. If the wallpaper is paper or duplex (double paper), then before removing it, you need to wet it with a wet cloth and wait about 5 minutes. If it is silk-screen printing or other thick wallpaper, then water will not help here. You will need to remove it only with a spatula, which is very easy. If there is a layer of paper under the wallpaper, it must also be removed.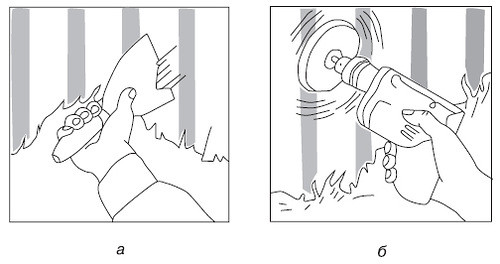 Scheme for removing old wallpaper: а – шпателем, б – сверлильной машиной. Когда с демонтажем старых обоев будет покончено, переходите к очистке стены от отстающей старой штукатурки и шпаклевки. Не нужно жалеть старого покрытия, так как в разрушенном виде оно никаким образом не будет защищать стены, а только ухудшит их качество, тем самым провоцируя обои отклеиваться. Отдельного внимания заслуживает демонтаж с поверхности старой краски. Даже тогда, когда краска очень хорошо держится, удалить ее все равно нужно. Если краска шелушится сама от времени, вам будет легко ее убрать обычным тонким шпателем. Ну а если так не получается, тогда приобретите специальный раствор для снятия старой краски и лаков, нанесите на поверхность, а по истечении определенного времени, когда краска вздуется, удалите ее. Старайтесь делать все так, чтобы на поверхности ничего не осталось, так как наклеивание обоев на краску дает риск их быстрого отставания со временем. Вернуться к оглавлению</a> Реставрация стен Следующим этапом является wall restoration. First, you need to shake the primer well and cover the surface well with it. It is preferable to buy a primer with antiseptics so that it not only promotes good adhesion of finishing materials on the wall, but also protects the room from fungus and dampness. This is especially true for the bathroom and corner walls. When the primer is completely absorbed, you need to dilute the dry plaster to the consistency of sour cream by adding water and apply it to significant damage to the wall, such as cracks, potholes or pits. Try to smooth everything out immediately, ensuring the greatest possible smoothness. After this, you need to wait until the plaster dries.
 Before applying wallpaper, the walls must beprime for better adhesion of the wall surface with the solution. Next, you need to go over the plastered areas with a primer again and start working with putty. Ideally, you need to putty all the walls and the ceiling completely, even if the surface is smooth and not highly porous. Firstly, this will improve the quality of adhesion, secondly, barely noticeable pores will go away. And thirdly, the walls will become a little warmer. Putty is applied with a spatula in thin layers, immediately smoothing it out. After drying, it is advisable to lightly sand the walls and ceiling so that the surface becomes even smoother. Now you just have to wait until the putty layer dries completely, and then prime the surfaces as thoroughly as possible, without sparing the material. You can apply a lot of primer, this will be even better. When the primer dries (and this is about a day later), you can proceed directly to pasting the wallpaper. However, when preparing surfaces, it is important to consider several points that will help you avoid many big mistakes. So, if the cracks in the walls are large, they need to be widened and then sealed. If the cracks are deep, it is advisable to insert a thin rope or thick cotton cloth into them before sealing with mortar and putty. This will prevent the surface from deteriorating even more in the future. Only then should you try to stuff as much mortar into the crack as possible. Return to contents</a>
Selection of glue and wallpaper
So, the walls are prepared for pasting with canvases.wallpaper. Now you need to decide on the choice of wallpaper and paint. Here, of course, you must decide everything for yourself. But still, you should take into account several important practical tips.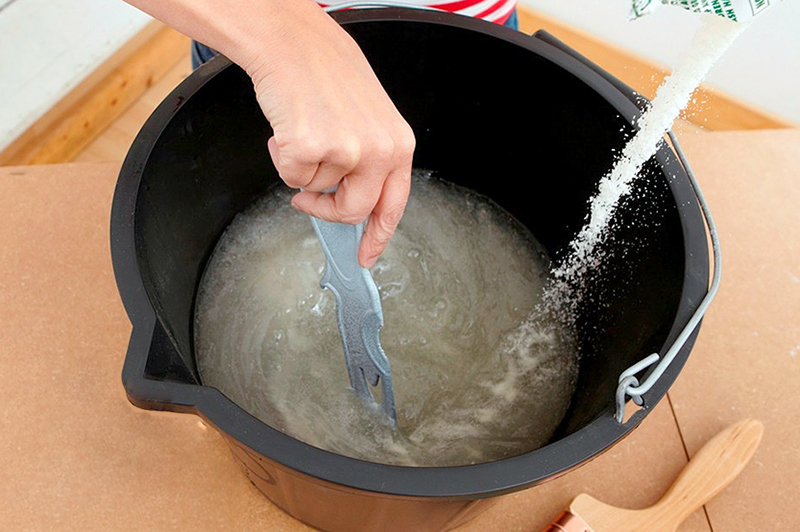 You can use it to dilute the glue.an electric drill with a special attachment, or mix the solution manually, but strictly adhere to the proportions specified in the instructions on each package of glue. When choosing wallpaper, keep in mind that paper wallpaper and duplex type wallpaper are suitable for any walls, even very uneven ones, since they will be glued with an overlap. It is advisable to glue wallpaper made of expensive materials on pre-leveled walls. Of course, some of them (for example, silk-screen printing) can be glued to uneven walls, but you will have to suffer a little with the joints, since expensive canvases involve gluing end-to-end. But gluing very wide Euro canvases to uneven walls is categorically not recommended. Now regarding the choice of glue. The best option for all types of wallpaper is a special universal wallpaper glue with the addition of PVA glue. But if you are working with heavy sheets, it is advisable to additionally add PVA even to the ready-made glue. Any glue should be left to sit well before use, about 5-10 minutes longer than the instructions say. Only then will it provide the highest quality gluing. Return to contents</a>
Technique of wallpapering
Let's prepare the wallpaper for pasting.First, they need to be marked. To do this, use a simple pencil and a long ruler. Cut out several sheets of the same length. In this case, the length is chosen approximately 20 cm more than the height of the walls or the length of the ceiling. But here a lot still depends on the evenness of the surfaces. The more curvature, the more sheet you need to leave for allowances.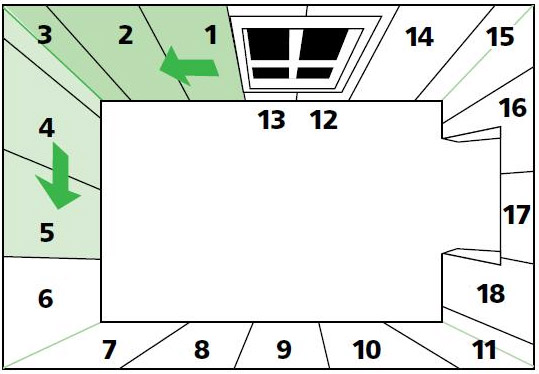 The procedure for wallpapering.Now start gluing. First, you need to glue wallpaper from whole sheets, where you do not need to cut out elements for openings or various communications or wall reliefs. Cover the floor with polyethylene and lay the wallpaper sheet on it face down. Spread everything well with glue, paying special attention to the edges. If these are thin paper wallpapers, then you need another person to simultaneously spread the glue on the wall. When the wall and the sheet are spread, carefully paste the sheet from the bottom up, immediately leveling it with a roller and focusing on the evenness of the height. If you are gluing heavy wallpaper or sheets such as duplex, then first spread the sheet well, then fold it so that the wallpaper is well saturated with glue, and during this time spread it on the wall. The thicker the wallpaper, the more time it needs to soak. But in any case, this should take no more than 7-10 minutes. When the canvas is ready, carefully unfold it and stick it from top to bottom, smoothing everything out with a roller or a soft cloth, if there is nothing on the front surface that can be easily damaged by careless touching. The edges will dry out a little during this time, so when sticking, lubricate them thoroughly with glue. And do not forget to press hard against the wall so that they grab as firmly as possible.
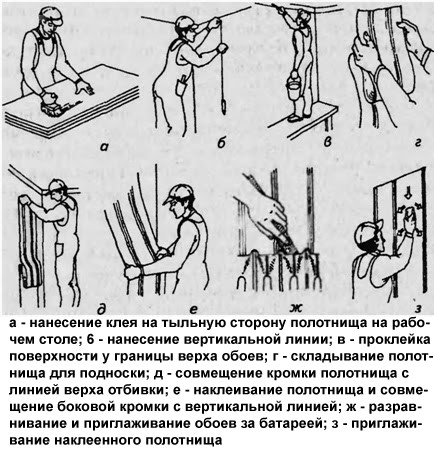 The procedure for gluing wallpaper.When gluing, do not forget about butt-jointing with heavy wallpaper and about overlaps for paper sheets. But even overlaps should not exceed 2 cm. And at the end of work with each new sheet, immediately cut off the excess parts of the canvases from below with a wallpaper knife, before they have time to stick thoroughly. The ceiling requires special attention in such work. If you decide to paste over it with wallpaper, then you should choose light types, maximum - light duplex. In this case, the sheets are pasted with an overlap. But it will be difficult for one person to work with the ceiling, even almost impossible. Therefore, immediately find an assistant for yourself and stock up on a ladder and some high piece of furniture such as a table, so that you can freely move along the sheet being pasted. After the main canvases are glued, work with the remaining sheets. First, measure and cut out the desired shape in them, and then glue them, also carefully pressing along the edges. After all the work is completed, you will not be able to open the windows for two or three days until the sheets have fully set. By the way, before pasting, all windows, vents and doors should also be tightly closed. The process of pasting wallpaper with your own hands is complete! As you can now see, pasting wallpaper is not so difficult and is quite entertaining and interesting. After all, only by doing the work yourself can you be 100% sure of a high-quality result.


