Not only in the country, but also in the apartment furniture,made independently, can serve as a real decoration of the interior. And to make, for example, a round table with their own hands is not at all difficult. In this case, you can take into account the dimensions that are necessary for you. And then the whole family will be able to gather on the veranda or in the living room for a gala dinner or an evening tea party. It is only necessary to decide in advance with the upcoming work front. 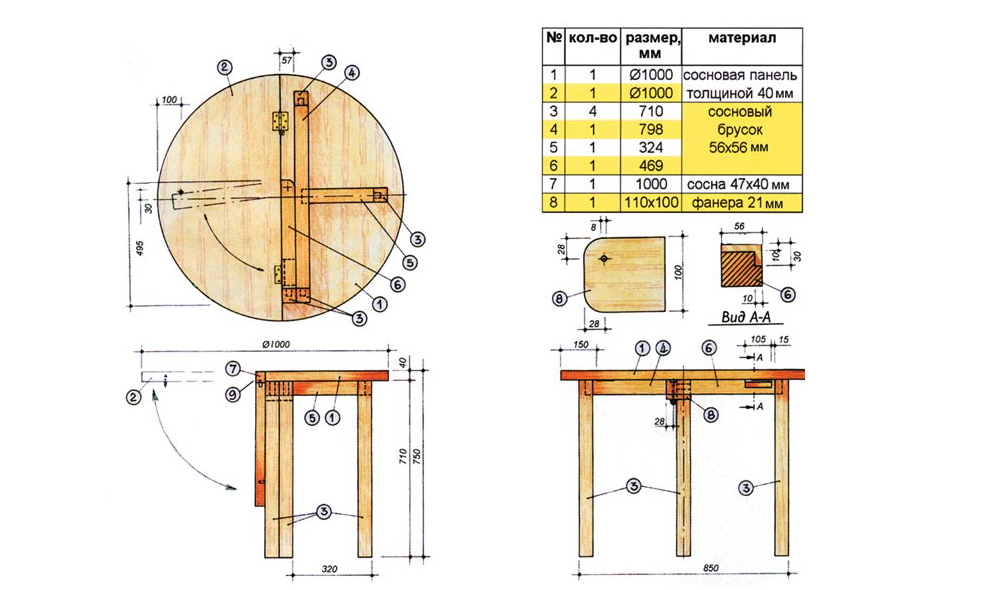 Figure 1. Schematic of a round wooden table.
Preliminary stages of installation
Many beginners have a question abouthow to make a round table yourself. It is believed that this form of the table top is difficult to manufacture. But if you know some of the nuances and cunning of the upcoming works, then even a novice joiner will cope with the assembly. First of all, you need to decide on the design of future furniture. The simplest drawing for self-assembly of the table is shown in Fig. 1. In this case, the furniture consists of the following elements:
- one-piece table top;
- support disk (bunch under the table top);
- cross strips (stiffeners) - 2 pcs .;
- legs - 4 pcs.
In the diagram shown, the cross bars are simplysuperimposed on each other and fixed with each other. If you make the legs of the furniture quite long, then sitting people will not touch them with their knees. But a more reliable attachment will be obtained if you put one bar into the other, forming the corresponding grooves in them. 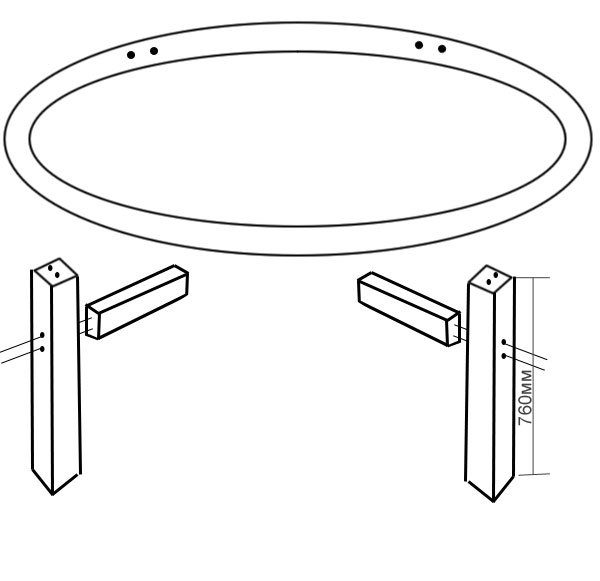 Figure 2. Scheme of assembling the details of the round table. In addition, one bar can consist of two parts. Then the crossbars are fixed between the corners and they are attached to the table top. In this case, the overall design is stable, but not too beautiful. To produce a countertop and support for it, you need a separate drawing. His example is shown in Fig. 2. You can provide your own sizes and make the necessary adjustments to the table layout. But to cut out such a tabletop is quite difficult. It is much easier to go to the workshop. An experienced craftsman will produce details of any shape according to your size. If you decide to make the round table yourself, you must first draw out the necessary detail on the wood, then drill the entire diameter of the hole (at a distance of 5-7 mm from each other). And only then saw the element by inserting the saw blade into the first hole. In this case it is easier to use an electric tool. Back to contents</a> Required materials and toolsmake a table with your own hands from a sheet of MDF or thick enough plywood. The thickness of the material should not be less than 35 mm. Instead of plywood, you can use a ready-made furniture board, but in this case the cost of the whole product will increase significantly.
  Figure 3. Drawing table top. The lower disc, which serves as the basis for fixing the legs and connecting the structure to the table top, is cut from the plywood with a thickness of 20-30 mm. This will be enough to securely fix all the elements together and not damage the table top. From the same sheet saw cross-bar. The legs are made from a bar with a cross-section of 12x5 cm. If you take a standard bar, the length of which is 3.5, then from one piece you can get 4 legs of 76 cm. This size is considered optimal. The following tools will be needed to process the parts and install the table:
- Electric drill and set of drills designed for woodworking;
- electric jigsaw;
- grinding machine or special drill bit;
- a set of hex keys of different sizes;
- screwdrivers;
- a set of sandpaper of different granularity;
- paint brushes and foam roller.
All anchorages and mounting kits foradditional reliability experts recommend to lubricate with joinery glue or PVA. In this case, the fixed parts must be tightened with clamps and leave until the adhesive has completely dried. And only then continue the installation. Back to contents</a>
Assembly of the round table
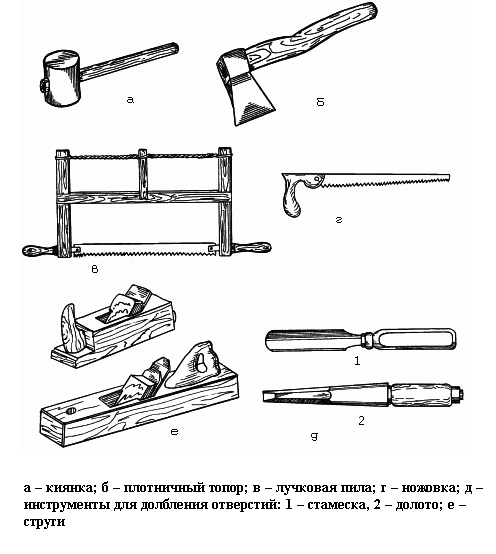 Tools for making a round table. First you need to cut out all the blanks for the assembly of the table. Experienced carpenters advise each of the elements to be pre-treated in 4 stages. First, polish the wooden surface, then varnish it. And after drying, repeat the operation. The fact is that even after a very thorough primary grinding, wood fibers can begin to crumble under a layer of varnish. This can spoil the appearance of the table, and later the burrs are formed on the surface. If you are going to not varnish the furniture, but cover it with stain, then the procedure must be repeated 3 times. After the blanks are completely dry, you can begin to collect the table. The general scheme of the assembly is shown in Fig. 3. First, fix the legs to the support disc. As the fasteners you can use ordinary screws. But the design will be more reliable and more stable, if you take confirmations (Eurobolts). Then the table will be able to withstand a heavy load. But it is more reasonable to take not standard, but elongated fastenings (0,5х18 mm). The legs are fastened with 4 bolts. Preliminary it is necessary to prepare the nests for confirmations. First, a plane is bored and then the butt. In the first case, the diameter of the nest should be 0.8 cm, and in the second - 0.5 cm. Next, the table top and crossbeams are formed. The diameter of these parts depends on the dimensions of the standard workpiece. The length of the side of ordinary plywood is 1.5 m. Therefore, the outer diameter of the supporting element will be 128 cm, and the inner diameter - 104 cm. The legs are installed flat part inside. Accordingly, the dimensions of the bar will be 12x106 cm. Back to the table of contents</a>
Finishing of the table
If you want to use a crossfastening of the strips, then in the workpieces it is necessary to form the corresponding grooves in advance. The thickness of the jumper should not be less than 2-2.5 cm, otherwise the bar in this place can break. But for the garden table it is enough to fix the lintels lap. After the table is fully assembled, and the glue in the fasteners is dry, you need to do the decorating of the table. As mentioned above, it can be varnished, covered with stain or paint. If you make furniture for the living room, it is more reasonable to combine the first 2 options. That is, first impregnate all surfaces with stain, and then treat with varnish. If you use a tool with a pigment, then even the simplest plywood can give the appearance of noble varieties of wood: oak, hornbeam, beech, mahogany. In this case, a clear transparent furniture lacquer is used for the final finishing. It is applied with a small foam rubber paint roller. Then the surface will be flat and no bubbles will form on it. The furniture intended for a summer residence, it is possible to decorate by means of an acrylic paint on a water basis. In this case, usually take white enamel, adding special pigments to it.


