The plinth is used as a finishingmaterial, with which you can aesthetically hide the joints between the wall and the floor. With their help, you can lay a television or telephone cable along the walls of the apartment, as in the skirting there are grooves for the location of various wires.  Additional details for skirting boards. How to install skirting boards on the floor with your own hands? This is a fairly simple process and does not require special knowledge and special training.
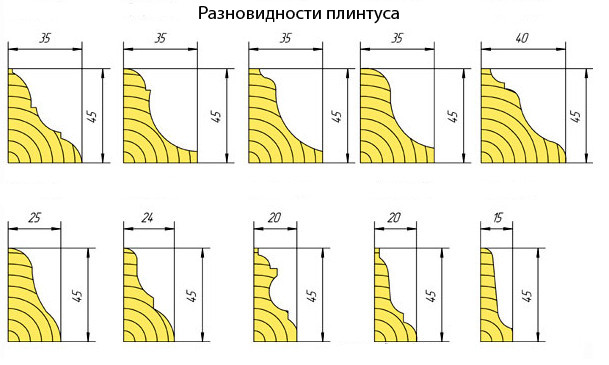
Classification of skirting boards
 Scheme of the device plastic skirting. At the initial stage of the process you need to decide on the choice of the required plinth. It should be understood that there are many varieties suitable for one or another of the needs of the owner of the apartment:
- standard plinth for the floor;
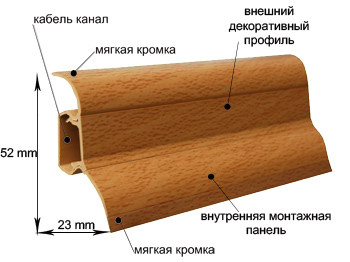
- plinth with cable channel;
- roll skirting for the floor;
- self-adhesive plinth (having a special substrate).
In addition to the technical specifications, skirting boards are classified as follows:
Plinth for the floor, made of natural wood: painted in a certain color, lacquered with preservation of the structure of wood.
Plinth plastic (cheaper and aseffect, available to most consumers): the appearance is in no way inferior to analogues made from natural wood, because modern technologies allow the structure and texture of natural materials to be transferred to plastics by painting using special technology.
Plinth laminated for the floor - enoughA new kind and no less popular, at its manufacture the plate from a wood cloth is used. It is noted that the structure of this material is very similar to the floor covering, it is quite environmentally friendly and has a presentable appearance. This plinth will retain its original color for many years. It can be selected for any shade of floor covering, because in production this line is made for existing shades of flooring.
 Types of skirting boards. Installation skirting on the floor is performed at the final stage of the repair work, after the installation of the flooring and finishing the walls. Regardless of the type of skirting chosen, the installation is done using the same type of technology, which involves the use of dowels and a screwdriver, by means of which the back wall of the skirting board is fastened to the wall surface. Back to contents</a>
Necessary tools and materials
In order for the process of performing this task to be easy, it is necessary to prepare a set of tools without which installation is impossible:  The process of installing skirting boards.
Plinth, purchased with a small margin of length.
Screwdriver (cordless or working fromnetwork). In case of using the power cord, it is necessary to think in advance of the power supply of the device. Prepare a carry or extension, with which it will be possible without much difficulty to move along all the walls of the room.
The drill is electric (it is desirable that it has the function of a perforator).
A hammer.
The measuring device (you can use both a tape measure and a laser measuring instrument), this tool is chosen based on personal convenience.
Double-sided adhesive tape for temporary fixation of the plinth.
Jig saw or standard hacksaw with a file onwood needed to cut the skirting parts of the desired length according to the size of the room, as well as for the possibility of joining the corners of the plinth in the room to be trimmed.
Drill for the drill (with a nozzle from the win), necessary for fast execution of holes in the wall.
Pencil (construction, graphite with a wide tip). It can be replaced with a water-based marker, which, upon completion of the work, can easily be removed with a damp sponge.
Accessories for butt joints: an internal corner for framing joints, an outer corner for framing the joints of two strips of plinth, plugs to the ends of the blade (left and right), a linear connector, an awl, a screwdriver of the cross shape.
Device for cutting wooden skirting boards at a specified angle, accurate to several millimeters, called a chair.
After you have purchased all the necessaryadditional tools and materials, you can proceed with the direct execution of installation work. For this, it is necessary to follow a certain sequence and follow the instructions given below, with which the task will be quick and easy. Back to contents</a>
The process of installing skirting boards made of plastic
 If the wall is flat, the plinth can be glued with liquid nails.
Carrying out of measurements and fixation of the received values on the drawing. From the accuracy of the first stage depends the success of the whole process, therefore it must be performed with particular scrupulousness.
Separation of the plastic skirting on the base, which plays the role of a support and on which the fixing work is carried out, and a decorative front panel playing the role of a cap.
Installation starts from the window and goes along the long wall of the room to be trimmed to the door.
The bracket of the corner to the end of the plinth is being made.
The inner corner is attached to the beginning of the wall, which is perpendicular (forming an angle) with the wall, on which the skirting cloth itself will be mounted.
Perform work on leveling the skirting board and, if necessary, cut off excess (if the preliminary measurement was not performed accurately).
Glue at some distance from each other pieces of pre-cut two-sided adhesive tape (it will help the rod to hold and do not slide off during fixing with screws).
Execute the markup of the wall, using for this purposesharply sharpened awl and hammer (notches should be left at a distance of 40 cm from each other). At the beginning and at the end of the wall, additional markings should be made at a distance of 5 centimeters from the edge.
On pre-marked marks, it is necessary to make a hole with a drill with a percussion mechanism for the subsequent installation of dowels.
Fixing skirting boards on previously prepared holes is carried out using dowels, which are hammered.
The final stage of the work is fixing the plinth in the corner of the next cloth from the perpendicular wall.
After all the fixing work is done, the outer bracket is fastened, after which the installation process is considered complete.
Back to contents</a>
The process of installing a skirting board made of wood
According to experts who are engaged in finishingapartments and offices, installing skirting boards made of natural wood is a more expensive and time-consuming process. In addition, the installation of such skirting requires the presence of certain skills and knowledge. But the installation of skirting boards of this plan with your own hands is also possible. It is necessary to carefully study the information provided in order to obtain the necessary knowledge that will help in the future in carrying out the work. Like the installation of plastic skirting boards, the work is divided into several basic stages: 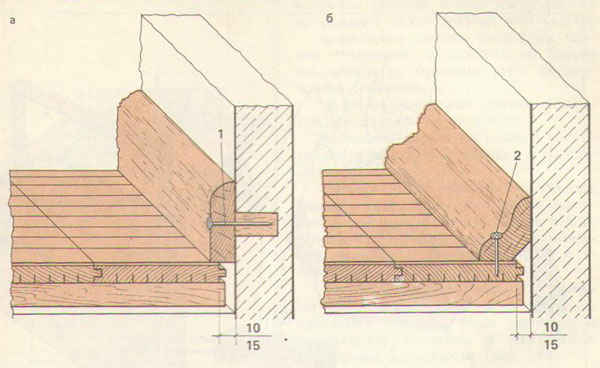 Installation of wooden skirting boards: 1 - a nail, hammered into a wooden cork; 2 - a nail, hammered into the floor.
All planes and angles are measured (when measuring angles, one should be extremely careful and do the work very carefully, because the success of the whole business depends on this stage).
With the help of a chair, according to pre-made measurements and pre-applied markings, the component parts are cut.
In order to be able to joinplinth in the corners at 90 ° C, it is necessary to align the corners beforehand. For this, it is best to use a gypsum mixture or putty. This should be done at the initial stage of repairing the premises, but if such work has to be done during the installation of skirting boards, it is allowed to fill the formed irregularities after installation, using a mixture for filling the walls.
Next, go to the layout of the baseboard itself,applying a pencil mark every 20 centimeters. Using a thin drill, holes are made in the marking (this is necessary so that during the screwing of the screws the wood does not crack the fibers and the plinth remains intact). Then, the screws are screwed into the screws until they are completely immersed in the plinth and exit the end with the thread on the other side.
A marking is made on the wall at the same distance. The process should be carried out especially scrupulously, so that the indicators coincide.
By marking with a perforator holes are made with a winning drill under the plastic parts of the dowels.
With the help of a hammer, dowels are dipped into pre-prepared holes and fixed in place.
Plinth with self-tapping screws leans against the walland fixed with a one-sided adhesive tape, after which fixing of the screws into the wall begins (for this work it is necessary to use a screwdriver with a cross base).
The finishing stage of the process of assembling the woodenskirting is considered the removal of irregularities and possible inconsistencies with the wall, using a small spatula and putty, which eliminates visual irregularities.
If necessary, the plinth is covered with several layers of varnish or paint, depending on the interior design.
As can be seen from the information, the choice and installation of skirting boards- quite simple and easy work. Work to perform under the power of every person who has little desire to learn to do something with their own hands. The detailed instructions above will help any person to perform the installation of skirting boards for the floor with their own hands and get an excellent result with minimal investment. </ ul>
Comments
Comments


