Suspended ceiling - one of the most rationalDecoration solutions for rooms with a high base level. There are many types of suspension systems: these are the Armstrong panels, stretch ceilings, and gypsum board cladding. In rooms with high humidity, the installation of anti-corrosion systems is important. These are aluminum railing ceilings. How to make a lath ceiling? Complex wave-like or oblique-angled structures are better entrusted to professionals, but a simple lining with racks is quite possible to fulfill any home master.  Scheme of suspended ceilings.
Selecting a rack ceiling
In the construction market there is a wide choicerack ceilings from various manufacturers. By type of installation they are divided into 3 types: open, closed and gapless. Open mounted with gaps between the slats of 14-16 mm. They are installed in rooms with a height of at least 5 m, most often in shopping malls. Closed ones are arranged on the principle of a board-lining: the laths go for each other. The gapless ones are installed end to end without gaps. When buying, pay attention to the parameters of the rails. The length should be selected such that when cutting, there is as little waste as possible. The width of the panels varies from 9 to 20 cm. For smaller rooms it is better to select narrow panels, for spacious ones - wide ones. The thickness of the bars is an indicator of strength and reliability, but thicker and more expensive. For installation in an apartment, panels with a thickness of about 0.5 mm are considered optimal. Reiki may have some design differences. Rectangular edges are typical for German products, rounded - for Italian. For the embodiment of bold design ideas, wave-like curved panels are suitable. 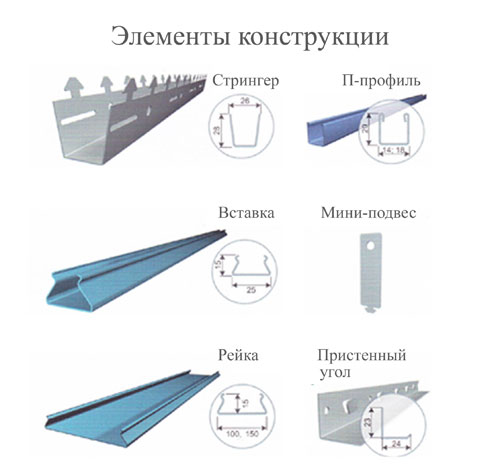 Elements of the design of the rack ceiling. The color range of the slats can be any, but the most common shades are: white, black, metallic, gold, chrome (with a mirror surface). In addition to the rails themselves, the kit should include:
- guides;
- adjustable suspensions;
- wall-mounted skirting boards;
- installation instructions.
It is important to ensure that the guide railsand the panels had the same manufacturer. Otherwise, you can face insoluble installation problems and eventually get a poor-quality ceiling with slots. The kit is designed for a certain area. When facing large areas, it is more profitable to buy large sets: in the aggregate they will be cheaper. The sold rails must have a protective coating. Despite the design features of a particular type of rails, their installation is basically similar. In order to make a ceiling rack, you need:
- roulette;
- level;
- long ruler;
- marker;
- perforator;
- drill;
- scissors for metal;
- knife;
- home tool;
- fastening (dowels, screws).
Back to contents</a>
Mounting of the rack ceiling
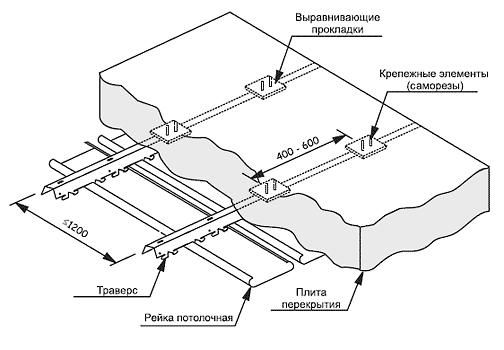 Scheme of installation of the rack ceiling.
If you plan to install embeddedlamps, then the wiring should be done before the ceiling is installed. Holes in the slats under the plafonds are cut out with a drill with a crown attachment. The ceiling is assembled already with the plafonds mounted in the slats.


