Installing a sliding door has a number of advantages.before the usual swing version. This concerns the availability of free space, which is required to open the latter design option. As for the first, free space is not needed for such designs, and this is where the convenience of using a sliding door comes in.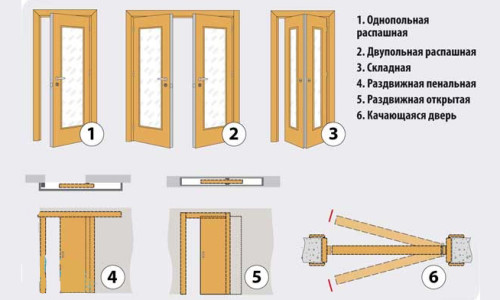 Main types of sliding doors.
What do I need to know about the design and how to mount?
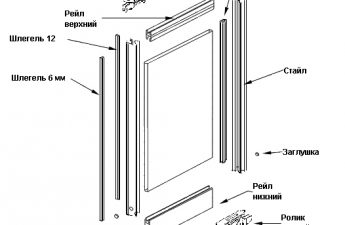
Before proceeding to the installation stage itself,you should understand the design features and determine which type of installation is best suited. With the design, everything is much simpler. The types of sliding doors may differ from each other externally, but their mechanism of action in most cases will be the same or similar. An important part is the roller mechanism, which is responsible for opening and closing the door leaf. It moves along the guide, which is located on the door leaf. The number of these elements may vary - it all depends on the type and class of the design.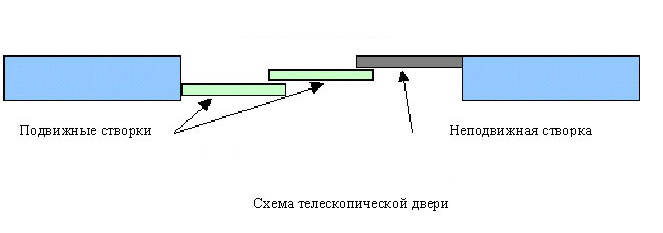 Telescopic sliding door diagram.The material the door is made of is of great importance. This is emphasized for a reason - the type of material the door is made of will determine the installation option, the number of guides and roller mechanisms used, and their type. For example, for a wooden door, it is enough to use a regular guide with one groove. In addition, two carriages with roller parts will be required. As for the glass version of the design, in this case, more roller mechanisms will be required than in the previous version. This is due to the greater weight of the glass panel, which requires more rollers due to the increased load. In addition, when installing the glass version, it is necessary to install a lower guide, while with a wooden panel, one upper one will be enough. There is also a difference in the method of clamping the panel. Since glass is a more fragile material than wood, the clamps must have rubber linings to prevent damage to the surface. Now we should talk about the installation methods. This point depends on the problem that needs to be solved. In the first case, installing a sliding structure will save space. For this, you can use a single- or double-leaf structure. In this case, the guide is attached to the supporting beam, which is fixed above the door opening.
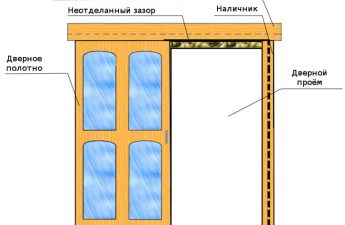
 Sliding door fastening diagram.The most popular type of installation is space zoning, which requires a sliding door. In this case, it is appropriate to talk about two partitions that divide the room into two zones if the door is closed. There may be various mounting options, although most often it is installed on the ceiling. In addition to the above methods, there is a door installation on a hidden guide. It is located in a hollow partition specially made for this purpose. Such a design will be hidden in the wall, which makes the door leaf invisible. This approach will help to make the most of the walls, which will be a kind of storage for the door leaf. This is also convenient because if the option of installing the door leaf on the wall was carried out, the movement of the door may be hampered by standing furniture or other objects. When using walls as a cavity for the door, you will not have to face such a difficulty. Return to contents</a>
Stages of work execution
Return to Contents</a>Carrying out marking For work you will need the following tools and materials:
 Tools for installing sliding doors.For proper installation, it is necessary to carry out measuring work, on which the exact location of the door and its functionality will depend. To take measurements of the guide bars for their subsequent installation, two methods can be used. In the first, you need to measure the height of the door, for which you will need a tape measure. The distance between the floor surface and the door leaf is added to the resulting value. This is approximately 10-15 cm. In addition, the height of the guide in assembled form is taken into account. Then you need to put the measurements on the wall surface. In the second method, the door leaf must be placed against the opening. A lining equal to the distance between the floor and the beginning of the opening should be placed under the leaf. After this, you need to draw a line along the upper edge of the door, putting up another distance required for the guide. This value is approximately 7 cm. When marking, it is important to make sure that this work is done correctly. Otherwise, this will lead to the door wobbling or its incorrect location. To avoid this, the marked lines should be measured for horizontality. For this purpose, it is recommended to use a building level. Return to contents</a>Mounting the main mechanisms
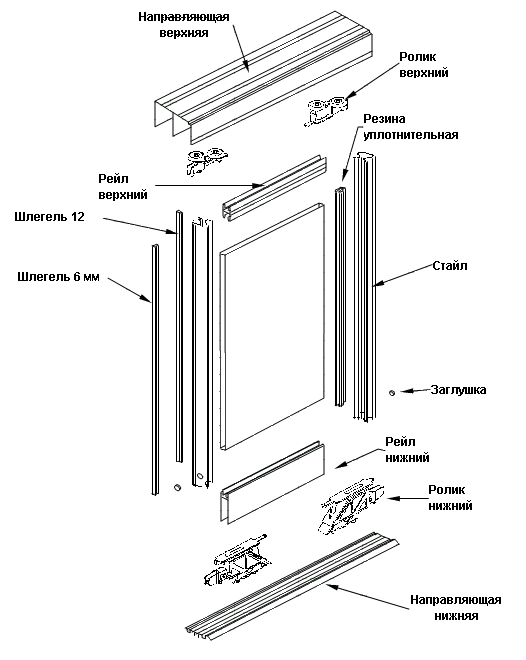 Sliding door assembly diagram.After marking, you can proceed to the installation of the main parts. At this stage, you will need to install the guide rail and roller mechanisms. The installation of the guide depends on the design features of the door used. Therefore, depending on this factor, the installation will be carried out with dowels directly to the wall surface using specially designed brackets to the lower beam, previously installed on the wall, or to the ceiling. Regardless of the chosen method, the upper plane, located horizontally, should be along the marked line. As for the gutter, it should move away from the wall slightly. This is necessary so that the door does not touch the wall when moving, including some decorative elements and other protrusions. It is important to note that the length of the guide should be at least 2 times longer than the width of the door opening. In addition, you should leave a distance for the so-called spare move. After fixing the guide, you can proceed to assembling the roller mechanism. To do this, you need to assemble the carriages for the rollers, insert the fastening bolts necessary for connecting to the ceiling surface. Upon completion of this work, the mechanism is inserted into the guide. It is necessary to check the movement of the mechanism in action, for which it is necessary to perform several manipulations aimed at opening and closing. The rollers should move freely, without additional effort. On the upper part of the door opening, it is necessary to install brackets. It is important to note that it is necessary to make a small indentation from the edge on each side of the door leaf. As for the number of brackets used, this value depends on the number of roller mechanisms. When using a conventional wooden structure, it is enough to use 2 pieces. Return to the table of contents</a>Finishing work At this stage, it is necessary toinstall the door leaf and do the finishing work. To install the door leaf, you need to place it under the guide, lift it to the desired level, and then secure the carriage mounting bolts in the brackets. This work requires holding the door and screwing in the bolts, so it is recommended to do this with someone else. When checking the horizontal position, you need to gradually screw in the bolts and check the position of the leaf with a level. In general, the work on installing the door comes down to joining the brackets with the carriage. At this stage, you also need to ensure the correct connection, so that you do not have to redo the entire work again later.
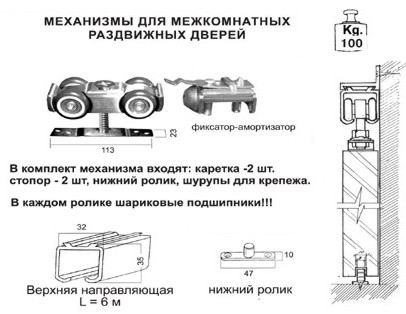 Complete set of sliding door mechanisms.After the door has been installed with your own hands, you need to install closers and limiters. They will prevent the door from falling out of the door leaf and the rollers from the carriages. Plugs made according to the shape of the guide profile can be used as limiters. They are installed in strictly designated places. It is best to use limiters with rubber or plastic stops. They allow you to increase the service life of the structure, and when opening or closing, the impacts of the door leaf will not be heard. The final stage of the work is installing door trims with your own hands. They prevent dust from getting inside the mechanisms, which also has a positive effect on the duration of the device and the mechanism as a whole. These parts are installed on pre-installed brackets. It is possible to install them on a guide, for which latches are used. At this stage, the process is completed, it remains only to check the mechanism in operation, after which the sliding door is ready for use. Thus, when performing work, it is important to pay attention to the correct installation. Compliance with all instructions and following them allows not only to avoid the need to adjust the mechanisms, but also save personal time. In general, installation is not difficult, the main thing is to perform all the specified actions.
