Practical, long-term and able to satisfyeven the most demanding consumers, the building material called laminate is today considered to be the most demanded floor covering. This material has a lot of advantages, but the most important is that laying the laminate with your own hands is a very simple and affordable process for almost everyone who knows how to handle at least a little with construction tools. 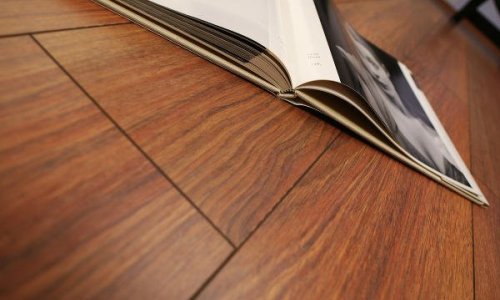 Laminate is very reliable, durable and capableto satisfy the tastes of even the most demanding customers with finishing materials. It does not matter whether you are familiar or not, it is important in such a matter to have a desire to equip your own home. You can always ask friends and acquaintances who have already encountered such a process as laying laminate flooring with your own hands, without the involvement of specialists. As a last resort, laying the laminate can be mastered by the method of errors and trial.
Preparatory work
Laminate is a multi-layer material. Its standard thickness is from 6 to 12 mm, length - from 1 to 1.5 m, and width - 20 cm. This material is produced in the form of small tiles in the size 1200x400 mm or 400x400 mm. It is also good in that it is produced in various colors and shades, so that it is possible to choose the most suitable option individually for the interior of any room. 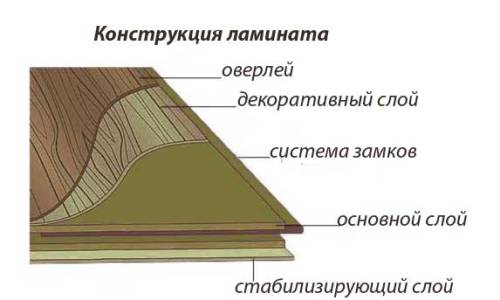 Layout of the laminate. Laying a laminate with their own hands implies the initial choice and purchase of material, as well as carrying out preparatory work. Laminate is considered a demanding material, as the surface for its laying should be flawlessly smooth and smooth. The following building coverings can be used as the basis for such a material:
- concrete;
- linoleum;
- tile;
- tree.
Consider the preparation of each of the listedcoatings, which will help determine the most appropriate option. Under the preparatory work with a concrete base, it is meant to remove the old coating, check for unevenness and cracks, and screed with a cement-sand mixture, which, after pouring, will take about 25 days to dry completely. Only after this, you can safely proceed with the laying of the finishing floor. It should be remembered about the mandatory layer of vapor barrier. 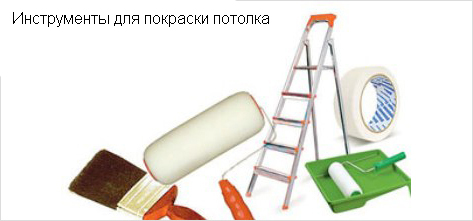 Laminate laying tools.Laying the laminate on the existing wood flooring is permissible only when the substrate is not affected by pests or fungi. In the presence of minor irregularities and drops, it is necessary to remove them by ordinary scraping. In case of serious damage, it is better to replace the wooden base. Laying the laminate on an uneven concrete and wooden base is also carried out with preliminary leveling of the surface using chipboard or plywood sheets. Since any firmly fixed, moisture-resistant and even surfaces can serve as the basis for laying the laminate, linoleum and tiles are quite suitable for this role. If the base is properly laid on the screed, the floor will turn out to be quite even, therefore, it will not be necessary to dismantle the base. Moreover, such a base does not require a vapor barrier; it will be enough to lay the substrate. Back to the table of contents</a>
What is necessary for styling?
The stacking technology is not reallydifficult and impossible, most importantly - to approach the work responsibly and follow the recommendations described. Before proceeding with the process, it is necessary to bring the material in its original packaging into a room with a temperature of not less than +18 degrees, and a humidity of at least 70%. In such conditions, the laminate should lie for 48 hours, so that he can master himself. 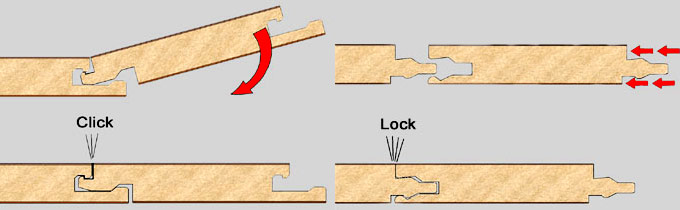 Scheme laying laminate with different types of locks. Laying a laminate without the right tool is simply impossible. Therefore, you should prepare the following list of tools in advance:
- Ruler and pencil;
- a hammer;
- clamp;
- a jigsaw;
- grandmother (bar for podbivaniya);
- spacer wedges;
- parobarrier (polyethylene film) when laid on a concrete base;
- substrate.
As previously mentioned, impliesuse only a flat and solid surface as a base. Therefore, it will be useful to once again make sure that these qualities are present at the base. Most experts recommend laying on a surface, the drop of which will not exceed 2 mm per 20 sq. m of the area of the genital base. The drop left in the process of work will be smoothed out by the substrate. Back to the table of contents</a>
Installation of floor covering
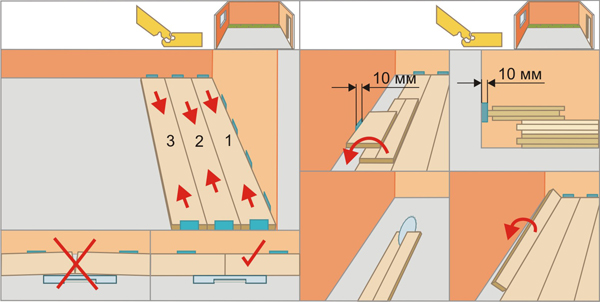 Technology of laying laminate. The installation instructions for the laminate are quite simple. If the laying is carried out independently, it is better to lay the material perpendicular to the wall where the window is located, which will further hide the joints between the panels in the flow of light. The film is laid on the entire area of the room, if it is not enough, then you can spread next to another roll, with the joints of the film to be glued together with adhesive tape. Cover with a polyethylene film, which will play the role of a vapor barrier material, only a completely dry substrate is needed. After that, the substrate should be laid, preferably cork, if you care about the environmental compatibility of the materials used. It is important to put the first row correctly in the beginning of laying the laminate. Preliminary, it is necessary to install spacer plastic wedges throughout the entire area of the room at the level of the future floor covering. This is required in order to provide a small gap between the walls and the laminate, because the coating used has the property of expanding / narrowing as the temperature rises / falls.
 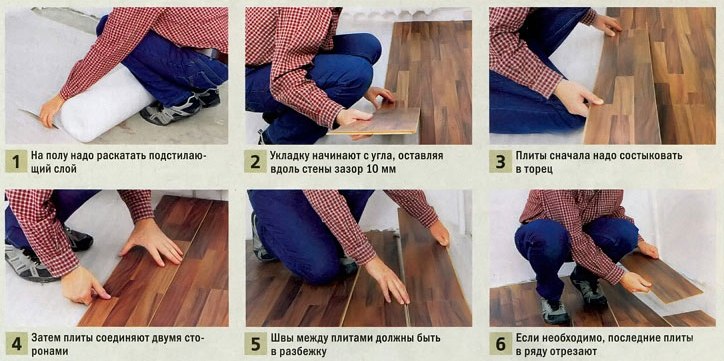 Photo 1. Sequence of laminate flooring.Lay the first panel in the corner of the room. After that, mark one panel exactly in half and cut with a jigsaw. Fasten one half next to the first in the corner, which will indicate for you the second row of laminate flooring. This is called a mixed type of installation - staggered panel placement. Since the assembly of the laminate is carried out in a floating way, the staggered installation will allow evenly distributing the loads along the entire perimeter. Now you should lay one panel in each row. Lay the 2nd panel of the 1st row next to the 1st panel, then put the grandmother at the end, and hit it with a rubber mallet. This is the technology of laying laminate panels. When installing the laminate in the joint lock, the panels should be connected at an angle of approximately 20 degrees. The panels are inserted into the lock and lowered, after which you should hear a slight click - this is a sign (Photo 1). The last panel of any row must be placed in the previous row. The same do-it-yourself laminate laying technology works as before. To put the block in the gap between the panels and the wall, use a clamp, one end of which must be inserted into the end of the panel, and the other must be lightly tapped with a hammer. Back to the table of contents</a>
Proper care for a new floor covering
Laying laminate with their own hands will not only allowsave money on the services of specialists, but first of all create a beautiful and cozy interior of your room. However, so that your work is not in vain, it is necessary to treat the new floor covering carefully. Recommendations for its operation are fairly simple: regularly conduct wet cleaning and do not allow the laminate to come into contact with the liquid for a long time. Due to the simplicity of laying and easy maintenance, the laminate continues victorious march through the windows of building stores, offices, as well as people's houses and apartments. </ ul>


