Laminate is a modern material thatwidely used in interior decoration. At the same time, the characteristics of this building material allow it to be used for laying on the floor, ceiling in any room irrespective of humidity. Laying the laminate is simple, but you need to follow the technology exactly to get a perfectly flat finish on the floor, ceiling or walls. 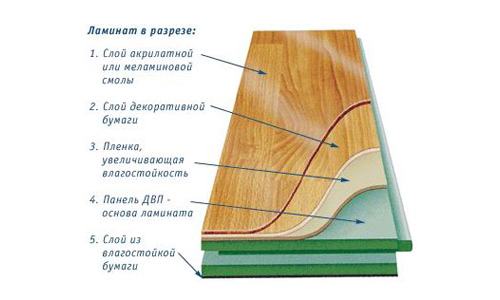 Layout of the laminate.However, the main requirement in order to install laminate panels is to obtain a flat initial surface. There are several ways to solve this problem. But the best is on plywood.
Correct plywood laying
In order to fulfill the condition of a regularinstallation of the laminate on the floor, it is necessary to lay the sheets of plywood. They will be able to level out minor blemish defects, and also create an even surface for further work. Plywood is a universal building material that is ideal for leveling the surface, easy to handle and durable. At the same time the installation itself is quite simple. In order to lay plywood sheets, you will need to purchase the following tools and materials:
- sheets of plywood with a thickness of 10-30 mm;
- electric or cordless screwdriver;
- self-tapping screws;
- glutinous mixture for wooden products;
- machine for grinding or sandpaper, which is fixed on a special handle, convenient for long work.
 Laying scheme for plywood backing.Additional tools that may come in handy are a jigsaw and a long building level. They can be used if required. Being a fairly dense material, plywood will give additional rigidity to the flooring, thereby increasing its reliability and durability. In order for plywood to have the same characteristics as the room in which it will be laid, it is necessary to let it sit in the room for several days. This will increase its service life. Installation of plywood can be performed directly on the existing floor or using a log. Moreover, the way it is laid depends on the rough flooring. For example, if the floors are originally made of wood, then plywood can be laid on top of it. Lags are used if the subfloor is made with a screed, and it is not possible to attach plywood sheets directly to it. When laying on a wooden floor, the plywood is staggered. This installation will allow you to lay the laminate on a hard, solid base. Moreover, 1 row of plywood sheets is stacked so as to cover the entire space of the room. The 2nd row is mounted with a shift of 200-300 mm relative to the first. Plywood is fixed with self-tapping screws using a screwdriver. In this case, the caps must be recessed into the sheet so as not to cause damage to the next row of plywood or laminate board. It is necessary to fix it at all corners of the sheet. Back to the table of contents</a>
Practical recommendations for laying
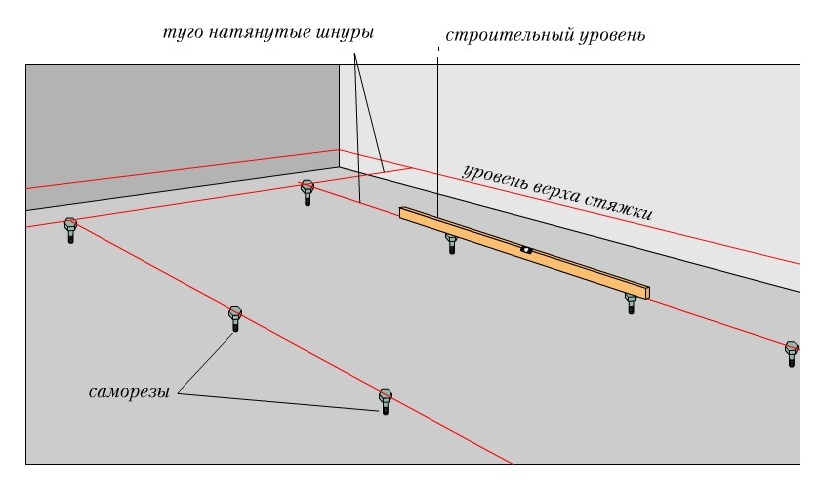 Beacon installation scheme.If plywood is compulsorily stacked on logs, then work begins with the installation of beacons. They can be self-tapping screws, which are screwed into the floor after 40-50 cm through 1-1.5 m, depending on the size of the plywood sheets. When doing this work, it is advisable to use a long building level. With its help, you need to ensure that a strict horizontal is observed. Next, 1 of the plywood sheets is taken and cut into the required number of strips 3-5 cm wide. These will be the logs. You can fix them using special glue. The resulting gaps are filled with plywood of the required thickness. The pieces are fixed with glue designed for working with wood. Further work can be carried out only after the glue mixture is completely dry. Plywood is cut with a jigsaw into squares, the size of which corresponds to the distance between the logs. The logs are cleaned from dust with a brush and the installation of plywood sheets begins. The joints between the plywood should be located in the middle of the log. Fastening is done with self-tapping screws using a screwdriver. If there are utility pipes in the room, then it is necessary to make the appropriate cuts in the plywood before final laying. In the process of laying plywood, it is necessary to control the horizontal at all times using a building level. This will avoid subsequent distortions of the finished laminate flooring.
 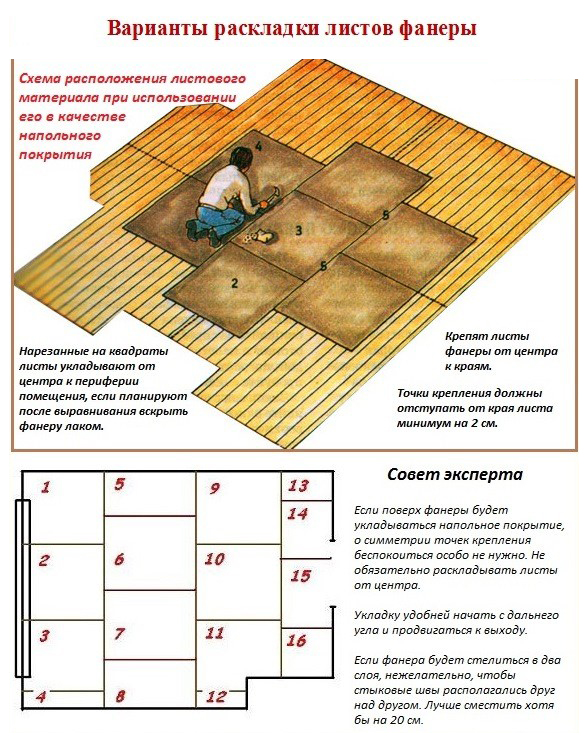 Sequence of laying plywood sheets. Regardless of the way the plywood sheets were laid, after the entire room is covered, the entire surface must be ground. For this purpose, use a grinding machine or sandpaper, which is fixed to the holder for ease of use. Special attention is paid to the joints when grinding. All this procedure is necessary in order to ensure a perfectly flat surface, since the further installation of the laminate requires the laying of a special substrate, which must necessarily be whole, without deformations and damage caused by uneven surfaces. In addition, grinding will remove flaws of plywood sheets that were formed during their production. Back to contents</a>
Laminat laying: features
Before starting work on, you need to prepare tools and materials. You will need:
 Tools for laying laminate. Laying a laminate with your own hands requires compliance with technology, patience and neat execution. The board must lie in the room where its installation is planned, at least 2 days, which will allow the laminate to acquire the same moisture characteristics as the room. This is necessary to ensure that after the installation, the laminate is not deformed as a result of changes in the room temperature. There are 2 main ways of laying:
- parallel or perpendicular to the window opening;
- on the diagonal of the room.
If you select 1 method, for example, perpendicularlywindow, the seams between the laminate boards will be almost invisible, the material consumption will be minimal and correspond only to the area of the room. If you lay down diagonally, then the laminate will be spent a little more, but the design of the room itself will clearly benefit. It should be noted that diagonal installation requires great skills, scrupulousness and correctness in calculations. Back to contents</a>
Laminate laying: completion of work
Along all walls, specialwedges. They can be made of wood, plastic. In addition, you can use pieces of laminate, which will be laid further. The substrate is laid, which is fixed with the help of a construction stapler on the staples. Before installing 1 row of laminate coating, it is necessary to cut the edge panel with a jig saw or a saw with fine teeth. Place the laminate itself so that the lock is located closer to the person. This will make it easier to snap the lock joint. 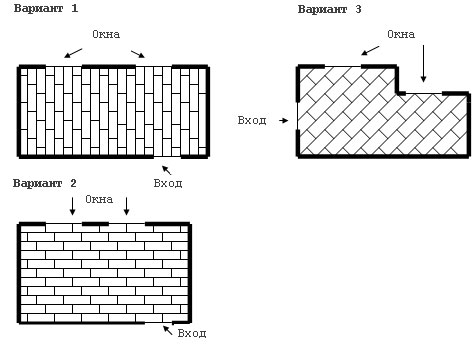 Variants of laying laminate. If the laminate is installed on the floor, then you can not additionally screw it with screws to the plywood. This is due to the fact that the board should be able to expand and contract when changing ambient conditions of humidity and temperature due to the presence of gaps left between the 1 row and the wall. To ensure the reliability of joints, the laminate should be located with a shift. Therefore, after the 1 row is laid, the extreme board of the next row is cut so that the necessary distance between the lateral joints is formed. The panels snap into place and are pinched by means of a bar and a hammer, which ensures a reliable connection. All other rows are stacked similarly. The slots for the communication are carried out before the panel is put in place, previously marked with a roulette and a jig saw. To ensure a smooth cut, you can use a square when marking. When the whole area is covered with a laminate, drill holes in the walls under the skirting boards. Install them in place, after removing all the temperature wedges. Thus, it can be assumed that the laminate is laid. Good luck!


