Ceiling baseboards, in other words, fillets - thisa decorative element of the premises, which will cover the problem place, where all the time cracks are formed, and new ones will not appear. When you glue the wallpaper gap between them and the ceiling becomes wider, the question is how to glue the ceiling skirting. Ceiling baseboards are necessary in those cases when it is necessary to cover the unsightly gaps that have arisen between the finishing materials on the wall and the ceiling.  Scheme of gluing ceiling skirting. They hold well if you glue them directly on the wallpaper, using the Moment Mounting glue. However, in the presence of curved walls, there may appear ugly gaps between them and fillets, which must be covered with the same glue. Some experts on the question of how to glue the ceiling skirting, give advice: before gluing the wallpaper paste them on the putty. With this method, it fills its slots, and the wallpaper is directly adjusted to the fillets themselves. The result is also good. However, each independently decides how to glue the plinth.
Materials and tools for ceiling skirting
In the current repair, instead of the panel, a ceiling skirting board was used, which hides the flaws of the repair work and gives the room an interesting look. Before you start the work you need:
- to study types of fillets;
- calculate the required footage;
- select glue.
Ceiling plinth made of plastic is verya convenient element for wall finishing, because its cost is low and it is easy to use. These products are made of light and safe materials:
- polystyrene foam;
- polyurethane;
- polystyrene.
 Tools for gluing ceiling skirting. When choosing a skirting board, you need to pay attention to the strips, the length of which is 1.2-2 m. In their majority they are:
- convex;
- concave;
- narrow;
- wide.
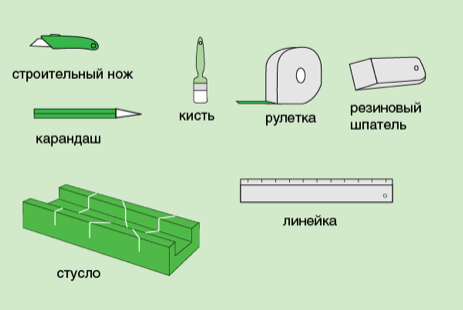
Buying a skirting board it is necessary to apply the simple formula: you need to divide the perimeter of the room by the length of the bar and add one bar of the fillet to the stock. For high-quality assembly of skirting on the ceiling you will need the following tools:
- roulette;
- pencil;
- knife;
- The chair is a device for cutting the skirting board at an angle;
- gun for sealant;
- spatula made of rubber.
To do the work, you need this material:
- plinth;
- liquid nails or glue;
- sealant for filling the joints of the plinth and its joints with the wall surface;
- putty. It may also be needed to fill the lykes that have appeared. In color, it must match the color of the product.
 Scheme of cutting ceiling skirting. Ceiling skirting is able to give the interior a refined look, but it must somehow be attached to the wall or ceiling. There are three types of glue that are specifically designed for this job:
- acrylic;
- polymeric;
- based on silicone.
Specialists recommend kneading putty on PVA glue, or use MasterKleigh, Moment Editing. Before you glue the plinth to the ceiling, you need to decide which method will be used:
Back to contents</a>
The technology of gluing the plinth to the ceiling
To seal the joint between the wall and the ceiling, oftenuse fillets that can have decorative corners. The fillet should be glued to a pre-primed surface. Plinths on the ceiling are assembled on a single principle, only adhesive compounds differ. Screws are used for fixing individual fillets. 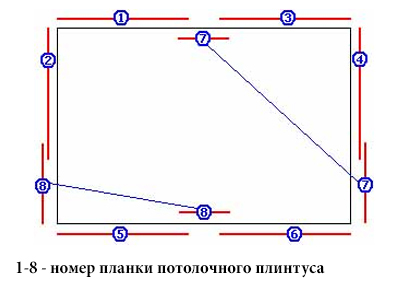 Example of calculating the required quantityceiling skirting. To glue the skirting board on the ceiling of a long length is necessary having an assistant at hand. First of all, both products must be cut with a hacksaw and a chair at an angle of 45 °. This is done in this way. First, using a chair, pruned two skirting boards, which are joined in a corner. Then, to the desired state with the help of a construction blade, they are brought to the norm. The gap must be removed, dividing it equally into two parts of the baguette, otherwise an ugly prong is formed in the corner. Begin to glue the skirting on the ceiling from the corner at once in two directions of the length of the wall. The glue is applied to the inner corners of the ceiling product with points 3-4 cm apart, in this case, when pressed against the wall, it will not be squeezed out. However, its savings lead to the fact that there is a possibility of further collapse of the ceiling skirting. Then pressing to the place of gluing it is necessary to leave it for a few seconds. Next we must again put it off. Eliminate all of its fine threads and leave it to dry for 1-2 minutes. After the glue has dried, but has not lost its elasticity, it is necessary to put the product in place of gluing. In the presence of uneven walls, the product does not need to be pressed, because it will also become crooked. In this case, it is necessary to glue the ceiling skirting evenly, and then cover the slits with a special mixture. The sealant is leveled using a rubber spatula, it is distributed without a gap in the seams. After they are filled with sealant, it must be dried within 6-10 hours.
 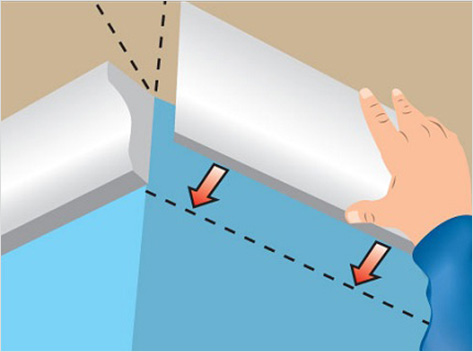 Scheme installation skirting. If there is a pipe where the plinth is glued, then the fillet should be cut in length so that it goes up to the middle of the pipe. Then you need to paint the ceiling skirting paint:
- acrylic;
- water-emulsion.
To achieve a better result, stainingit is desirable to conduct in two layers, between which a complete drying is necessary. Having pasted walls with a paper tape, you can avoid getting paint on them. Back to contents</a>
Tips for gluing the plinth to the ceiling
Before gluing the ceiling skirting, it is necessaryclean the surface of walls and ceiling from excess glue. Silicone and acrylic adhesive can be removed using a rubber spatula and a damp cloth. If it is necessary to glue the plinth onto the putty, then its excess is eliminated with a small brush moistened with water. Any gap between the baguette and the ceiling or the wall must be filled with glue. This applies to the corner joints. You can not disguise them with paint or wallpaper. Often when the glue dries, the edge of the product slips. In order for this to happen, it is necessary to attach the butt of two adjacent baguettes in the right place with needles. The glue will dry, you can pull them out and cover the holes with putty or glue. Back to contents</a>
Useful recommendations
Before you glue the plinth on the ceiling, you need to keep in mind that:
- if you want to visually raise the walls of the room you must use a narrow ceiling, while the wide one makes the walls in the eyes shorter;
- the last skirting board will be glued correctly if you first cut off the angle of 45 °, then adjust it along the length;
- before you start to glue the wallpaper, you need to glue the plinth, otherwise the wallpaper can be spoiled. Using a spatula, the wallpaper should be placed under the fillet and cut with a clerical knife.
Back to contents</a>
The reasons why the skirting on the ceiling is not glued
There are several reasons that affect the gluing of the plinth. It:
In order to glue the ceiling skirting will have to gain strength, time and patience. However, with a serious attitude toward such work, the result will be remarkable. </ ul> </ ul>


