Modern building technologies and finishingmaterials allow you to show maximum imagination not only in the decoration of walls and floors, but also the ceiling. Multilevel ceilings are becoming an increasingly popular feature of modern design, not only for residential, but also for office or retail space.  Using a multi-level ceiling, you can createan unusual, stylish and beautiful interior. Variants of this design, they allow you to create an infinite set, so the room immediately acquires an individuality that distinguishes it among others like it. Such a ceiling immediately catches the eye of the incoming, and he must certainly create a favorable impression. At the same time, installation of the structure and design can be ordered by specialists, and it is possible to develop a concept and install such a ceiling with your own hands. It should not cause any special difficulties, unless strictly follow the recommendations and comply with technological requirements.
Materials, tools, planning
 The scheme of multilevel false ceiling. Multilevel ceilings are frame structures made of metal and plastic profiles, on which an overhead or tension cover is mounted. The most popular material for this coating is a gypsum board. It is easily cut and bent, it is well laid with putty and paint, at the same time it has a good safety margin and can be securely fixed to the base. The process of installing such a coating is simple and takes relatively little time. Instead of gypsum cardboard to create a multi-level ceiling system, you can also use a stretch ceiling made of shrink PVC film. Often these materials are combined within a single room. To make such a ceiling with your own hands, you first need to draw a diagram and make calculations. All dimensions of the room are measured and the levels are marked taking into account all the details and protrusions. They will hide communications, ventilation shafts and decor elements. Then on paper sheets of a large area, in which the old rolls of wallpaper are usually used, all the desired elements are drawn in full size and laid out on the floor. The floor and ceiling of the room, as a rule, are identical in area and shape, therefore the placement of the elements of the future design on it will visually see it on the spot and identify all the shortcomings still at the planning stage.
 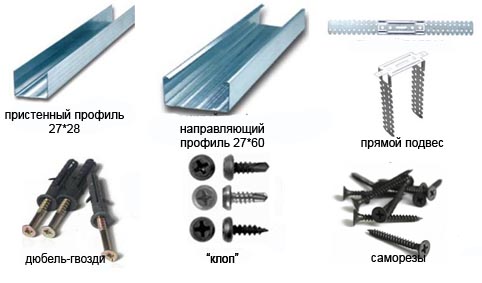 Required materials for installationmulti-level ceilings. The next step is to prepare tools and purchase materials. Gypsum boards, metal profiles in the form of the letter "P" and the letter "C", screws, putty and paint are bought. Since the lighting fixtures will be mounted simultaneously, fixtures and electrical wires are purchased. Instruments will need an electric screwdriver, a special cutter for fastening profiles, a needle roller for bending the surface of gypsum board, nippers, pliers, rasp and edge plane. Then, on the ceiling, the foundation levels of the new ceiling and the reference for the beams are measured and denoted. Placement of lighting should be planned in advance, for them you need to equip special niches and nests. After that, you can start the installation of levels yourself. Back to contents</a>
Multilevel Ceiling Mounting Technology
To start on the perimeter of the room to the ceilingthe guide U-shaped profile is mounted with the help of self-tapping screws every 20 cm. Then the first frame of the supporting C-shaped profile is attached to it. The distance between the profiles must be a multiple of the width of the gypsum board. Then the skeleton for the next level is attached to it, and so on, according to the number of levels. Lower the levels can be using the U-shaped metal brackets to which the profiles are attached. They are installed every 40 cm. If the surface is already completely closed and it is not possible to locate the bearing profiles, the next level can be fastened directly to the base ceiling with long self-tapping screws. They will go straight through the cover of the previous level. 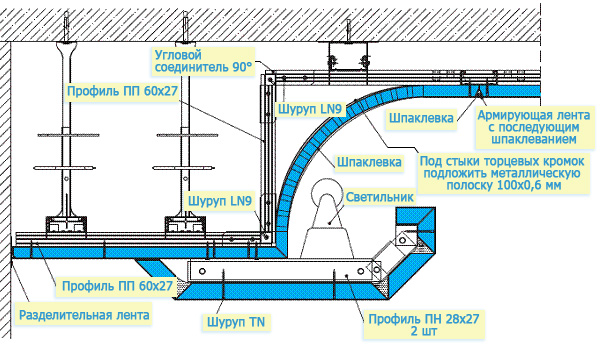 Scheme of installation of a two-level ceiling fromdrywall. When the surface of the previous level is covered by the next one, it is not necessary to cover the ceiling - it is enough to cover only the surface that will be visible from the floor. Plate drywall should try to use the maximum, and cut in such a way that the edges accounted for half the width of the profile. Then to it it will be possible to strengthen the next. The edge of the slabs at the edges at the joints is cut at 45 g, which makes the joints smeared with putty practically invisible. If the ceiling design provides for the use of a tension surface, then it is best to attach it to the plastic profile. It bends much more easily than metal, and with its help it is possible to form curved surfaces right up to the imitation of waves. The profile, in order for the stretch ceiling to lie well, must be fastened very tightly to the supporting structure. The canvas is attached to the corners and cut off at the edge. On the cutting line, there should be no fringe, and on the surface - creases and divorces. After that, you can turn on the heat gun. Do not just forget that the stretch ceiling must be at least 50 cm away from the furniture when assembling, otherwise it can just catch fire in the process. Back to contents</a>
Installation of lighting devices
 Layout of wiring in a false ceiling andinstallation of a spotlight. Inside along the profiles, wires and other communications are laid. To install the luminaires, special grooves are made. Lighting devices with a tension ceiling are usually attached to the base solid base, which is much safer and safer. The holes for them in the film must be properly processed so that it does not lose strength. Many levels allow you to set them in an infinite number of options. Usually in this quality in tension systems it is customary to use halogen bulbs with a power of 35 W. The opening for them should have a height of at least 7 cm. If the tension film has a glossy surface, the reflected light can produce an additional optical effect. In general, the multi-level ceiling provides a lot of aesthetic and purely practical possibilities. Gypsum board and stretch coating when it is created is best to combine, as each of them has its own advantages and properties. As a result, the effect can be extremely attractive and produce a strong aesthetic impression. Multi-level ceilings visually change the interior spaces of the premises, making them higher and more spacious.
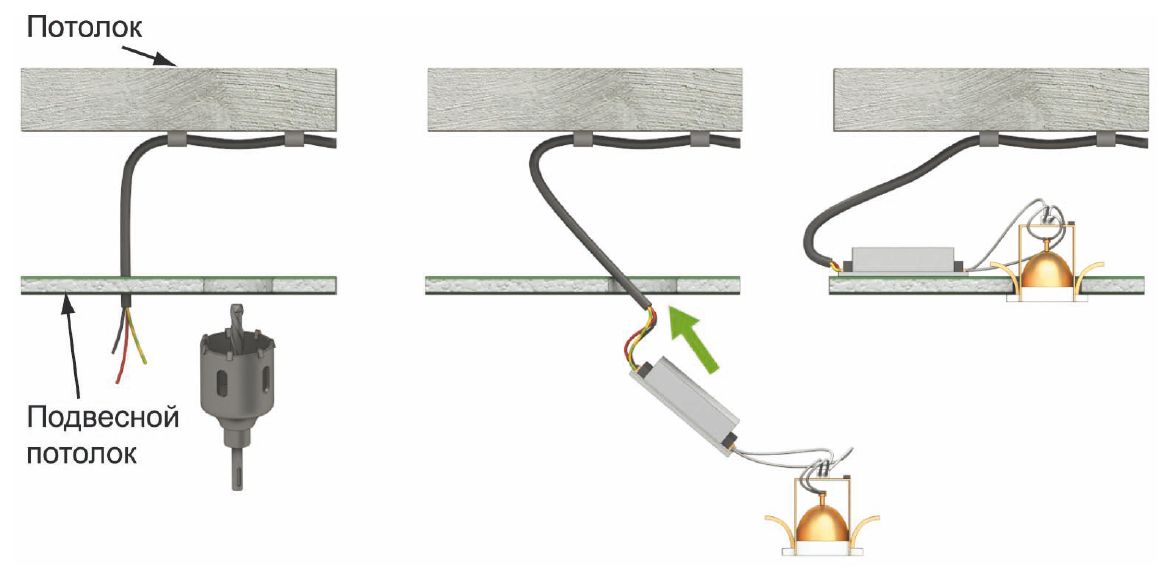


