Virtually every family has old furniture,which inherited, but not always this furniture has an acceptable appearance. The cover is easy to replace. Then the favorite grandmother's chairs and armchairs will get a second life and play with new colors.  Instead of buying new chairs, you can make upholstery old: shabby seats replaced with new ones, saving money.
Chair with a soft seat
To do this, you need:
- dense tape;
- lining fabric;
- upholstery fabric;
- filler (batting, sintepon, coconut fiber);
- furniture foam;
- building stapler;
- hammer and nails.
To tighten chairs yourself is not soIt's difficult if you follow the technology and know the sequence of the assembly. It happens that when not only the skin, but also the inner contents require replacement. The first thing to do is to remove the seat, pull out the old nails with the nail, remove the upholstery and filler. You should only have a wooden frame from the seat.  For the upholstery of the chair, the main tool isfurniture stapler. Now you need to attach a dense tape on the bottom (in the form of a lattice), which is used for upholstering furniture. One end of the tape is nailed with 3 nails, the second end is wound on a wooden bar and tighten. On the opposite side, fix the tape with nails, then cut it, the end is bent and fastened with a stapler. The distance between the strips should be about 5 cm. On the seat of a chair, 2-3 strips are usually nailed on each side, intertwining them in a lattice. Instead of nails, you can use a stapler - in this case, the staples are arranged in 2 rows, a short distance from each other. For this purpose it is better to take staples in 8 mm. After this, take the lining cloth and fix it with a stapler along the entire perimeter of the wooden frame. Then lay the filler layer. These can be batting, coconut fiber or sintepon. After cutting a piece of foam rubber so that it was more than a 2-3 cm seat. First, it is fixed with the staples in the center of each side, then the sides are shot. Angles are made in the last turn, while the ends are collected in small folds. During work, you need to make sure that the foam rubber does not bend, otherwise the upholstery will turn out to be uneven and will get an inaccurate look.
 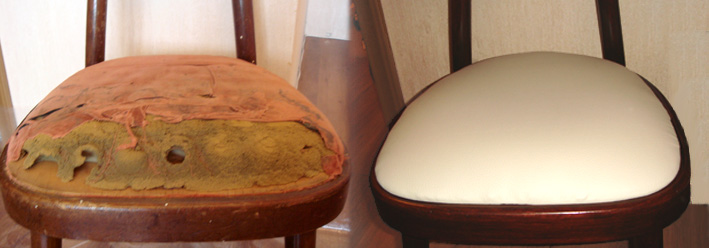 To pull the chair you must first strengthenskeleton, and then remove the upholstery fabric. It remains only to cover the seat with a cloth. Lay out the matter on the table, lay the seat from above (foam down), shoot at 3 staples in the center of each side. Try to stretch the fabric evenly, so you do not have any distortions, otherwise it will affect the appearance of the product. At the corners lay beautiful folds, shoot them with a stapler, cut off all that is superfluous. Fold the ends and secure them in the same way, and then place the seat on the chair. It is more difficult to tighten the chair seats with your own hands if springs are present in the upholstery. Many craftsmen do not recommend replacing them with a less durable foam rubber. The first thing to do is to carefully disassemble the contents. As a rule, the springs are already connected. Then you just have to check the bunch on the fortress. If some threads have been damaged over time, they need to be replaced. After you have nailed the ribbons and lining, place a bunch of springs on it, sewing each under (several stitches from all sides). On top of the construction, fasten the dense lining fabric and in the same way sew the springs to it. Then follows a layer of batting or sintepon, after which the seat is clogged with a cloth and placed on a chair. Back to contents</a>
Chair with hard seat
To do this, you need:
- thick furniture foam;
- dense fabric;
- building stapler;
- braid;
- Glue gun.
 Scheme of chair tightening. It is quite easy to tighten a chair with a hard seat: even a person who has nothing to do with the furniture business can easily cope with this. First it is necessary to cut foam rubber, it must completely repeat the dimensions of the seat. There is no need to cut the fabric, since it is much easier to work with a cut that is 15-20 cm larger than the one laid. Foam laid on the seat of a chair and covered with a cloth. First, shoot (along the border) each side in the center, then along the sides. Then decorate the corners: the fabric is gathered into small folds and fastened with staples. It is important to ensure that the staples are located clearly along the line. Then cut the matter, retreating from the fastening by about 5-7 mm. It remains only to paste the braid, which will hide the staples. To do this most easily with the help of a glue gun - the work, although easy, but requiring maximum attention and accuracy. In the same way, the stool upholstery is performed, but in this case the upholstery fabric is not fired on the rim, but on the back of the seat. Therefore, there is no need to decorate the seam with braid. Back to contents</a>
How to replace the upholstery on the seat?
To change the upholstery you will need: 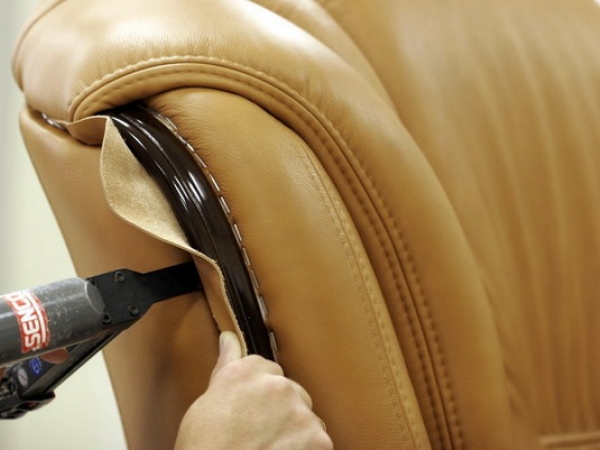 Upholstery chair is made with a construction stapler, upholstery fabric and a hammer with nails.
- upholstery fabric;
- building stapler;
- hammer and nails.
Update the upholstery in the old armchair possibly with your ownforces. The first thing to do is to carefully remove the old upholstery. It is important to remember where exactly and how the fabric was fastened, and even better all this is photographed. Use the old upholstery as a pattern, when cutting, add a stock of 1-2 cm on each side. First, the arm rests. In order for the fabric to stretch easily, a hard tape (on the back side) is sewn along the edge of the fabric. If this is not available on the farm, then you can use a strip of dense cardboard (it is shot with a stapler). Upholstery is repeated exactly the same as it was done before. After that, proceed to a fairly important process, the tightness of the back. There should not be any distortions and wrinkles. In order for the fabric to lie flat, it is necessary to build the following device: take the fiberboard, cut a long strip 2-3 cm wide, beat the nails into it (1-2 cm apart), then nape the bottom of the upholstery fabric. By doing so, you can easily pull the fabric and fasten it to the bottom of the chair. For this purpose use deep brackets of 0.8 or 10 mm. After the backrest and armrests are tightened, proceed to sewing a cover for the seat. As a basis take an old cover. If the lightning is well preserved, then there is no need to replace it with a new one. The bottom of the chair is tightened in the same way as the back. Using the tips outlined above, you can easily upgrade not only the chair or stool, but also the old chair. Dare, and you will succeed!


