Painting the ceiling with your own hands can qualitativelyChange your interior, as well as develop new creative abilities without too much effort. Decorate the room in this way will be interesting, but the result will always be original. To avoid unnecessary difficulties in this task, it is necessary to observe the special technology developed for ceiling painting, which consists of three stages - preparation, drawing of a bitmap image and its final covering.  Drawings on the ceiling look very nice in any room and can perfectly complement its interior.
Tools, as well as the required materials
In order to perform the painting yourself, you will need the following materials: 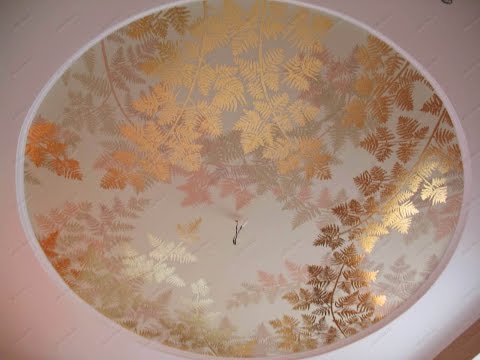 Painting with a stencil can not even be done by a professional.
- bucket;
- water;
- metal, different in size spatulas;
- brush (with soft pile);
- brush on an elongated handle;
- level (a tool for calculating the flatness of the horizontal);
- sandpaper (preferably fine-grained);
- putty (starting and necessarily finishing);
- acrylic primer.
Back to contents</a>
Preparatory stage
First of all, prepare the ceiling for the primarydrawing an image. This stage needs to be carried out with high quality and with all responsibility, since it will depend on it the type of work completed and the difficulties at further stages. To do this, use a large spatula to remove all the plaster from the ceiling. Then, wet the brush with a long handle in a bucket of water and rinse it. On the cleaned surface, apply a roller or a fluffy brush with a deep penetration primer and allow it to dry. The drying time is indicated in the instructions or on the packaging. When the ceiling is completely dry, check the level of how smooth it turned out. If at the same time you have detected irregularities that have a difference of more than 1.5 cm, they need to be leveled with plaster. To do this, dial the finished mixture with a small spatula, spread it over a large spatula and apply to the surface at an angle. In the presence of small irregularities, they can be corrected with a basic (starting) putty. At the end of the drying, the ceiling should be sanded using sandpaper. After doing all these operations and completely drying the surface, you can proceed to applying the finishing putty, which is superimposed by a layer of no more than 2 mm. Thanks to her the ceiling will be perfectly even and ready for painting. The acrylic primer is necessarily applied next to the finishing putty. After it has dried, you can start applying the image. Back to contents</a>
Where can I get a design sketch?
 For ceilings, you can take acrylic paints,which are used for painting glass and ceramics. To paint the ceiling with your own hands can seem like an easy task. After all, you need to have a special artistic talent for this. However, this is not quite true. To make a painting you need to have a full-color sketch of what you are going to transfer to the ceiling. Only in this way you can imagine what will happen as a result. You can come up with a sketch yourself or look for his story in modern design magazines. The theme of the picture should correspond to the purpose of the room. Do not choose aggressive pictures for the bedroom, and gloomy - for the nursery. The selected image should open the functionality of the room in which it will be present. So, quiet tones will help to relax in the bedroom, and bright - to develop creativity and accompany games in the nursery. The solemn drawing put on a ceiling or a wall in a drawing room, will give it a special atmosphere. You can easily use the volumetric drawing going up, which will significantly increase your space. If you select the desired picture, you found that its scale does not fit you, it will not be a problem. It can easily be changed in size, simply transferred to paper and divided into equal-sized squares. For convenience, you can also number them. Then take the paper of the correct size (from which you will transfer the image) and apply a numbered grid to it. After that you can transfer an element of the final picture to each square. When the design of the sketch is completed, you can proceed directly to the painting.
 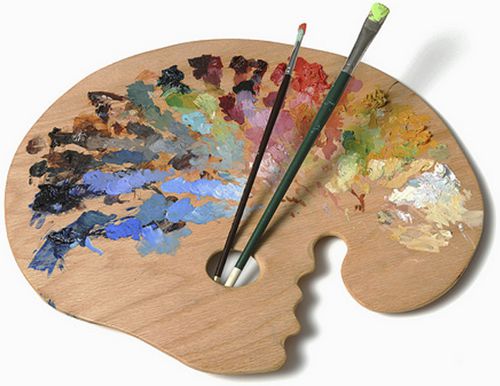 To mix the colors, the palette is used. For the next stage, prepare such materials and the necessary tools:
- water tank;
- palette;
- sponge;
- brushes made of natural bristles;
- stairs;
- pencil;
- acrylic paints.
Back to contents</a>
The order and technology of drawing works implementation
Install the ladder on a flat surface andmake sure that it does not stagger. This will help you prevent the appearance of blurred lines in the figure. For these purposes, you can easily use a ladder with a platform, with which you can work lying down. Now you need to transfer the image to the ceiling. This can be done in two ways. If you made a sketch in real size, then stroke it with a soft pencil and attach this side to the ceiling. Then, squeeze his lines with the same pencil or pen. With a reduced copy of the image, you need to use a slide projector, and draw the outlines with a pencil. After all the lines of the drawing are transferred, you can proceed to coloring. Start with the background and larger elements. Mix in the paint palette until the desired shade is obtained and carefully apply them to the surface. To remove excess lines, you can use wet sponge. After coloring the large elements, go to the design of the smaller ones until the whole drawing is ready. Acrylic paint is considered to be moisture-resistant and promises to last many years. But despite this, it is best to cover the completed pattern with a protective layer. So it will still retain its original look, color and strength even better. Acrylic lacquer, which is applied as a protective layer, gives the image even greater brightness and clarity. Apply it only after the full drying of the acrylic paint (after 24 hours). For uniform coating with varnish, you can use both a spray gun and a soft brush. And after applying, place it with a dry brush. Due to the fact that the paint can absorb dust and unpleasant odors in the first time after application, it is necessary to prevent smoke and excessive dust from entering the picture. If you follow these rules, you will be able to admire your creation for a long time. Having done everything on the above tips and recommendations, you can enjoy the final result of your work. And the painted ceiling will be the object of your pride and enthusiastic views of the guests.


