Clay is rapidly regaining its popularity andis increasingly used as a building material. The ecological purity of finished buildings, the use of time-tested technologies, the application of new methods - all this makes clay houses strong and durable. Another significant advantage of houses with clay walls is that they are quite warm in winter, and the rooms remain cool in summer. For ordinary city apartments and even modern private houses, this is a great rarity. Scheme of applying plaster to the walls of a house.Clay walls provide the most comfortable living conditions without the need for special climate control equipment. However, in order for clay walls to remain in good condition for as long as possible, a number of important measures must be taken to protect them. One of the most important of these measures is applying a special plaster coating to the walls. Clay walls must be plastered in compliance with all technological rules and requirements.
Preparation of tools and materials for work
Clay walls are plastered in 2-3 layers. The initial layer is carried out using the following materials:
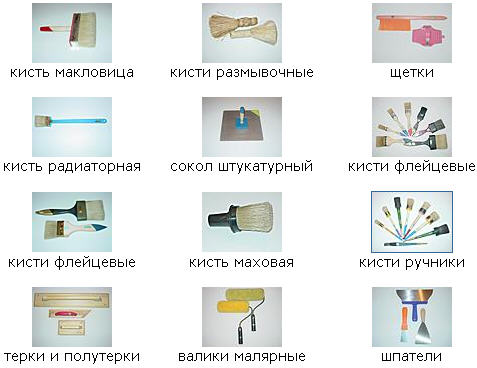 Tools for plastering.Special attention should be paid to sawdust, which will be used to plaster the walls. Only thoroughly dried sawdust can be used. They should not be affected by fungal diseases under any circumstances. Fresh sawdust cannot be used to plaster clay walls. Before use, they must lie for at least 1 year. In the process of preparing the mixture, sand is first mixed with sawdust and only then water and clay are added. The 2nd layer of plastering the walls is applied using sand, cement and clay. For work, you will need a minimum set of tools, namely:
For plastering such walls, it is usedspecial clay composition. You will have to select the optimal ratio yourself, because the properties of clay from different areas, such as plasticity, "fatness", etc., differ. The optimal proportions of the composition directly depend on this. Take some sawdust, the same amount of clay and 3 times more sand. Thoroughly knead the mixture, gradually adding water to it. To check the readiness of the plaster composition, you can use various simple and proven methods. Despite their simplicity, they will help you easily find out whether the mixture is ready or whether you still need to experiment with the ratio of ingredients.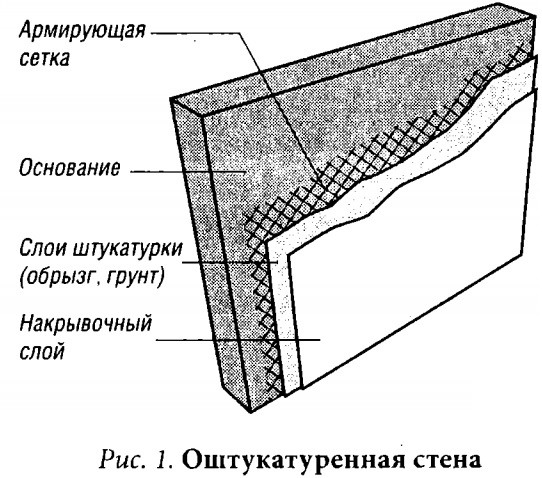 Wall plastering scheme.The first method is known as the "clay ball". You need to bring the plaster mixture to a state where it no longer sticks to the skin. Roll a small ball from the resulting mass, a diameter of 30 mm will be enough. Place this ball on any horizontal surface and crush it with your palm. If cracks appear along the edges, the composition is not plastic enough, and the proportions will need to be revised. Ideally, when there are no cracks. This composition can be safely used for plastering clay walls. Another method is based on the "flail" test. Prepare a small amount of the composition and roll it into flagella. Flagella with a diameter of 2 cm and a length of about 20 cm will be enough. Bend the prepared flagella. Check the quality of the composition again by the presence or absence of cracks. To regulate the plasticity, you will need to add less or more sand to the composition. It accounts for about 50-80% of the total mass of the finished mixture. It is more convenient if you have a concrete mixer for preparing the solution. If you don't have one, you'll need to dig a hole, add the components there and knead the solution with your feet. You can also use a trough for this. It's important to check the plasticity of the mixture. Otherwise, the plaster will simply crack during the drying process, and all your work will go down the drain. If you had to go away somewhere during the work and the mixture has dried out, you only need to add some water to restore it to working condition. After that, you can return to work. Such properties are an undoubted advantage of this type of plaster. Return to contents</a>
Step-by-step instruction for applying a rough plaster layer
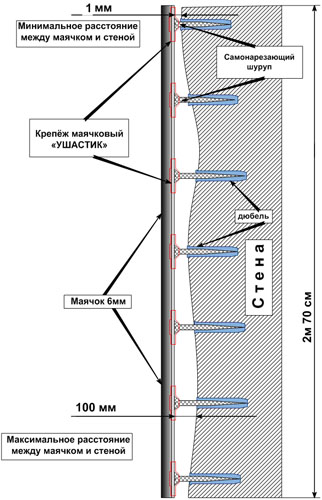 Scheme for installing plaster beacons.Thanks to sawdust, the plaster will be stronger and you will not have to use a special plaster mesh during work. This reduces the time and effort spent on the work. The disadvantage of the plaster mesh is that you have to use long nails to attach it. And the thicker the wall, the longer the nails should be. Because of them, the integrity of the wall is compromised, its strength, although not very noticeably, is reduced, so it is best to give preference to proven old methods that have been known for hundreds of years. So you can add sawdust to the mixture without any doubts. If you have an assistant, plaster the walls in the following order. Divide the responsibilities between you and the assistant. You will throw lumps of the mixture onto the desired areas of the wall, and the assistant will control where to throw the plaster. If you wish, you can switch. The thrown mixture should be immediately carefully leveled using a grater board or spatulas. Do not delay with leveling, the more time passes, the more difficult it will be to work. So it is better to invite not one assistant, but two or even three. If there are no assistants, you can plaster the clay walls yourself. But this will take more time. Take a small spatula or a grater board. Put several lumps of clay plaster on the working tool in one pile. Apply the tool with the composition, press it quite hard to the wall and spread it. You need to move from the bottom up, trying to make the layer as even as possible.
 Proportions of plastering solutions.Use a level to check the evenness of the plaster. Any irregularities must be eliminated immediately after detection. If the walls are relatively even, the rough layer will be about 10 mm thick. If the irregularities are quite significant, it will increase to an average of 20-30 mm. Serious irregularities are already noticeable, and to detect small defects, you will have to use a building level. After the rough layer has been applied, it must be allowed to dry completely. This takes an average of 1-1.5 months. It is highly advisable to plaster clay walls in the warm season. It is best to start at the end of spring or the first weeks of summer. Of course, you can do everything in cooler weather, but then the rough layer will dry for 3 months or even more, and no one can guarantee high quality work in such conditions. Return to contents</a>
Manual for finishing
At this stage you will have to make a final decisionlevel the clay walls and do the grouting. For this, a solution of sand, clay and water without a filler in the form of sawdust is used. First, prepare the solution for the 2nd layer. It should be quite liquid. Use part of the cement, the same amount of clay and 3 times more sand. The liquid solution is easier to apply, and the coating is more even. The sand should be of medium fraction. Only dry material can be used. When using fine sand, much more cement will be needed for the job.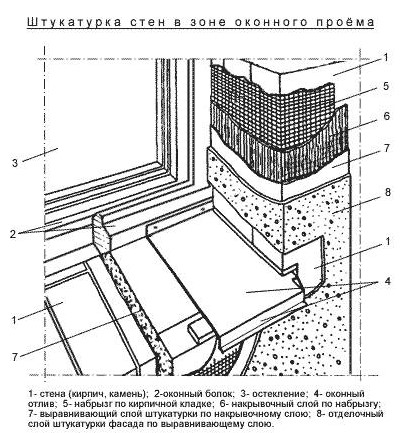 Scheme of plastering walls in the window opening area.If it is large, the coating will not be as beautiful. Mix cement and dry sand. Then add clay. Mix all 3 components thoroughly, gradually adding clean water to them. This layer dries faster than the rough one - in 1-3 weeks. The specific time depends on the microclimate in the room. It is strongly recommended not to speed up the drying of the plaster with a building hair dryer, heaters and other devices. Everything should happen naturally. If you use any additional units, the walls will crack - you will have to seal the cracks and wait again until the composition dries. That is, wanting to save time, you risk spending even more. Return to the table of contents</a>
Finishing decorative finish
After the finishing coat has dried, the wallsit will be necessary to process with lime. The traditional method involves its multi-layer application. You can also use another method, according to which the surface to be processed is carefully sanded with fine-grained sandpaper. After processing with sandpaper, a deep primer is applied to the walls, and then a gypsum mixture. After such processing, the walls can be painted or pasted over with wallpaper. Or you can choose another option for finishing. There are many options. You can easily choose the most suitable one. Someone may say that clay walls are a thing of the past. However, it is important to consider the fact that the ideal building material is one that is safe for human health, as reliable and durable as possible, and also cost-effective. Clay fully meets all these requirements. In addition, it is extremely easy to work with it. It does not require the use of special equipment and tools. Therefore, walls made of this natural material are becoming increasingly popular, and now you are ready to plaster on clay with your own hands. Good luck with your work!


