The ceiling is the most visible part of the room,and during repairs it cannot be left unattended. As a topcoat, you can use paint, suspension systems and much more. It is possible, it does not require careful preparation of the surface. However, you need to be prepared for the fact that in order to equip such a system, you will need to mount a frame system.  Schematic of a single-level pendantceiling on a metal frame. The guide profile should be installed perfectly evenly, which is why when installing it, you should use the level, it will also allow accurate marking of the installation site, it will work more comfortably with the laser level, but its cost is much higher. By means of a two-meter level, it is possible to determine the evenness of the installation of drywall sheets on the frame. In the process of work, it is necessary to equip the holes for the dowels, for this purpose a perforator should be used. Lock the position of the profile and drywall will allow the drill, which can be replaced with a screwdriver. It is necessary to stock up and the "Bulgarian", equipped with a circle designed to work on metal, you can also cut a metal with a hand hacksaw.
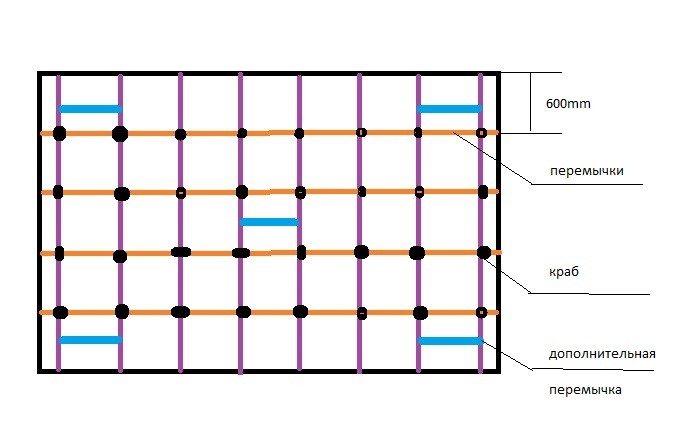
 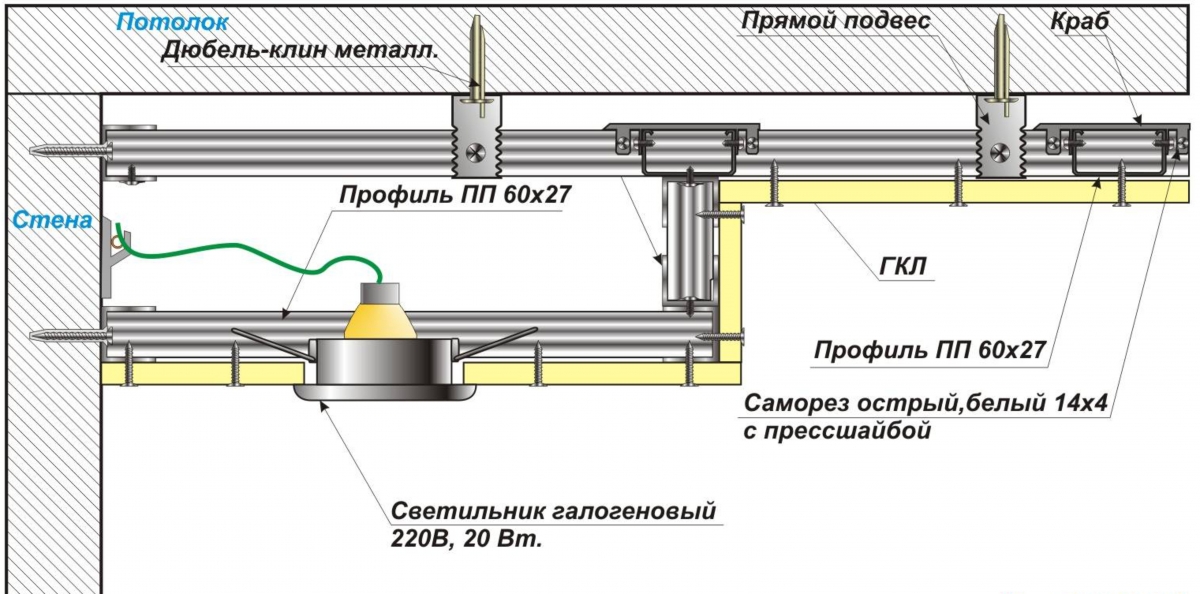 Suspended ceiling from gypsum board with illumination. To arrange a ceiling from gypsum cardboard the hands it is necessary after installation of a skeleton in which basis the profile lays. The profile can be directing and ceiling, for the arrangement of the frame you need both. The first is fixed around the perimeter of the room. Before purchasing the frame elements, you need to calculate their required number. The guide profile must be calculated along the perimeter of the room. So, if the area of the room is 20 m2, and the length of the walls is equal to 5 and 4 m, then with a standard profile length of 3 and 4 m, a profile of 3 m in length will be needed in an amount of 7 pieces. To this quantity, you need to purchase 1 more profile for the stock, this is necessary, because during the sawing during the work can form a marriage. In addition, you need a profile length of 4 m in the number of 5 pieces. Thus, the perimeter should be divided by the length of one profile. Gypsum plasterboard ceilings are often arranged in two levels, with the number of required profiles being increased, the length of the additional elements should be added to the above quantity. Mounting gypsum cardboard ceiling is also made with the use of a C-shaped profile, the calculation of its quantity can be carried out as follows. In view of the fact that the sheet of plasterboard has a width equal to 1250 mm, under ideal conditions it is fixed at a distance of 600 mm. Thus, for the above example, it is preferable to use a profile whose standard length is 4 m, this will allow a smaller amount of waste. The length of the wall in 5 m should be divided by 60 cm, which will allow 8 ceiling profiles.
 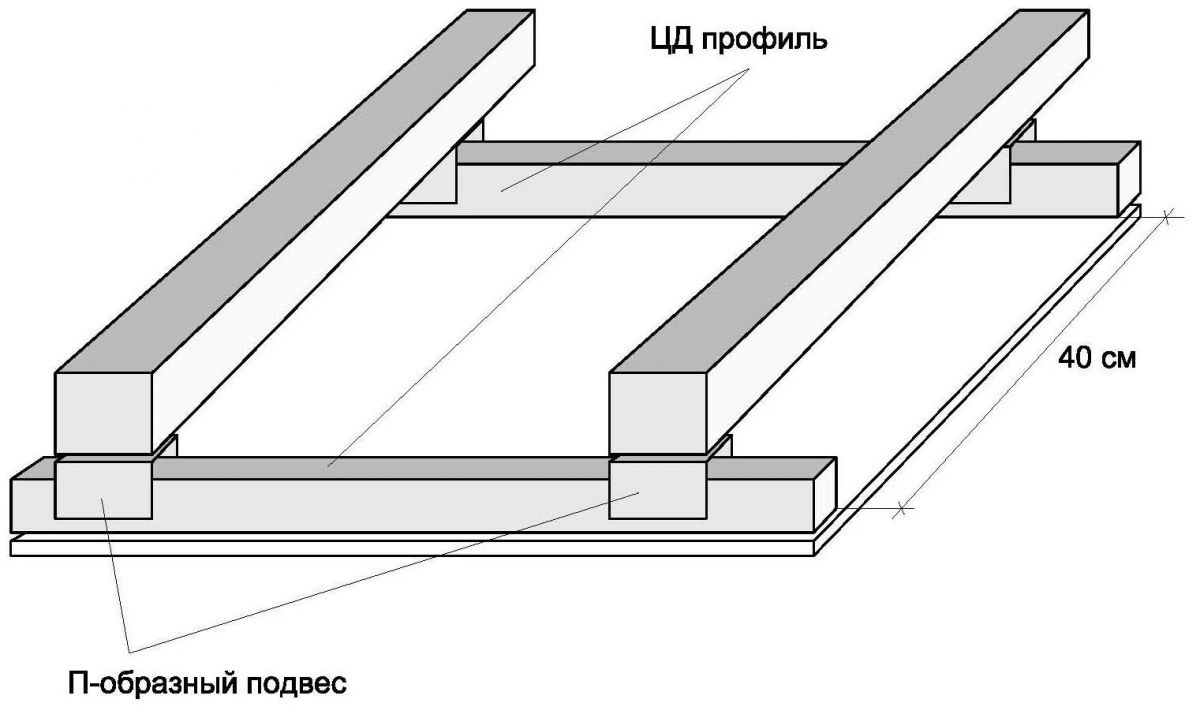 Fastening of plasterboard. It is important before you start installing the ceiling to choose the right drywall, which can be ordinary, moisture resistant, and also fireproof. If the work is supposed to be done in an ordinary room, the conditions of which are not characterized by high humidity, you can use a regular sheet, which costs less moisture-proof. To mount the ceiling system, do not use a material whose thickness exceeds 8-10 mm. With thicker sheets, the mass of the structure will be greater, and the practical benefit of this will not work. In addition, sheets with greater thickness will complicate the work. The ceiling can be arranged with less material costs with proper calculation, for this you need to use the following formula: a / b = c, where a is the ceiling area, b is the area of one sheet of plasterboard, c is the required number of sheets. For fastening, a direct suspension is required. For an area of 20 m2, 50 pieces of such suspensions will be needed. With a more complex ceiling design and thicker sheets, more hangers will be needed. In the process of fastening it is necessary to provide a distance between them of 700 mm.
Tools and materials
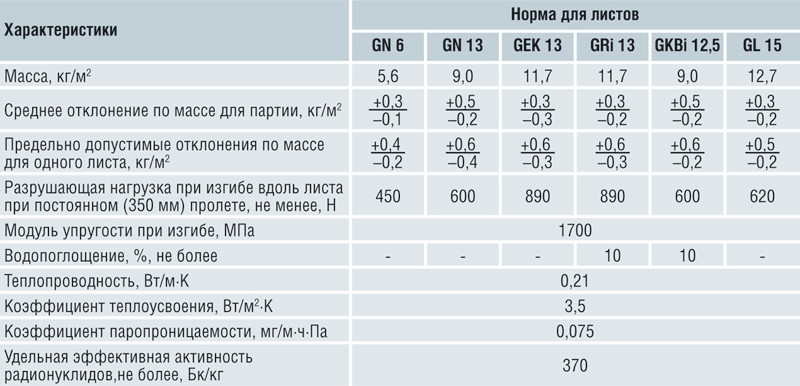 Physical and technical characteristics of gypsum boards.
- Finishing plaster;
- gypsum plaster;
- Adhesive mesh;
- self-tapping screws;
- dowels;
- water level;
- perforator;
- drill;
- roulette;
- a cutting knife;
- pencil;
- Bulgarian;
- scissors for metal;
- GCR;
- profile.
Back to contents</a>
Mounting the frame
 Mounting the jumpers into the framework of profiles for the ceilingfrom gypsum board. When installing the ceilings with your own hands, you will first have to make a marking for mounting the guide profile, while using a water level. The distance at which the system will be located can be determined on its own, however, for the convenience of mounting the structure, which in particular concerns the placement of the heat insulator or spotlights, it is worthwhile to provide a deviation from the ceiling overlap of 10 cm. Once the markings on the four walls are ready, drill holes for dowels using a perforator. The guide profile should be mounted to the wall in 40 cm increments, this distance in the corners should be equal to 15 cm. By installing the guide profile, markings on the wall should be made along the perimeter by means of a tape measure in increments of 60 cm. To equip an uncomplicated single-level structure, you will need to install the C-shaped profile in two directions. Thus, marking must be carried out on two oppositely located walls. Then you can begin to fix the suspension to the ceiling. If you equip them at a distance of 70 cm, it will be easier to lay a heat insulator. After the installation of straight hangers, you can start fixing the ceiling profile.
 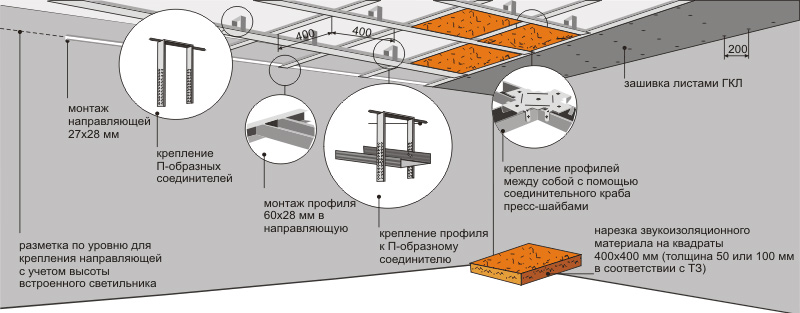 Installation of the ceiling from gypsum board. By arranging the ceilings in the room, the parameters of which are the same as in the example room, you will not have to dock the profile, whose length is 4 m, since the ceiling length is equivalent to 4 m. If necessary, two additional suspensions to the ceiling must be mounted at the connection points. By means of a suspension or a longitudinal connector, the screws must be twisted together by screws. With a drill or a screwdriver, you need to connect the docking points of the profile to the guides, as well as the suspensions and the C-shaped profile. Docking the ceiling and ceiling profile, using a two-meter level, you need to ensure that the profile is fixed smoothly, without forming deflections and sagging. If this rule is ignored, the installed gipsokartonnye sheets will have a wavy surface. Mounting the ceiling at the stage of completing the fastening of the frame, you need to carry out communications and laying insulation, which can be used as a mineral wool. Back to contents</a>
Carrying out of a covering of a skeleton and шпаклевочные works
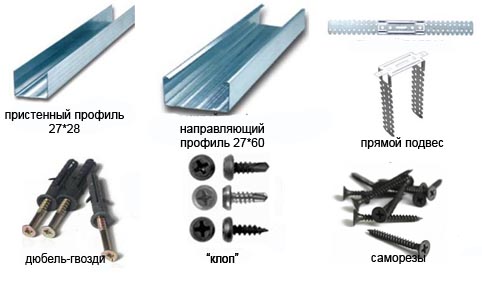 Materials for mounting the ceiling from plasterboard. One-level ceiling should be mounted by fixing the GKL to the frame using self-tapping screws. The distance between the fasteners should be 10-15 cm, this will ensure a reliable design. Fasteners should be placed around the perimeter of the sheet. The sheets have rounded ends. This is necessary to ensure that the joints are not formed cracks after the puttying, because in these places the layer will be thicker. If the ceiling is to be equipped with whole sheets or cuts, then through the knife it is necessary to create insignificant grooves along the edges, where they do not exist. Mounting the ceiling, it is necessary to heat the heads of the screws by about 1 mm. With the protruding fastener elements, it will be impossible to produce a high quality shpaklevaniya process. Moreover, the finish of the gypsum board will not look as prominent as the ones projecting above the surface of the fasteners. Such ceilings must be provided with lighting systems, for which holes must be formed in the cavity of the sheet, which is done with a knife. Ceilings will be easier to equip if you cut out holes with a special nozzle on the puncher, which can be replaced by a drill. Using power tools will allow you to get more accurate holes for lighting equipment.
 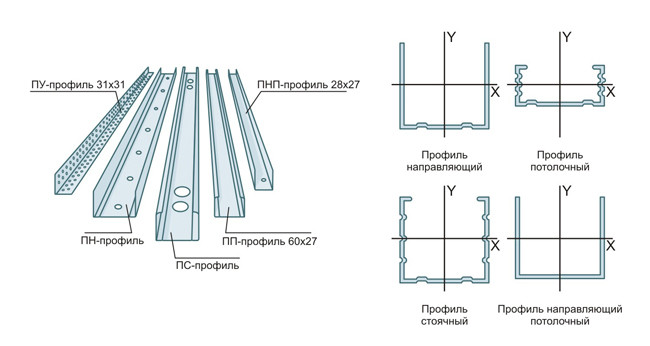 Scheme of assembling the frame by mounting galvanizedprofile under gypsum board. If the sheets are fitted sufficiently tightly, the junction points are prepared for the puttying process, and the holes for the luminaries are cut out, it is permissible to proceed with the finishing. The ceilings must be treated with gypsum plaster and reinforced with an adhesive mesh at the GKL docking points. Start such work you need from the joints. It is necessary to apply a thin layer of the mixture to the joint, and then the mesh should be laid on the composition. The latter should be pressed somewhat into the plaster, and afterwards it is necessary to apply one more layer of the composition. This eliminates the possibility of cracks appearing on the joints of gypsum boards. They need to be allowed to dry a little after applying the mixture, only then you can start to puttying the entire surface using the finishing plaster. The walls should dry well, which will take a day or two, after you can begin to surface treatment with 100/120 sandpaper, the base should be not only smooth but also smooth. Now the surface of the ceiling can be used for decorating. Back to contents</a>
Decoration of plasterboard ceiling
Decoration of the base can be madeby means of plaster molding, as a simpler and more elegant variant, baguettes made of foam plastic will perform. The surface of the ceiling can be decorated with a pattern, but it should be noted that such decoration will cost much more than all the others, as it will have to involve a professional artist. Excellent wallpaper on the surface of gipsokartonnyh sheets wallpaper, which can be painted in any color, from time to time changing the shade, which will update the interior without changing the finish. In addition, gluing wallpaper will not be an extremely labor-consuming task. It is preferable to start such work after you have gained some knowledge and skills in this field. It is better not to proceed immediately to the arrangement of a multi-level ceiling, a simple option will also look good. Over time, it will be possible to model a more complex design and make it real.


