Virtually every house can be found severalold chairs, the appearance of which leaves much to be desired. Do not rush to throw them away. Breathe a second life into an old, but a favorite piece of furniture will help restore.  Restoration gives the chair a second life and createsunique furniture. Very little effort, and old chairs or chairs will turn into real works of art and will please their owners for many years.
Give a second life
Restoration of chairs by one's own hands is not a processso complex, how much laborious. Before you get down to business, you need to carefully inspect the product. As a result of the inspection, it becomes clear what to do: just pull the seat of the chair, refresh the paintwork or carry out more serious repairs. If the stool loosened, then the cause should be sought in the stud joints. Over time, the wood is poured, the binding elements begin to hang out in their nests. To eliminate this and strengthen the structure, you need to increase the size of the stud, tighten the rods and replace the power jumpers. 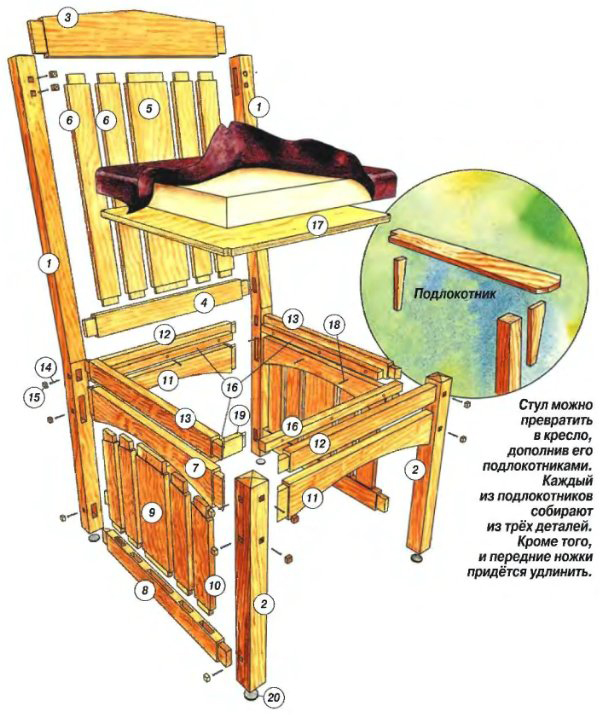 Assembly diagram and chair constriction.The restoration of the paintwork will require less effort. The old paint will have to be removed, the surface of the parts sanded and covered with paint or varnish. For high-quality work, the chair must be disassembled: remove the seat, unscrew the back and legs. If the design of the product is complex and has many small parts, then during disassembly, a diagram of the location of each part should be drawn up. This will make it easier to assemble the chair after the restoration is complete. The easiest way to update an old chair is to replace the upholstery. Replacing old and worn fabric can change the appearance of furniture beyond recognition. If necessary, it can be performed in any one way or include all of the listed types of work. Back to the table of contents</a>
Preparing for recovery
Before you start working, you need to prepare tools and materials. If the chair needs serious repair, then it will be necessary: 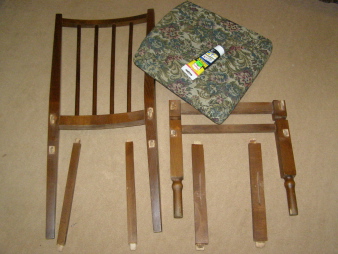 Before the restoration, the old chair must be dismantled.
The first step in the recovery of the stool -cleaning it from dust and dirt. To wash it well, you need warm water, a soft cloth and a little dishwashing liquid. This solution will help quickly clear the stool not only from dirt, but also from a part of the old varnish. The washing procedure should be carried out promptly so that the wood will not be in contact with water for a long time, and then everything must be thoroughly dried. The next stage of the restoration is dismantling. First you need to remove the backrest and the back legs. Here the main thing is to follow the rule: the chair assembly should be carried out in the reverse order. Only in this way all the holes will coincide with each other. In addition, all the details and fasteners need to be marked. This will also facilitate the assembly. 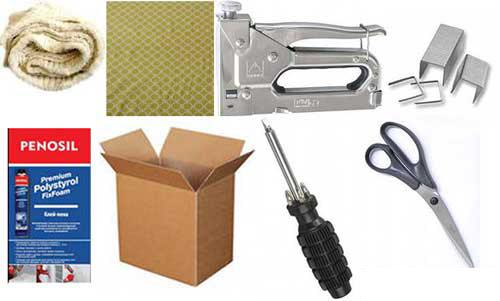 Tools for the restoration of chairs: batting, fabric for upholstery, stapler, staples, mounting glue foam, cardboard, screwdriver, scissors. If the hats of the screws that hold the parts are hidden in the nests and they are covered with wooden caps, then they can be extracted with a chisel. If it does not work, then you need to use a drill, the diameter of which is equal to the diameter of the plug, and drill it. The opened screw is turned with a screwdriver. A drop of technical oil applied to the screw will make the work easier. If the chair was fastened with epoxy resin, hot water would help to remove it. Rags or a napkin to wet and put in place gluing. Repeat the procedure until the adhesive is completely softened. Then it must be scraped off with a knife and dried. Softening the glue in tight joints will help hot steam. To do this, a rubber hose is put on the tip of the kettle, a steam jet is sent to the connection. Back to contents</a>
Machining and assembly of parts
To qualitatively restore the chair, itsmust be carefully inspected. All parts must be treated with sandpaper. Detect large cracks and glue together using clamps. Smaller glue and fix with paper tape. Extra holes and chips on the parts must be filled with a gum of glue and small sawdust. Continue to work only after the glue has completely dried. To facilitate work with sandpaper, it should be cut into narrow strips and glued on wooden bars 20-40 mm wide and 300-350 mm long. The paper needs to use a different grain size. Surface after treatment should be smooth and smooth. To facilitate the work and significantly reduce the processing time will help the grinder. It is necessary to check all connection points. If the chair is inserted into the seat directly in the seat and in the course of time they become loose in the nests, then it is sufficient to support them to strengthen them. At the ends of the upper, narrowed parts of the legs, a saw is made and a wedge is driven into it. Due to this method, the diameter of the butt becomes larger and it densely sits in the socket, which must be pre-coated with glue. It will be more difficult to restore the chairs with crossbeams between the legs and under the seat under the seat. In such constructions, the connection of the spike-groove and sizing is used to fasten the parts. When the seam weakens, it is necessary to drill an inside hole with a small diameter and a syringe to drip a few drops of glue. When the thorn is loosened, it must be strengthened with thin wedges. For this purpose matches or wooden chips, which are dipped in glue, are suitable. Scoring in the nest they need with a spike. If the chair is loosened very much, then besides the gluing of the joints, it is necessary to strengthen the construction with the help of wooden bars. They should be attached with screws to the rods, which are used to connect the inner corners of the frame. The bars and czars must be perfectly matched to each other. Even the smallest gap between them will cause the whole structure to skew. Now you can begin to collect the skeleton of the chair. All parts must be in place. To ensure that the glue is seized, it is necessary to provide sufficient pressure. Bonded elements can be pulled off using clamps or cords. A bucket of water can be placed on the seat. This will provide the necessary pressure. With such a load, the chair should stand for at least 24 hours. Surplus glue immediately need to be cleaned with a wet napkin. Back to contents</a>
Replacing the soft seat
Before restoring the chair, continueit is necessary to wait for the glue to dry completely. Then the product can be painted, varnished, decoupled or decorated with painting. Everything will depend on the desire and imagination of the owner. If the chair has a soft seat that requires replacement, it's time to start. First you need to remove the old cloth and stuffing. If there are defects on the wooden surface, they must be eliminated. On the new foam should be marked. The old seat is applied to the foam rubber and surrounded by a felt-tip pen. To cut exactly, you need to take a sharp knife. Then make a pattern on the fabric, taking into account the allowances for the folds and foam rubber. Then spread out the pattern on a flat surface facing down. On top put foam, and then the seat. The allowances need to be wrapped on the wrong side, tighten and align the front side. At the corners align the folds, bend the edges and attach the material with a stapler. If it is not at hand, then you can use small studs that have wide hats. Renew the seat on the frame with metal corners and screws. If the chair has a soft back, then it is restored in the same manner as the seat. Completely restored and transformed chair will serve its owners for many years.


