Roman blinds have been used by many people for a long time.centuries. And during this time they have not become less popular. This is explained by the fact that the design of the curtains is extremely simple. Such a curtain can be made literally from scrap materials.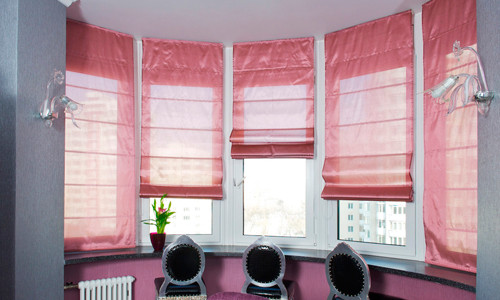 Roman blinds help to design the roomunique and protect the room from sunlight. The curtain resembles a sail in its structure. The finished curtain looks like a rectangular piece of fabric or other material stretched over transverse slats. Due to this, the curtain can be raised and lowered.
Choice of material and type of construction
Modern Roman blinds are multifunctional.In their homeland, these curtains are intended to protect the room from bright sunlight. In addition, they prevent hot air from entering the rooms. Therefore, they are most often sewn from dense and fairly dark fabrics.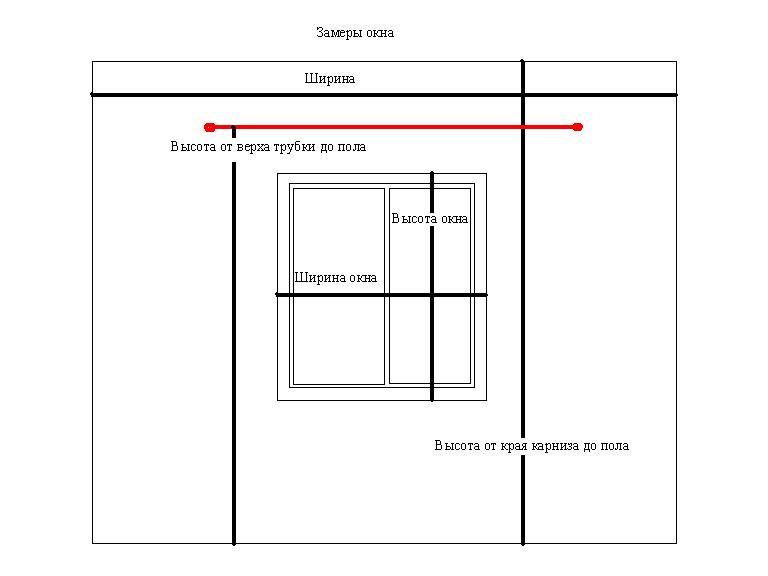 Window measurements for sewing Roman blinds.But now a Roman blind can also serve as a fashionable detail of window design. Therefore, it is sewn from light translucent decorative materials. Experts recommend decorating narrow and high window openings with such curtains. They are indispensable in small rooms, for example, kitchens. This design does not clutter up the space. At the same time, there is no risk that a random gust of wind will blow up the curtain. For windows in bathrooms and kitchens, a curtain made of material with water-repellent impregnation is suitable. This will ensure easy maintenance of the curtain. In addition, such a curtain will not absorb grease, dirt and moisture. If you have chosen this version of a Roman blind, then it is not at all necessary to buy specialized fabric. The curtain can be assembled from a ready-made polypropylene tablecloth or shower curtain. Such improvised materials also differ in different textures. They can be smooth or fleecy, with embossing or a cut pattern reminiscent of lace. Therefore, the curtain will be not only functional, but also beautiful.
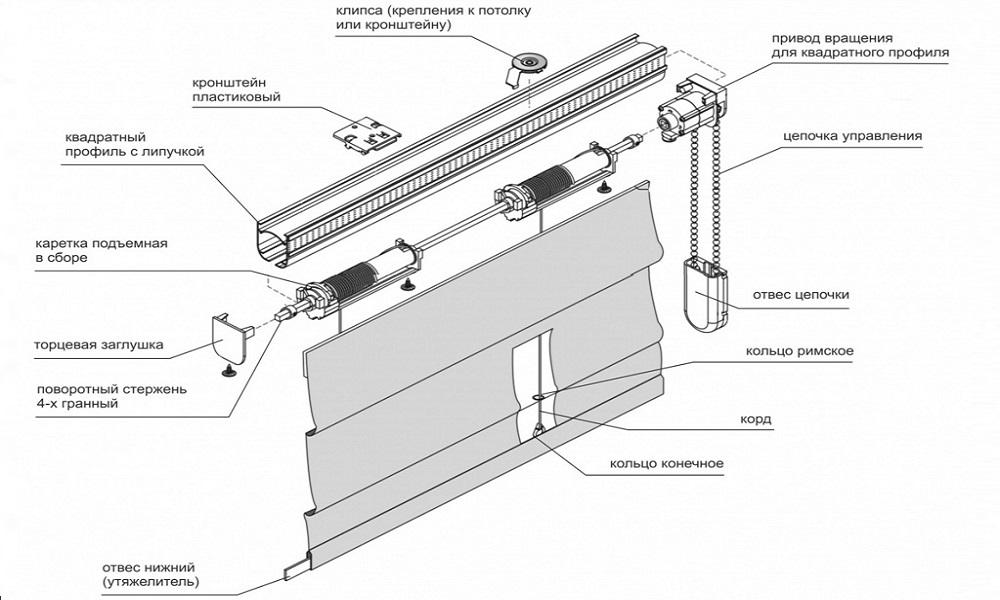 Scheme of the device of the cornice for Roman blinds. The design of modern Roman blinds can be of two types:
Each of these models has its own advantages.and disadvantages. It is difficult to ventilate the room with a narrow curtain, as the curtain prevents the window from being opened. A design with a wide curtain can be quite bulky and heavy. It is difficult to fold, and the long crossbars lie unevenly when folded. Return to contents</a>
Measurements for sewing
But the choice of model also depends on the tastes and preferences of the owners. The types of measurements that need to be taken for sewing depend on the design. That is, you will need the following measurements: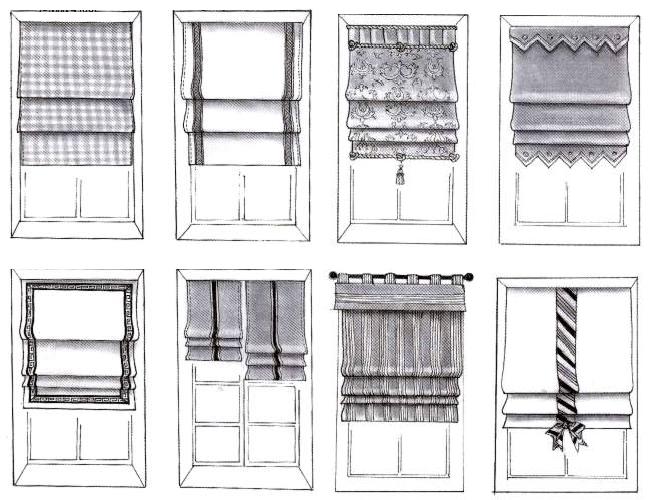 Types and styles of Roman blinds.
- distance from the bottom edge of the cornice to the floor;
- distance from the lower edge of the eaves to the windowsill;
- the width of the window opening (without regard to the width of the curtains);
- The width of the eaves from one wall mount to the other.
If you are going to sew a narrow curtain thatбудет крепиться внутри оконного проема, то последняя мерка станет основной при определении ширины портьеры. Но римские шторы хороши тем, что тип крепления можно выбрать по собственному желанию. Классический занавес такой конструкции монтируется на штанге карниза, которая продевается в специально для этого предусмотренную кулиску. Но сейчас можно приобрести плоские крепления. Они выглядят как пластиковая панель, которая фиксируется на верхней раме окна или оконного проема. Ее поверхность представляет собой ленту Велкро («липучку»). Вторая половина тесьмы пришивается к шторе. В таком случае ширина полотнища зависит только от вашего желания. Обычно римские шторы опускаются до подоконника или чуть ниже его (примерно на 10-15 см). Но при желании можно сшить и длинный занавес. Только в этом случае стоит учитывать, что чем длиннее штора, тем большая нагрузка приходится на подъемный механизм. Вернуться к оглавлению</a>
Building a pattern of curtains
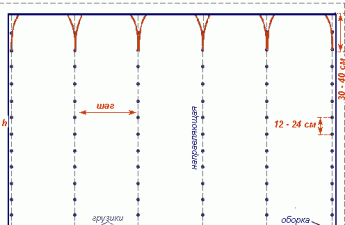
 An example of a pattern for a Roman blind.To , professional sewing skills are not required. The main difficulty lies in the competent construction of the pattern and calculation of folds. The fabric is cut along the dotted lines. Naturally, you can construct a pattern based on your own measurements, but experts advise adhering to the specified proportions. The following formula is usually used to calculate the depth of the folds: Curtain length/(number of cross slats*1.5 cm) In this calculation, 1.5 cm is the allowance for the drawstring of the slat. For example, the length of the curtain is 145 cm, and there are 7 horizontal fasteners. In this case, the calculations look like this: 145 cm/(7*1.5 cm) = 13.8 cm But it should be noted that this calculation provides for shallow folds (the classic version). The pattern can be constructed based on personal preferences. There are curtains with folds of 30-40 cm. At the same time, the whole product looks great.
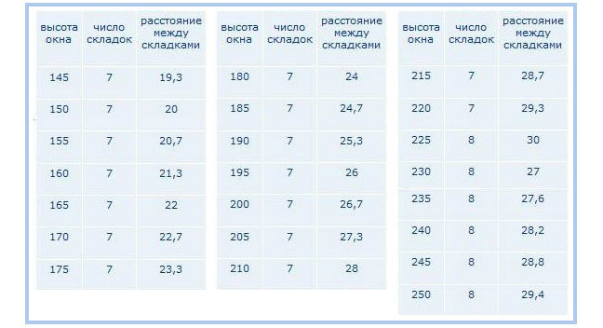 Table for calculating the folds of a Roman blind.As a rule, such curtains are sewn from 2 identical panels. In this case, 1 piece is the front side of the curtain, and the second is the back side. The drawstrings for the slats are formed using bias tapes stitched from the back side. But if you are making a curtain not from fabric, then the fastenings can be external. This is the method of fixation shown in Fig. 3. In this case, instead of drawstrings, a reinforcing tape is used (for example, trouser or curtain tape). Rings are sewn onto the tape, and a cord is threaded through them, which replaces the slat. Return to the table of contents</a>
Sewing of Roman curtains
To sew folding curtains you will need the following materials: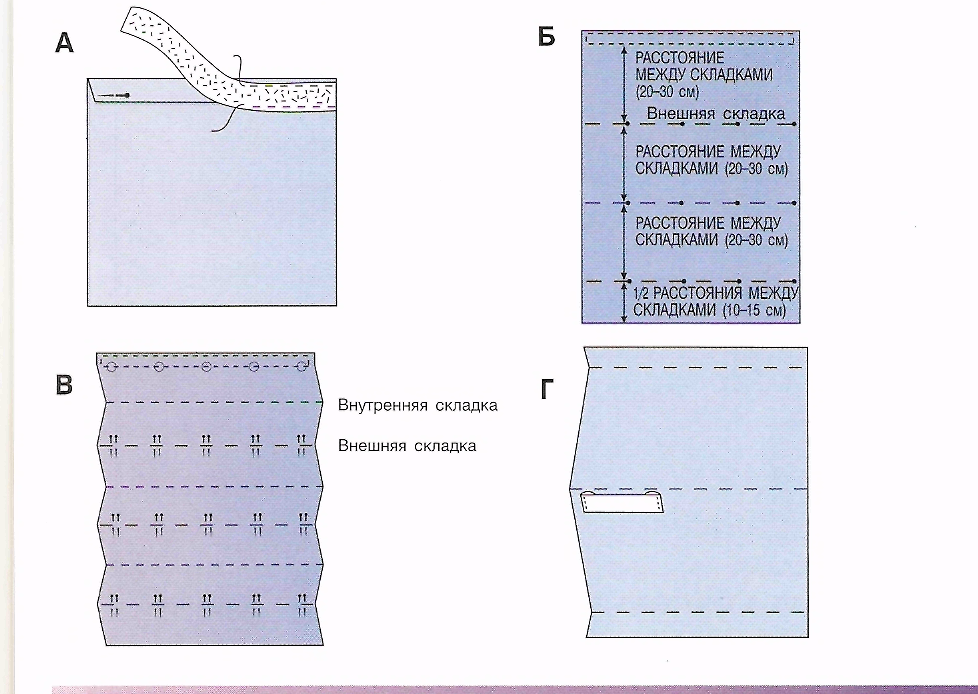 Scheme for making a Roman blind.
- the main and the back fabric (non-woven fabric);
- gasket for kulisok (in case of sewing curtains of a thin material);
- reinforced threads;
- Reiki (can be replaced by a flexible metal or plastic rod);
- rings and cord;
- stoppers for the ends of the cord.
To make the pockets stitchturned out neat, use a special foot of the sewing machine. It is designed to form drawstrings and sew on cords. And to form places for fastening the slats at an equal distance from each other, you will need a guide ruler, which is attached to the carriage. The pockets for fastenings are reinforced with a lining (non-woven or interlining). If this is not done, the fabric stretched over the slats will quickly become unusable. It is wiser to use reinforced threads or threads with silk fiber for sewing. Then the curtain will serve you much longer. This rule also applies to the manufacture of curtains from non-woven materials. It is not necessary to make a pattern for Roman curtains separately. All the necessary marks can be applied directly to the fabric with tailor's chalk or a piece of dry soap. If you are sewing a curtain with a lining, you can cut out both panels at the same time. The fabric is folded in 2 layers, the marking is applied only to 1 panel. Then both pieces are cut together. Cutting and sewing a curtain from non-woven materials (polypropylene tablecloth) is no different from making a curtain from traditional fabrics. But it is worth remembering that such a canvas will have holes from needles and pins. Therefore, it is not recommended to pin or baste them beforehand. Return to the table of contents</a>Making a Roll Up Curtain Fold bothPlace the canvases face to face and pin them around the perimeter. Make a stitch approximately 1 cm from the edge of the fabric. First, stitch the bottom edge of the curtain, then the side cuts. The top remains open. If you have chosen a thin material for sewing curtains, then the allowance is cut close to the stitching. The workpiece is turned inside out. The edges are ironed. Please note that a curtain made of non-woven material cannot be ironed. In this case, it is enough to run a fingernail along the entire length of the seam. The curtain is stitched along the seams at a distance of 0.5 cm from the edge. In this case, you can use threads of a contrasting color. Next, form the pockets for the strips. First, you need to make a drawstring for the lower weighting rail. From the bottom edge of the curtain, measure a distance equal to the width of the strip plus 0.5 cm. The allowance is folded to the wrong side and stitched. It is wiser to use a double stitch. This will make the whole product more reliable. Then mark the locations of the crossbars. It is better to apply the marks on the front side of the curtain, then the stitching will be neater. Next, sew on the bias tape or curtain tape. They will form the drawstring into which the rail will be inserted. Usually, the width of such tape is 2.5-3 cm. Lastly, process the upper edge of the curtain. Fold the allowances to the wrong side, pin and iron. The width of the fold should be 2-2.5 cm. Apply half of the Velcro tape on the wrong side and stitch it, grabbing the fabric allowance. In this case, the edge of the Velcro should protrude above the edge of the curtain. The rails are inserted into the pockets of the completely finished curtain.
