In order to create beauty and comfort in the apartment,there is no need to spend a lot of money on expensive furniture and household appliances. As a rule, in order to radically change and refresh the interior in the hall or bedroom, the simplest and most accessible materials that are available in any hardware store are enough. Such material is plasterboard. It can be used to make arches, columns, suspended ceilings, walls, partitions and all kinds of shelves. The combination of various unique properties made it an indispensable material for DIY repairs and construction. Plasterboard shelves will give the room an individual design and will also help to get rid of furniture that takes up a significant amount of space.
Properties of gypsum board
Gypsum plasterboard is a productconsisting of two strips of thick mounting paper and a solid gypsum-based plasticizer between them. GKL has many unique features. Thus, it has the following advantages:
- environmental Safety;
- flexibility, allowing the creation of curvilinear structures;
- affordable price;
- ease of processing and installation;
- absence of thermal expansion;
- water resistance after appropriate treatment;
- incombustibility;
- the possibility of equipping lamps of various types;
- strength, allowing to withstand a significant load.
By installing plasterboard shelves in the hall, you can not only decorate it, but also hide some defects and unevenness on the wall. Return to contents</a>
Place of the plasterboard shelf in the interior
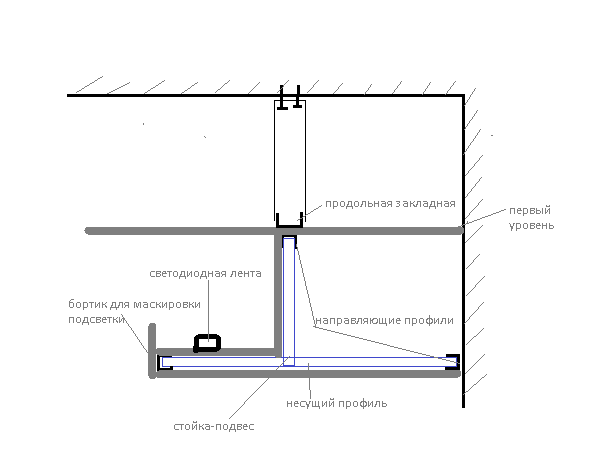 Scheme of a niche made of plasterboard with lighting.Using plasterboard products, you can not only get rid of furniture that takes up a significant amount of space in the hall, but also create an individual design of both color and shape. Wall shelves can be used to place photographs, souvenirs, vases and flowers on them. Larger wall shelves can be used to place books and magazines or as a stand for an aquarium or household appliances. Plasterboard shelves can be made in a variety of shapes. The most common options are:
- niches in the wall for a TV or related equipment;
- protruding volume frames;
- Angular straight and curved constructions;
- arches;
- vertical and horizontal bends.
Plasterboard shelves located on the wall,can perform both practical tasks, serving as a base for placing various objects, and purely aesthetic ones, being a decoration and an integral element of design. Thus, semicircular shelves located below similar suspended ceiling structures will look very good in the hall. In order to install plasterboard shelves on a wall or partition in the hall, basic construction skills and tools that are in every apartment are enough. Return to contents</a>
Tools and materials
Before starting work, a drawing is madeshelves. The drawing can be done on a sheet or a personal computer can be used for this. The project determines the location of the plasterboard shelf on the wall so that it looks harmonious against the background of the interior of the room. When the project is completed, the materials are calculated and the tools are prepared. To make a shelf for wall or floor mounting, you will need the following tools: Tools for making plasterboard shelves.
- perforator;
- Screwdriver;
- Bulgarian;
- a hammer;
- belt-grinding machine;
- building level:
- knife;
- scissors for metal;
- roulette;
- pencil;
- spatulas 8 cm and 20 cm;
- sandpaper;
- paint brush.
The tool must be checked and completed. The list of materials required to perform the work is relatively small. It includes:
- galvanized steel CD and UD profiles;
- arched profile;
- GCR thickness from 8 mm to 12 mm;
- reinforcing mesh;
- self-tapping screws for metal;
- dowels or anchor bolts;
- aluminum or plastic corners;
- starting and finishing putty;
- liquid primer;
- finishing material.
If the shelf is to be backlit, then the calculation and purchase of electrical wiring, lamps and switches is carried out. Return to the table of contents</a>
Mounting of the frame from the steel profile
The frame must support not only the weightfinishing material, but also the weight of the objects that will stand on it. This must be taken into account when mounting it on the wall. The frame for the shelf in the hall is mounted in the following order: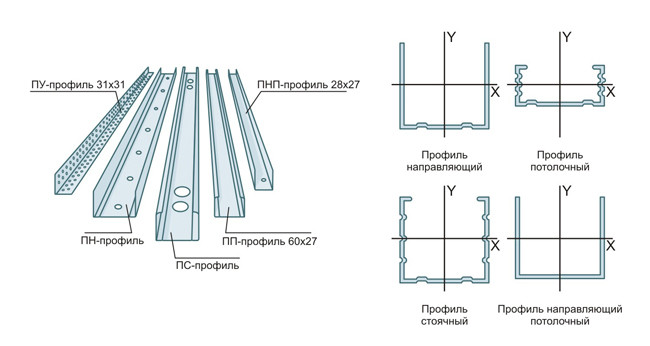 Scheme of frame assembly by mounting galvanized profile under plasterboard.
Upon completion of installation, the strength of the frameis checked by pressing on it from different sides. If the structure meets the strength requirements, then the electrical wiring is installed inside it in a special protective box. Return to contents</a>
Skeleton casing
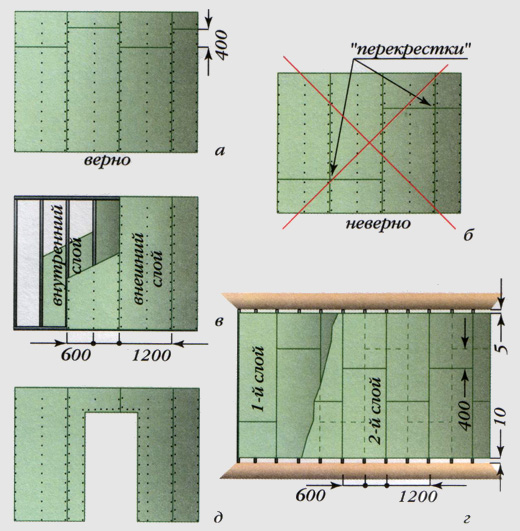 Scheme of correct joining of plasterboard sheets.In order to avoid mistakes when preparing blanks from plasterboard, it is recommended to make a template for each of them. Newspapers, sheets of Whatman paper or wallpaper are suitable for this. Only after careful adjustment can you apply the pattern to the sheet of finishing material and cut out the part. This can be done using:
- sharp knife;
- hacksaws for wood or metal;
- jigsaw.
The finished fragment is placed on the frame andis screwed to it with self-tapping screws for metal. Their heads need to be sunk into the surface by 1-2 mm. Fragments of the gypsum board of a curvilinear shape are moistened and, after achieving the necessary flexibility, are attached to the profile. After drying, they can be processed. Excess material protruding beyond the edges of the frame can be ground off using a belt grinder. Finer grinding of the edges is carried out manually with sandpaper. Return to the table of contents</a>
Surface Finishing
In order for the shelf surface to be smooth and durable, its finishing is carried out. It consists of the following: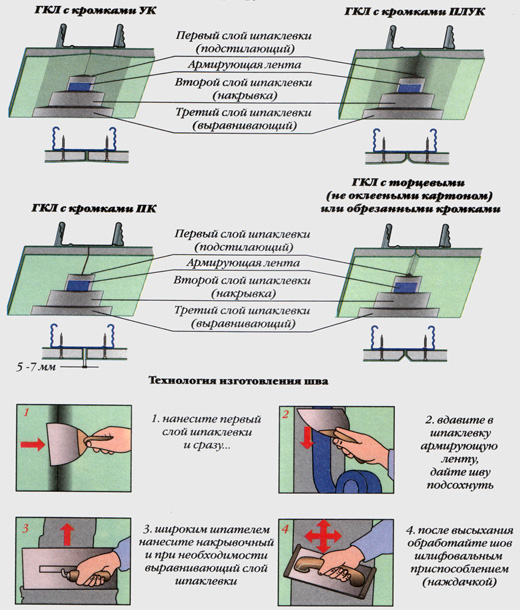 Scheme of plasterboard joint filler.
The finishing touches are complete, we can move on to decorating. Return to Contents</a>
Decoration of structures from GKL
The hall will have a presentable appearance.only if all the interior details look organic and match each other. To do this, the created shelf needs to be finished to match the surrounding environment. This can be done using the following materials:
- oil, acrylic or water-based paint;
- wallpaper or colored paper;
- paintings;
- mirrors;
- tiles;
- mosaic;
- decorative plaster;
- stained-glass windows;
- natural or artificial stone;
- application.
The bottom of the niche should not be made darker than the wall,which it is placed, it is better to make it a little lighter. A good visual result is given by backlighting a shelf on the wall. With the help of various types of lamps, you can give the room a rather elegant look. The wiring for the lamps is installed immediately after the frame is made. A plastic box or corrugated hose is used for its laying. Spotlights and LED strips are used for backlighting. To enhance the visual effect, you can use lighting devices of various power and color ranges. This will make the wall even more beautiful. With the help of such a unique material as plasterboard, you can create structures of absolutely any shape that your imagination is capable of.</ ul>


