To revive the general interior, it is enough to decorateapartment with all kinds of accessories that can be placed on the shelves of existing furniture or on other buildings. In order not to spend extra money, it is quite possible for everyone to make and install shelves on the wall with their own hands. At the same time, you can come up with your own unique design and form, you can use the most incredible materials. But first of all it is necessary to understand what kinds of shelves are divided into a wall.  Scheme of fixing the shelf to the wall.
How to make and install
This piece of furniture designed forplacing many items, can significantly save the total area of the room. Since shelves made of different materials are manufactured, they perfectly match any style. All of them differ from each other in different parameters. Back to contents</a> The difference between furniture products 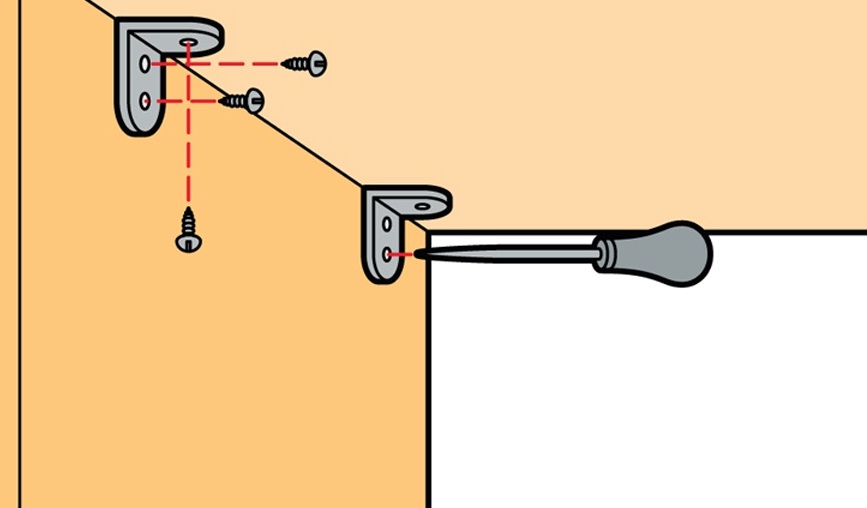 Scheme of mounting fasteners for fixing the shelf. Shelves by design can be the following:
- for books, that is, only books and magazines are placed on them;
- for the bathroom: designed for various hygiene products, made of waterproof material (plastic, glass, ceramics, steel);
- for the kitchen, that is, for food, so the material should be as natural as possible (wood);
- for universal use: accessories and other accessories.
Also, the shelves differ in location. For example, the corner is placed only between adjacent walls, the usual one - anywhere in the wall, the built-in is installed in the niche, and the suspension one, respectively, is suspended to the ceiling or wall by means of twine, rope. The material can be used quite different. The most commonly used is a tree: natural, chipboard, MDF, plywood, veneer. If you perform additional varnish treatment, the service life is increased. With wooden products it's enough to work, but they look elegant and modern. 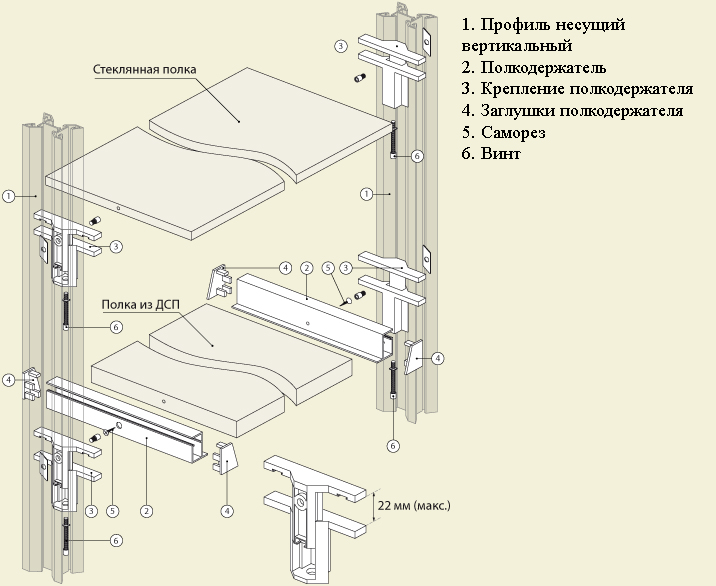 The scheme of installation of glass shelves. The shelf on the wall of plastic has a small weight, so it can be installed on the weakest wall. Thanks to a wide range of finishing materials, it can be given any appearance: from wood to stone. The plastic is perfectly bent, so the shape can be different. Metal products are durable, but not every interior is combined with them. Glass looks great, but it's quite problematic to make such models on your own. As well as wooden shelves, simple in manufacturing are products from gypsum cardboard which can be finished with a paint, a paper, thin veneer sheets. According to the design of the shelves are:
- a simplified console that has a plane fixed by an angle or bracket;
- with walls only on the sides;
- with a wall at the rear;
- with walls at the back, sides and top;
- multi-tiered;
- decorative, that is created exclusively by the imagination of man.
Especially multi-tiered species can have a combined design, where vertical, horizontal, and asymmetric planes will be combined. Back to contents</a> Creating and mounting To the shelf on the wall,with their own hands made, possessed the required qualities, you must first carefully think through: to present a shape, dimensions, choose a place and purpose. 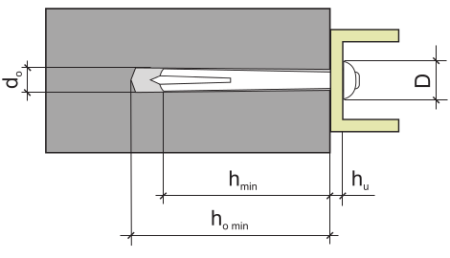 Shelf mounting scheme using dowels. Even if you do not have experience in the drawing business, you still need to draw a drawing where the parameters of each plane will be calculated. This does not require special knowledge. If you assume that the items intended for the shelf will have a significant weight, then choose the appropriate material. Let's say that plastic does not work in this case. Before you start making shelves on the wall, take care of the appropriate tools that you will definitely need:
- drill and screwdriver;
- The grinding machine or sandpaper of different granularity;
- building level;
- carnations, screws or screws;
- ruler, square and pencil;
- material for the shelf;
- dowels;
- bracket.
Particular attention should be paid to the creation of shelves fromwood, because it must be properly treated with a special tool sold in the store. A well-dried board should be carefully ground, treated with a mortar and then given it the necessary shape. Classic shelves are made very simply. To do this, transfer to the board the appropriate measurements, cut it and go through the places cut. Suppose you have a two-section shelf, so you need two pieces of horizontal and three vertical. To connect them together, take the screwdriver and, having folded the horizontal part with the vertical, screw the screws from both sides. Do the same on the other side. Now connect the rest of the vertical drill to the center. Two sections for books are ready. Then the finished shelf is covered with varnish, stain or paint. If you choose a stain, then the product will have the natural color of the wood used. After complete drying, the shelf is strengthened on the wall. You can do this by hanging it with loops, which are made in advance, on the dowels, or in another way. For example, on the bracket. In the wall it is necessary to drill holes with a drill, whereupon the dowels are screwed into it. First, one bracket is hung and checked for strength by pressing. After that, the second one is installed, and the shelf itself is suspended. Note that the dowel-nail should be 6 to 10 cm long. And for each wall there are certain dowels. The model of this type of furniture can be different, but the principle of connecting parts and mounts is the same. Experts recommend nothing to be afraid of and boldly get down to work. Because the shelf, made by own strength, will always bring joy to everyday life.


