Drywall has long occupied its niche in the market.It is deservedly popular, as it is a universal material that can be attached to walls or ceilings or used as a partition. However, depending on the installation location, the installation methods will change, and various tricks will appear that must be taken into account when carrying out work. Drywall is used to level walls andceilings in the room. can be done in several ways: on a metal or wooden frame or on glue. Each method has its own advantages and disadvantages. It is worth considering them in more detail.
Wall mounting by wireframe: necessary materials and tools
This method is applicable to any premises.regardless of their size and purpose. The frame is used to close walls and ceilings, as well as to erect partitions from gypsum boards. It is worth noting that the lathing is assembled almost identically in all cases. Nomenclature of profiles for gypsum board. At the initial stage, it is necessary to prepare all materials and tools. To carry out the work, you will need:
- perforator;
- Screwdriver;
- a hammer;
- mounting knife;
- Self-tapping screws for wood or metal (depending on the material of the crate);
- scissors or hacksaw for metal;
- drywall;
- profiles or slats;
- mounting hangers;
- pencil;
- level;
- roulette;
- plumb bob;
- gon.
Return to Contents</a>
Wall preparation and foundation marking
Important! Preparation of the base includes cleaning the wall from easily peeling coatings, repairing significant damage, and removing deformations.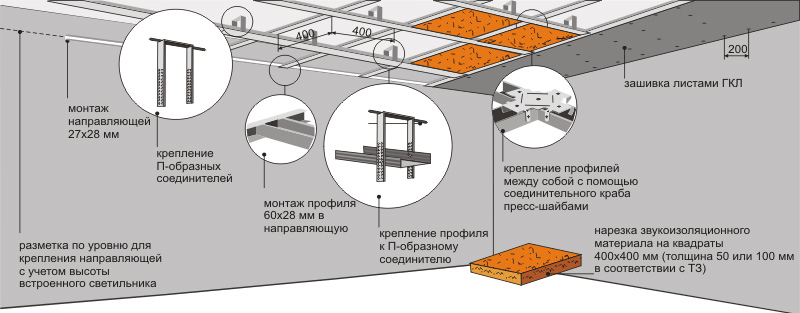 Scheme of a single-level plasterboard ceiling.The next step is marking. It is necessary to make an indent from the wall to be closed at a distance necessary for laying communications and insulation. Next, the location of the guide profiles located on the floor and ceiling, as well as on the walls, is marked. All guides must be in the same plane. Then it is marked where the rack profiles will be located. The distance between them should be 40-60 cm. In this case, it is necessary to calculate the distance so that the edges of the plasterboard sheets lie on the profiles, and do not fall into the gap between them. Return to the table of contents</a>
Mounting of the frame for GKL
Next, the frame is assembled.First of all, the guide profiles are installed on the floor and ceiling. The reliability of the entire structure will depend on them, so they must be fastened very carefully. The profiles are installed using dowels with a pitch of 40-60 cm. Then, the guides are installed on the walls in a similar way. Scheme of fastening of metal frame underplasterboard. Then plumb lines are mounted to the wall along the line of the supporting profiles. The step is 60 cm. It is desirable to shift the plumb lines relative to each other on adjacent lines. You can arrange them in a checkerboard pattern. This will give greater strength and rigidity to the structure. Next, the rack profiles are inserted into the guides and moved to their places. They are attached to the guides and to the plumb lines. Self-tapping screws can be used for this operation. If the plumb lines have “ears”, they should be screwed inside the frame. After installing the vertical profiles, proceed to installing the transverse ones. All operations are performed in a similar manner. If the profile is too long, it can be cut using a hacksaw or metal shears. If, on the contrary, it is short, then it is necessary to extend the length using special connectors. The lathing from wooden bars is assembled in a similar manner. Return to contents</a>
Installation of GCR on the walls
The last step is to install the drywall.However, before proceeding to the final stage, it is necessary to solve the issue of noise and heat insulation of the room. Mineral wool, foam sheets, cork can be used as insulation. All these materials absorb sound well. Installation of communications, laying of engineering systems is carried out before the walls are covered with plasterboard. When the room is insulated and all communications are connected, you can start installing the sheets. For this, you will need self-tapping screws for metal. Important! The plasterboard is drilled every 30-40 cm to all frame profiles. During installation, the following rules must be observed: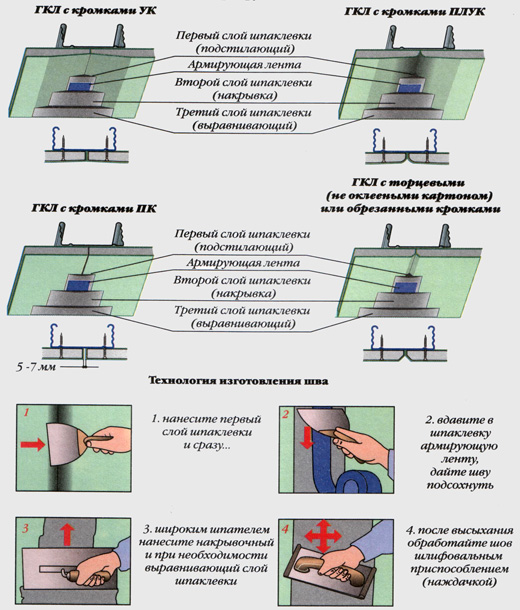 Scheme of processing plasterboard seams.
Return to Contents</a>
Pros and cons of this type of drywall installation
This method has many more positive aspects, and it is used more often:
- even walls with significant swings, pits or protrusions are leveled;
- all flaws in the ground are masked;
- reliable fastening of plasterboard;
- there is no need for thorough preparation of the foundation, its leveling, etc .;
- possibility of additional warming and soundproofing of the room;
- absence of "wet" operations;
- can be used in any room.
There are only three main disadvantages:
- reduction of the area of the room;
- low maintainability;
- For GKL there is no solid wall.
If assembling the frame seems too much of a hassle, you can try simply gluing the material to the walls. Return to Contents</a>
Fastening of plasterboard on glue
It is not always possible to glue plasterboard. It can only be used if the following conditions are met: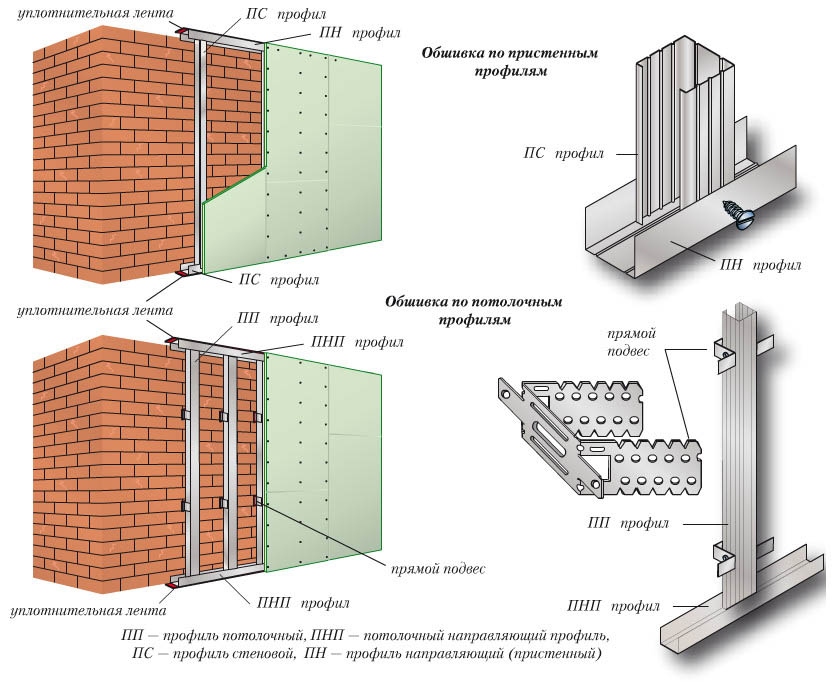 Scheme of wall covering with plasterboard on a metal frame.
If at least one of these is not metconditions, it is better to use the frame method of fastening. You cannot glue plasterboard to the ceiling: in this case, the lathing must be used. One of the special advantages of this type of installation is the saving of space. It is very convenient in small rooms. Return to the table of contents</a>
Pre-treatment of walls
 Wiring installation diagram for plasterboard.Before gluing the plasterboard, it is necessary to lay out the wiring. All cables must be recessed into the walls, into the grooves. You can also cover the wires with special cable channels. To glue the plasterboard, you need to prepare the walls. They need to be cleaned of wallpaper, old paint, dirt, dust and oil stains. If necessary, smooth out large depressions. Then dry. To improve adhesion and reduce the moisture absorption properties of the walls, they should be treated with a special primer. It must also dry. Only after completing all the preparatory activities can you begin gluing the plasterboard. Return to the table of contents</a>
Required materials and tools for gluing the material
To carry out the work you will need:
 Scheme of fastening plasterboard sheet to the frame.The gluing method will depend on the characteristics of the base. This will affect the materials used. If the differences do not exceed 5 mm, then gypsum putty will do just fine. The work is carried out as follows. The sheets are trimmed so that after gluing there is a gap of 10-15 mm to the floor, since the drywall will be installed on the trim pads. The fact is that gypsum glue needs air to dry. Subsequently, the trims are removed, and the gap is sealed with a sealant. This is necessary to prevent the GKL from absorbing moisture from the floor or from the screed. The sheets must have communication holes. To ensure that the hits are as accurate as possible, it is best to trim after gluing the previous sheet. Gypsum putty is applied to the prepared material along the perimeter and in the center with a notched trowel. This will prevent the material from sagging and allow it to be installed on the wall evenly. If something is attached to the wall, such as a shelf, it is better to apply the adhesive in a continuous layer. Then the sheet is lifted and attached to the wall. To make it easier to take the sheet, you can put it on a plank flooring. Align the protruding parts, for this you can use a board and a hammer. When the adhesive dries, you will need to putty the joints between the sheets and seal the gap where the pads were. For uneven walls, you will need a special glue "Perlfix". It is applied in heaps over the entire panel at intervals of 250 mm. Then the plasterboard is lifted and attached to the wall. For alignment, use a level, a ruler and a board with a hammer. You can apply markings to the floor and ceiling to make it easier to align the material and ensure that the panels are in the same plane. In fact, there is nothing complicated in this work. First, you need to think everything through, calculate, and only then do it.</ ul>


