Redistribute interior space betweenusing traditional materials is not easy at all. You need to have special skills and a margin of time. Meanwhile, everyone can do it. If the future partition is planned with a doorway, the process will not be too complicated.  The scheme of the device of a partition from a gypsum cardboard with a door aperture: 1 - a vertical bar, 2 - a horizontal brace, 3 - a door beam, 4 - a ceiling beam, 5 - gypsum cardboard, 6 - a floor bar.
Tools and materials
Before you make a wall with plasterboard lining, you need to prepare everything you need to do the work. List of tools:  Tools for working with plasterboard.
- perforator;
- level, plumb bob (better laser osepostroitel or level);
- a marking cord;
- marker;
- roulette;
- scissors for metal;
- prosector;
- Screwdriver;
- a hammer;
- knife;
- gypsum plasterboard hacksaw;
- slabs on plasterboard;
- a hacksaw on wood;
- cushion with cuvette;
- drill with a mixer;
- spatulas;
- grinding grid holder.
List of materials:
- galvanized profiles;
- wooden bars;
- dowels "quick installation";
- self-tapping screws;
- a heater (noise isolation);
- soundproof tape;
- drywall;
- primer;
- putty;
- grinding mesh;
- ribbon-serpyanka.
For the device of partitions, profiles of 2types. UW profiles are used as starting profiles. These are U-shaped elements with straight edges. The width of the base varies from 50 to 150 mm in increments of 25 mm. Shelf height is 40 mm. The thickness of used for the manufacture of galvanized steel for quality profiles is from 0.6 mm.  The device of a two-leaf sliding partition: a - general view, b, c - nodes of the partition construction: 1 - plywood, 2 - filler, 3 - bar, 4, 5 - joints of two door leaves. The same thickness should have the steel used for the manufacture of CW racks. They also have a U-shape, but the edges for increasing the stiffness are bent. Each UW width corresponds to the same CW rating. In fact, the CW is 1.2 mm narrower to go between the starting shelves. The height of the shelves of the rack elements is 50 mm. The bars are selected in such a size to fit tightly inside the CW. That is, for a 50 * 50 mm rack, the cross-section of the beam should be the same. Elements of greater width make sense to choose for placing inside the wall construction of insulating materials or engineering utilities. Many people do not consider soundproof tape as an obligatory accessory, but it allows to considerably reduce the transfer of vibrations from building structures to the partition. The tape is glued to the outside of all used start profiles. The need for the use of insulating materials is determined by the appointment of adjacent rooms and the number of plasterboard layers in the cladding. In general, mineral wool materials are used as heat and sound insulation. Popularity is gaining use of cellulose insulation (ecowools). Back to contents</a>
Structure of the frame
 Diagram of the installation of the frame of the doorway. To mark the location of the future partition, it's enough to mark on the floor 2 points near the conjugated walls. With the help of a plumb or laser instruments, they are transferred to the ceiling. Intermediate points are marked along the laser beam or stretched between the extreme cord. Connecting the ends of the lines on the wall and ceiling determines the location of the starting profiles on the wall. Before fixing the UW around the perimeter of the partition, the position of the future opening for the installation of the door unit should be noted. If the door with the box is already on the object and its exact width can be measured, the opening is made to the size of the box with a margin of 1 cm per side. At installation the gap is filled with mounting foam. In the opposite case it is necessary to repel the nominal width of the web. To it is added 10 cm. The excess clearance is blocked by the casing of the door. It can be selected with a width of 5 to 7 cm. The block is not placed close to the adjacent wall. To install a complete clypeus, it is necessary to retreat at least 5 cm. The height of the opening is chosen in a similar way. This is either the height of the block plus 1 cm, or 205 cm. The last value is due to the standard height of the cloth of 2 m. When measuring, the mark of the clean floor should be known. When installing doors without a threshold, it must be taken into account that a gap is left between the floor and the fabric. In general, it should be 10-15 mm. For some rooms it is increased.
 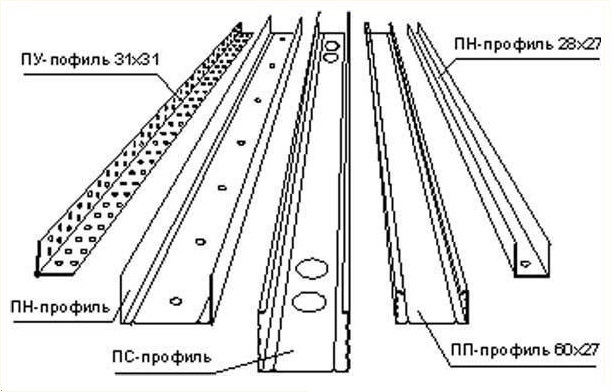 Profiles: ceiling - PP, directing - PN, partitions, rack - PS. In kitchens and rooms where boilers and gas columns are installed, the gap for normal airflow is about 5 cm high. In the opening, the lower starting profile is not attached. Throughout the rest of the perimeter it is fixed with dowels or self-tapping screws, depending on the material of the adjacent floor, walls and ceiling. The holes for the dowels are drilled by the perforator through the profile. You can hammer a nail of dowels in a stopper with a hammer, or it is possible to punch in percussion mode without rotation. The racks are placed in the frame vertically with a step of 60 or to increase the stiffness of 40 cm. When filling the structure with insulating materials, it is more convenient to increase its rigidity by setting in increments of 60 cm of paired CW profiles. They are placed by the necks to each other and are twisted by screws in 30-40 cm, forming an I-beam. The connection of UW and CW is performed without self-cutters by the cutter. When using self-tapping screws on the front surface of the frame, their hats protrude, which prevent the wall from making even due to poor fit of the sheets.
 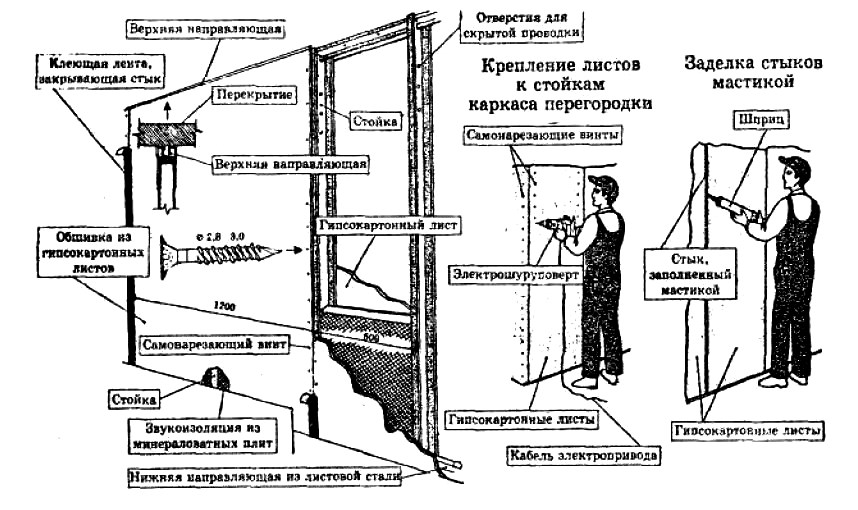 Scheme fixing drywall on the partition. Horizontal CW is added when it is necessary to increase the height of the sheets at their joints. But the joints are placed in unison. That is, whole sheets are pressed through one, then to the ceiling, then to the floor. With a double-skin plating that is performed with a shear of sheets, the horizontal inserts are placed in a mirror manner both from the ceiling and from the floor. On the perimeter of the opening elements CW are installed. In them a bar of a suitable section is got and fixed by screws from the side of the opening. The presence of the beam significantly increases the rigidity of the structure and facilitates the installation of the box. Sometimes, to ensure the rigidity of the entire construction of the beam, they are inserted into each frame frame. Back to contents</a>
Skeleton casing
Plasterboard sheets are screwed with screwsmetal with the head "under the pot." For the first layer, self-cutters of 25 mm length are used, for the second layer 32 mm. All joints of sheets of both layers must fall on the profiles. With a two-layer skin, the joints of the sheets move relative to each other to the next profile.  Scheme of puttying gypsum board joints. The setting pitch of the screws is 20-25 cm. The tightening torque must ensure that the self-tapping screw is immersed 1 mm behind the sheet plane. Screws are screwed without inclination, perpendicular to the skin. At an oblique entry or scrolling, the screw is removed and screwed about 5 cm along the indent. The sheet is fixed on all elements of the frame, both internal and external. Cutting sheets is done with a knife along the guide. The cardboard is cut from one side, and on the second sheet is broken. When cutting through the sector, one of the cuts is made by a hacksaw. Part of the plating falling into the opening can be cut off with a hacksaw directly in place. After performing a one-sided plating inside the frame, the networks are laid and heat and sound insulation is installed. Mineral wool materials are inserted between the frame racks. Ecowool is applied glutinous. Back to contents</a>
Additional instructions
When the finishingshpatlevochnye work, you need to apply the sheets with a facet. When the sheets are stacked vertically and there is no factory chamfer on the upper and lower ends, it is performed independently. To do this, use a special plane for gypsum board or just a knife. The chamfer is removed by 2/3 of the thickness of the sheet. Before the putty joints are primed. On the dried joints, a suture band is glued and a putty putty is applied with a spatula. After setting the putty it is grinded with a special net. To the profile of the frame with the bars inserted in the middle, the box is easily screwed with self-tapping screws. Smooth vertical surfaces allow you to quickly and accurately set the box in the opening. It is enough to be guided by the alignment of planes and the uniformity of gaps. Follow the instructions and the wall with plasterboard plating with the door will turn out solid and tidy. </ ul>


