Contrary to popular belief, wallpaperingceiling - a fairly simple task. When starting this work, the main thing is to know its basic rules and follow some recommendations that will help achieve the best result. Pasting must be done by at least two people, because it is almost impossible to do such work well alone. The process is preceded by a certain preparation of the surface, which significantly affects the final result.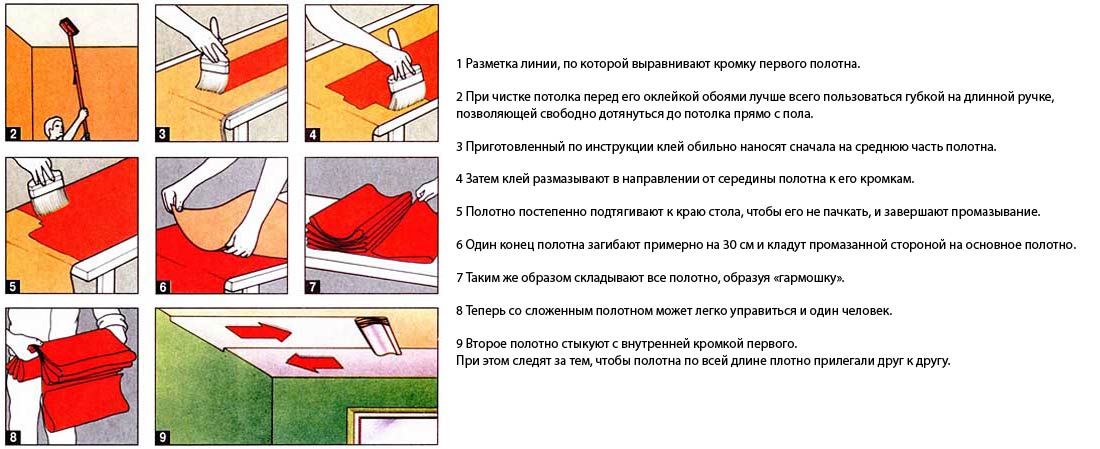 Scheme for gluing wallpaper to the ceiling.
Material selection and surface preparation
When choosing wallpaper for covering the ceiling, pay attentionattention to the coatings specially designed for this surface. Such wallpapers have a higher density compared to ordinary wallpapers, as well as relief, which allows you to mask the irregularities on the surface to be pasted. It is best to choose the glue depending on the type of material from which the wallpaper is made. Do not save on glue, because good adhesion of the material to the surface will ensure the durability of the repair. Before pasting, you should thoroughly clean the ceiling from previous coatings: paint, whitewash, wallpaper. Then all existing irregularities are rubbed with putty, priming is carried out. As a primer, you can use either a specially designed mixture or glue pre-diluted with water. The surface dried after priming is completely ready for pasting. It is imperative to turn off the electricity, and also eliminate the presence of unwanted drafts by closing all windows and doors. Return to the table of contents</a>
Sequence of work
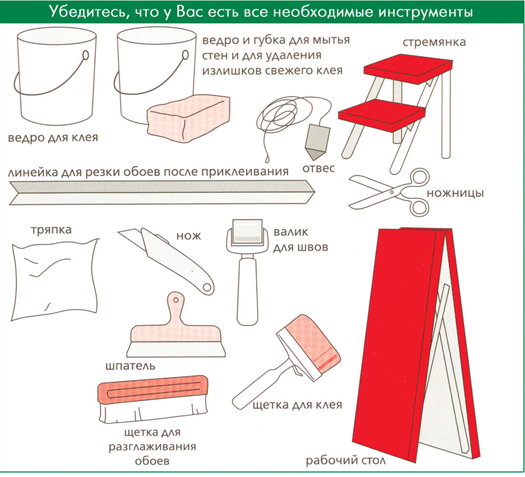 Necessary tools for wallpapering. To properly wallpaper the ceiling, you will need the following tools and devices:
- roller;
- roulette;
- stationery knife;
- rag;
- ladder-ladder.
First, the length is measured using a tape measure.ceiling, because wallpaper is usually glued along its length, not width. Having received the necessary measurements, it is necessary to cut a strip of the required size with a stationery knife. In this case, you should make a reserve of several cm, the excess of which will subsequently be cut off. Next, the remaining strips are cut in the same way, the number of which must be calculated based on the size of the room. It is best to prepare the glue some time before starting work. After applying the adhesive, the material is folded several times and left for 5-10 minutes. You can apply glue directly to the ceiling, and leave the wallpaper dry, this method is convenient due to the fact that a wet strip is quite difficult to apply evenly to the ceiling. It is better to start from the corner near the window. Glue each strip end to end with the edges of the previous one, the extra cm remaining along the wall are immediately cut off with a stationery knife. When applying the strip to the ceiling, you need to carefully smooth it out with a soft cloth to avoid swelling and bubbles on the surface. The ceiling light is disconnected from the wiring and removed. After gluing the strip, a small hole is made in the place where the wiring is located. The socket of the light should be larger than the hole in order to completely cover it later. Wallpapering the ceiling does not require special skills and abilities, so you can easily handle this work yourself. By following the necessary rules and sequence of actions during repairs, you can achieve a pretty good result.</ ul>


