The ceiling of gypsum board is becoming more and moreis actual, because such a system is able to hide all the irregularities of the overlap, even if they are very impressive. In addition, the appearance of such ceilings can be very diverse, the master is able to implement various design solutions: it is permissible to mount a flat base or multi-level structure that will have a complex shape. As an additional advantage of the ceiling from gypsum board it is possible to supplement it with built-in lighting fixtures and decorative lighting. Under the thickness of the material, in the hollow space of the ceiling from the gypsum board can be laid thermal insulation panels, which will fulfill the additional role of sound insulation. The system is mounted quite simply, and there will not be much money spent on it.  Suspended ceiling from gypsum cardboard is able to hide all unevenness of the overlap, even if they are very impressive.
Preparing before starting the installation
Before the installation of the ceiling of plasterboardit is necessary to measure the room, which will allow you to design the frame structure and understand how to properly place the material webs. The step between the sheets of GCR and the main overlap will be determined by the irregularities and dimensions of the built-in lighting devices. The following materials and tools must be prepared for the work: 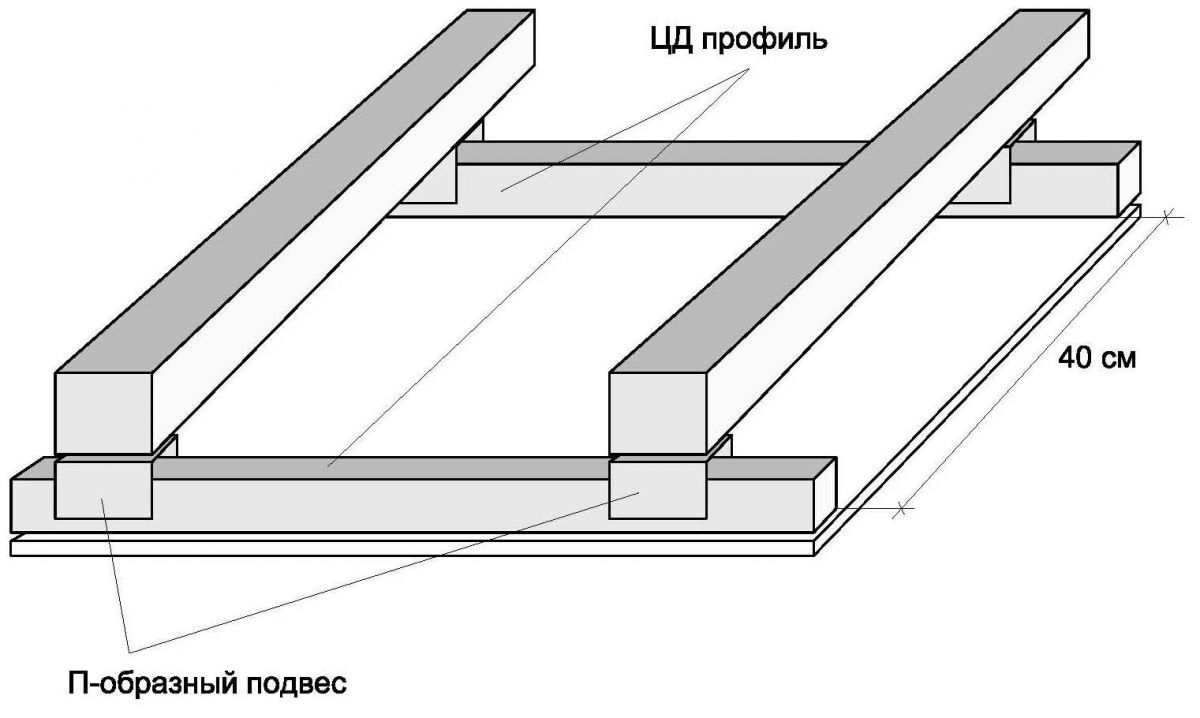 Fastening of plasterboard.
- GCR;
- guide and bearing profiles;
- a primer;
- screws intended for work on metal;
- hangers and connectors;
- reinforcing sickle;
- dowel-screws;
- screws for working with plasterboard;
- finishing putty;
- roulette.
- the Bulgarian;
- water level;
- cutter for profiles;
- Pull out cord;
- perforator;
- screwdriver.
- rule;
- scissors for work on metal;
- a hammer;
- drill;
- knife for drywall;
- putty knife;
- grinding grater.
Back to contents</a>
Technology of work
 Scheme of a simple false ceiling from plasterboardwith illumination. Stretch ceilings are also able to hide communications and surface irregularities, however, only professionals who have appropriate equipment in the arsenal are engaged in installation. Therefore, if you have not yet decided what type of ceiling system to choose, the above circumstance should be taken into account. To begin with, a guide profile is to be fixed on each wall along the perimeter of the room. In order to ensure its strictly horizontal location, you should use the water level for work. Lay a flat line on the marks made will allow a padded cord. The required distance from the base ceiling should be postponed to the lowest corner of the room. After the chopping cord should be as tight as possible between the marks, somewhat to remove from the wall and release, at the moment of impact on the surface will remain a clear trace. This line is useful in order to establish a guide profile. It must be fixed to the wall by means of "quick installation". For this purpose, holes must be made in the body of the wall, using a puncher, the distance between them must be 40 cm. In the fixed guide profiles it is necessary to attach the carriers, it is necessary to mark the points of their installation with a marker.
 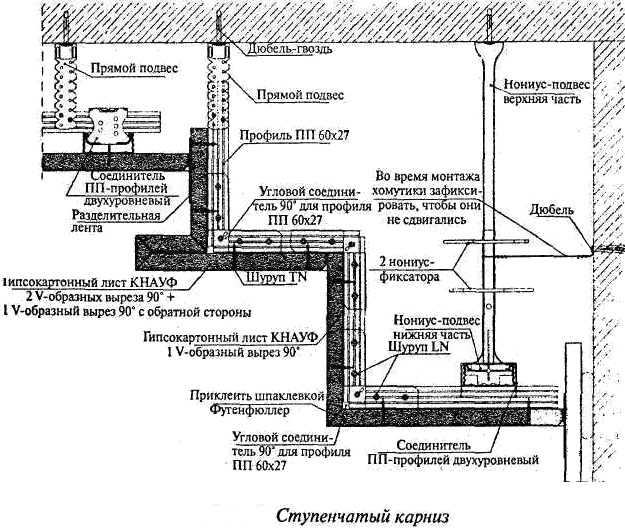 The arrangement of a false ceiling located inthree levels. When assembling the suspended ceiling from gypsum board, it should be taken into account that the webs should be joined in the central longitudinal line of the supporting profiles, this will ensure a reliable fastening of the system. The central longitudinal lines of the bearing profiles should be removed from each other by a distance of 60 cm, this is due to the width of the coating sheet, which is equal to 120 cm. The installation of the starting bearing profile should be made by retracting from the wall 60 cm. On the surface in the center of the bearing profiles, they must be located at a distance of 80 cm, using the technique described above, "fast installation." For each suspension, it is necessary to equip the ceiling with two holes using a perforator. Installing a false ceiling, you will encounter the need for cutting profiles. This should be done using a Bulgarian. After the element is installed in its place, it should be fixed with screws to the guide profiles, as well as to the suspensions. In order to screw the fasteners it turned out to be a simpler task, it is necessary to use cutters, in advance preparing holes in the steel profiles. Avoid the effect of subsidence of the carrier profiles by using a thread, which you need to pull in the center of the room, placing it at an angle of 90 ° with respect to the profiles. Installation of all carriers of the remaining profiles is carried out according to the technology already described. The area where the chandelier is fixed should be strengthened by mounting jumpers from the supporting profiles. If the system assumes the presence of a ceiling curtain intended for curtains, then the areas of future fixation of the named element require similar strengthening.
  Scheme of a two-level plasterboard ceiling.When installing a suspended ceiling, some craftsmen are faced with a problem expressed by the insufficient length of the canvases for the width of the room. In this case, in the places of mating of the sheets, it is necessary to mount jumpers from the bearing profile, which are fixed with self-tapping screws by means of single-level connectors like crabs. should be mounted in such a way that the material canvases are located "at a distance" or, in other words, in a checkerboard pattern. At this stage, we can assume that the frame is ready for further work. Back to the table of contents</a>
Installation of gypsum boards
Ceiling with light at the stage of fastening sheetsmaterial involves the use of self-tapping screws designed to work with plasterboard. You can use this method, which involves marking the location of screws, you need to do this on the one hand. To ensure that the fastening cap does not break the blade at the moment of screwing, just a little immersed in it, you must correctly adjust the tool screwdriver or use a specially designed nozzle that has a stop. You can see an illustration showing how to properly place the fastener when fixing the drywall to the profile. Cutting of sheets is made by means of a knife and an aluminum rule. In this case, you need to use a special cutting technology. With a knife next to the rule, you need to cut a layer of material from one side, then turn over the sheet and hit it a little to cut it off, then bend it a little and then cut the second layer of the canvas with the bend. After the sheets have been installed, joints where there are special chamfers, must be glued with a "sickle", while using a mixture of putty and spatula. Processing is subject to the wells left from the fasteners, they have to be covered with putty. After the putty gets strength, it is necessary to plaster all the base of the material, use a grater. If necessary, the mixture can be applied in several layers, this will give an ideal surface. Completion of finishing grinding should be accompanied by the beginning of priming, but beforehand it is necessary to rid the surface of dust with a dry brush. Back to contents</a>
Installation of lighting equipment
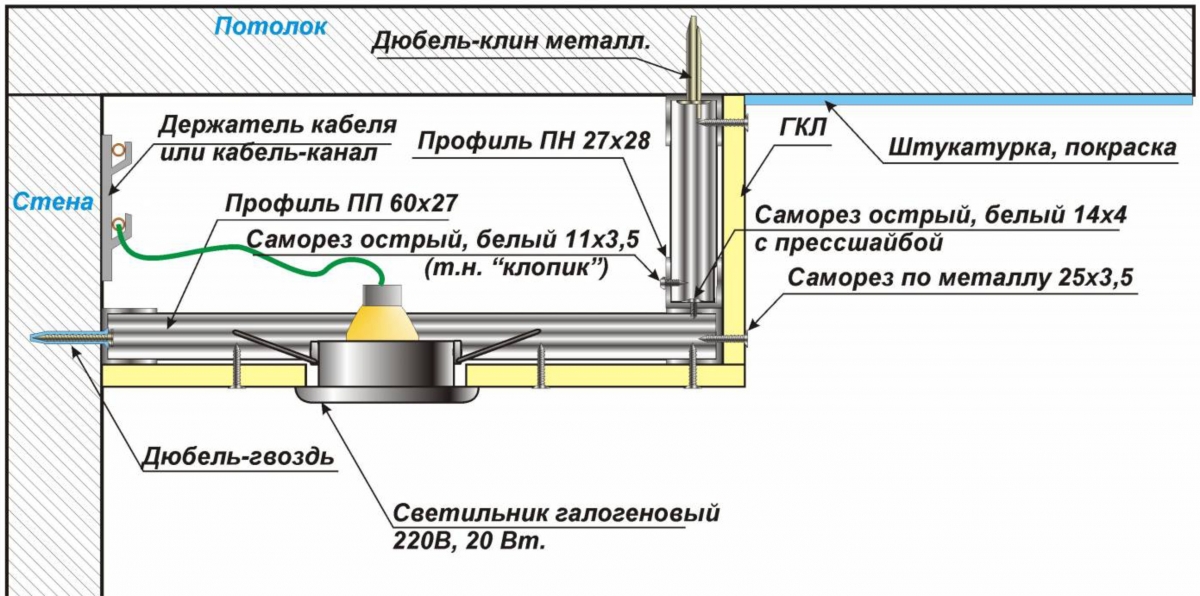
In order for the ceiling to be illuminated,In advance it is necessary to connect the built-in equipment by a method of a lining of electroconducting. In those places where it is supposed to locate devices, it is necessary to equip the holes of the required diameter, the last of which must correspond to the dimensions of the luminaire. Use a drill with a crown. Through the hole, it is necessary to partially remove the padded wire, to which the device is connected by connecting contacts. If 12 V bulbs are used, a step-down transformer is required. The mounting strip of the lighting fixture must be fixed with self-tapping screws through the plasterboard to the installed profiles. If you plan to install a multi-level system with illumination, then its installation should be done with adjustable suspension of different lengths, which will allow you to adjust the height of the levels. Back to contents</a>
Features of LED strip installation
The illumination of the ceiling can be represented andLED strip. It can be cut only at special places that are marked by the manufacturer. For pairing several tapes, you can connect via LED connectors. But you can also solder the tape with a soldering iron. The described illumination should be chosen so that the power supply unit has a reserve of 30% power, otherwise it can not be avoided premature combustion. The backlight is attached exclusively to the insulating material.


