If you have an old table that has become worn out over timehas lost its former appeal, do not rush to get rid of it. Any furniture that has outlived its usefulness can be given a second life, for example, restore a table using the fabric decoupage technique or decorate it with a mosaic of coins. To decoupage the table, you can use three-layer napkins, photographs or newspaper clippings.
Tissue decoupage of a wooden table
You will need:
- the cloth;
- PVA glue;
- brushes;
- ground on wood;
- acrylic lacquer;
- rubber roller;
- white acrylic paint;
- sandpaper.
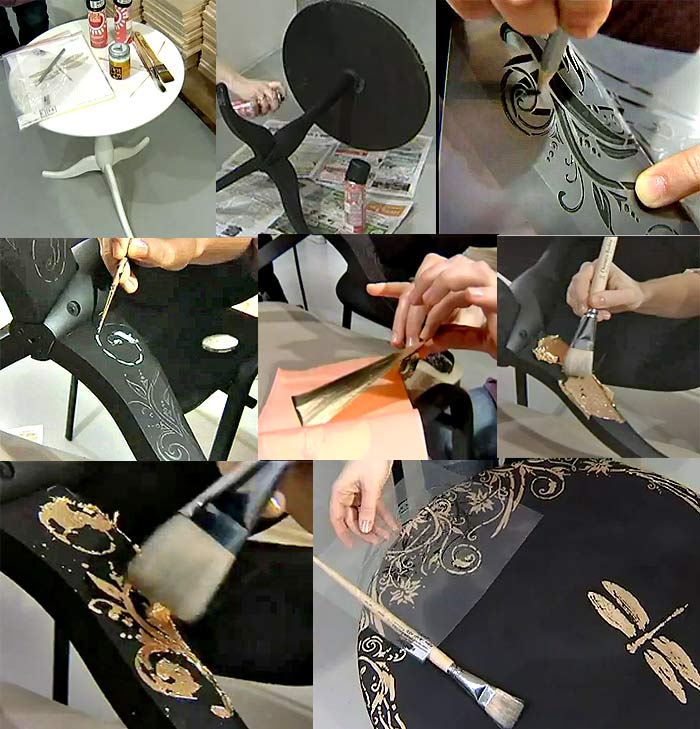 Stages of painting a table using a stencil.Decorating a table using fabric decoupage technique is quite simple. First of all, you need to prepare the surface. If the old table is not very damaged, you can limit yourself to redoing the tabletop. If the furniture has an unpresentable appearance, it is better to redo it completely. First, you need to get rid of the old paint and varnish coating. The surface of the table is sanded with sandpaper soaked in water. A special tool called a scraper (sold in construction departments) is also used. Instead of a scraper, you can use a piece of broken glass, with its help the varnish is scraped off the surface, then sanded with sandpaper. After the old varnish is removed, proceed to priming the table. For this purpose, a special primer is used, intended for a wooden surface (can be replaced with an artistic one), applied in a thin layer with a brush. Next, the table needs to be painted with acrylic paint in any shade that is present in the pattern of the material. The tabletop will be decorated with fabric, so it is painted white, which will create a background and advantageously shade the texture of the material.
 Stages of table decoration with mosaics.Then the tabletop is coated with PVA glue, covered with fabric, and then smoothed out with a rubber roller, moving from the center to the edges. After about 15 minutes, the fabric is glued again, left until completely dry, and if necessary, the edges are trimmed with a sharp knife or scissors. After this, the surface is glued 2-3 more times. The next day, the result is fixed with acrylic varnish, which is applied 3-5 times with mandatory intermediate drying. If you notice that the varnish has not laid evenly, and in some places layers have formed, then this problem is eliminated with sandpaper soaked in water. After which the surface is varnished again. For this purpose, it is very convenient to use aerosol varnish, it is sprayed in a thin layer at a distance of 30-40 cm from the surface. If you apply a thick layer of varnish at once, then streaks and bubbles will appear, which is extremely undesirable. To avoid the spray nozzle from sticking, turn the can upside down at the end of the work and press the pump until the remaining varnish is completely sprayed. The sides of the table can be decorated with furniture trim tape, a cord with tassels or fringe. Glue the decor with a glue gun. Return to the table of contents</a>
Decoration of a coffee table with coins
 To give the coins an antique look, they are first painted with gold or silver paint. You will need:
- coins;
- bitumen antique;
- car lacquer;
- universal glue for mosaic;
- acrylic paints;
- grout for seams.
You can remake a table with your own hands usingmosaics. Let's look at an example of decorating with ordinary coins, which you can turn into antique ones. To age coins, you need to paint them with gold, copper or silver acrylic paint (it's better to use aerosol paint). After it dries, apply antique bitumen, and after about 10 minutes, wipe off the excess with a cloth soaked in vegetable oil. The bitumen should remain only in the recesses and along the edge of the coin. After that, mix blue and green acrylic paints, then take a foam sponge and lightly go over the surface (in some places). This way, you get the effect of patination (imitation of old metal). To make rust, you need to mix red, yellow and brown paints until you get a reddish tone. Then apply the resulting shade along the edge or center of the coins. After that, you can tint the surface with bitumen again, and also apply gold paint in places. Here it is important to use your imagination and not to overdo it with the material, the main task is to achieve the maximum aging effect. The result is fixed with car varnish in an aerosol. The coins are prepared - this means you can start the mosaic. The surface of a plastic or glass table is degreased with an alcohol solution, a wooden one is sanded with sandpaper, then primed. Glue is applied directly to the coins, gluing them from the edge to the center, moving in a spiral (if the surface is round or oval). A square or wooden table is decorated in rows in a checkerboard pattern. After the glue dries, the seams are filled with tile grout. Instead of coins, you can use regular mosaics, shells, pebbles or broken colored glass. Return to contents</a>
Table in the style of a bungalow
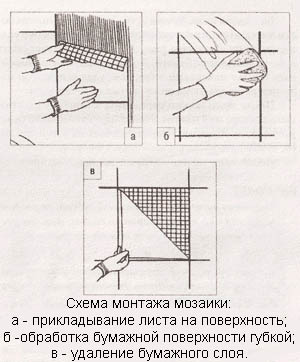 Mosaic installation diagram. You will need:
- seashells, pebbles;
- 4 slats made of thick bamboo;
- sheet of plywood;
- thick treated glass;
- twisted hemp rope;
- glue gun;
- double sided tape.
If you have collected an impressive collectionseashells, then you can make a DIY table remodel in the bungalow style. First, you need to cut a sheet of plywood to the size of the coffee table, paint it in a suitable shade. Then, using a glue gun, install a frame of thick bamboo slats on it, let the glue dry well. Mask the ends of the plywood box with twisted hemp rope - just glue it with a glue gun. Stick double-sided foam tape to the tabletop of the coffee table, attach the plywood box to it. Place shells, pebbles, starfish or corals in the middle, cover the structure with thick shockproof glass. If you bought glass with untreated edges, then no problem, buy stained glass tape with an adhesive base in the craft department and decorate the edge. Instead of shells, you can use minerals, dried herbs or painted cereals. A wonderful bungalow-style table is ready!</ ul>


