Plastering is a construction phase that isin most cases it turns out to be necessary for high-quality wall decoration. In addition to leveling, plaster also strengthens surfaces. And how firmly the solution itself will adhere to them depends on how carefully it was carried out.  Preparation of walls for decorative plaster.
Permissible thickness of plaster
Despite the fact that a quality solution aftercongealing is a fairly strong material, it should not be applied to a wall with a thick layer, as it will not stick to the surface. Building regulations determine how thick the plaster layer should be on the wall when it deviates from the vertical plane. The requirements are as follows: 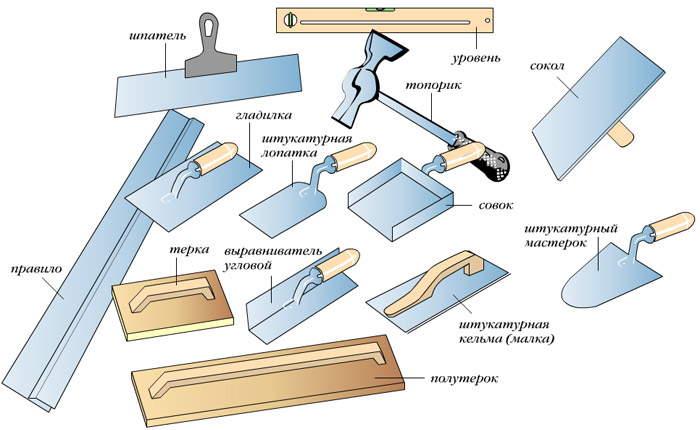 Tools for plastering walls.
- if the deviation of the surface is up to 1.5 cm to the height of the room or not more than 0.3 cm per meter of height, then the thickness of the layer from the ordinary solution can not be more than 1.2 cm;
- the thickness of the improved solution when applied to an uneven wall can be no more than 1.5 cm if the curvature of the wall along the vertical does not exceed 1 cm to the height of the room or 2 mm to each meter thereof;
- high-quality mixtures can be used for wall deflection up to 0.5 cm (for the height of the room) and 1 mm (for each meter), with the layer not exceeding 2 cm in thickness.
It should be noted that with great curvaturesurfaces will have to take measures for their preliminary alignment. This process can be carried out by applying several layers of cement-sand mortar, however, its consumption will increase significantly. Back to contents</a>
Strengthening plaster reinforcement
In addition, to equalize the wall you need andThe reinforcing mesh, which will improve the adhesion of the solution to the surface. For this purpose, a slab or other metal mesh with 1 x 1 cm cells can be used.  Preparation of wooden surfaces for plastering. To the surface made of bricks, such reinforcement is fastened with nails, which can be hammered into the seams. This method of fixing is less laborious and more expensive than fixing the mesh with dowel-nails, screwed into the masonry. Nails should be driven with some deviation from the plane perpendicular to the wall. On concrete walls, the grille is attached to the valve releases. Otherwise, it is screwed to the plane of concrete with a dowel-nail. The mesh itself is sprayed with cement milk. It creates a film on the wire through which rust will not appear afterwards, and the grip of the mesh with the solution will be better. Metal mesh is used not only for wall leveling, it should be used also when the layer of plaster layer can be more than 4 cm. Back to the table of contents</a>
How to prepare the wall
However, before grating on the surfaceIt is necessary to remove defects: cracks, deep depressions, etc. Before sealing some cracks, you need to make sure that they do not increase. To do this, between the opposite sides of the gaps in the wall are installed beacons from gypsum, mortar or paper, which are monitored for a certain period. If the beacons break, then it is necessary to repair the wall or its base, eliminating the cause of the crack. If there are no changes on the indicators, the cracks are cut off by the scar. They should look like expanding grooves, so that they can be embedded as deep as possible in the grooves. Before embedding, large holes are treated with a primer. 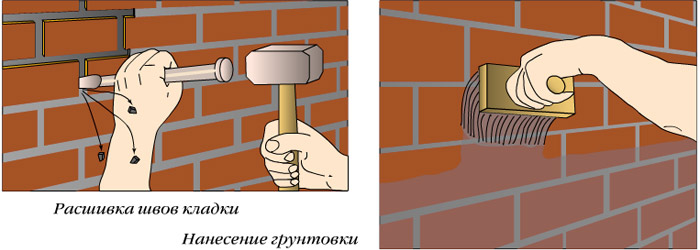 Preparation for plastering: jointing and primer application. From the walls are removed dirt, traces of old paint, dust. Surfaces can be treated with a solution of HCl (3%), after which the residues of impurities and acids are washed off with water. There is also a way to clean the walls of fat layers, in which their absorbent fatty clay. Plastered with a thick layer, it interacts well with the deposits. After drying, the clay is removed. Probably, for qualitative removal of fat it is necessary to put clay repeatedly. It must be said that the fat spots on the walls do not always disappear. They can so deeply penetrate that over time they will penetrate through the plaster and even through the finish. To anticipate a similar result, the "fatty" fragment is best cut down by the puncher to the required depth, and then the mortar is sealed with a solution. Before installing the grate, the wall is impregnated with a primer. So, for preliminary cleaning of the walls for subsequent plastering it is necessary to prepare:
- perforator;
- scarlet or chisel;
- a hammer;
- putty knife;
- steel brush;
- capacity with a 3% solution of hydrochloric acid;
- brush or roller;
- a container with water;
- a primer;
- cement for the preparation of cement milk.
Back to contents</a> Beacon Installation  Mounts for lighthouses for plastering. Aligning the plane of the walls for subsequent plastering today can not be imagined without beacon profiles. Having installed them, even an average hand the master can perform high-quality work. When using beacons, more trouble is associated not so much with stretching the solution over the wall as with their correct installation. This procedure does not require physical effort, but only patience and accuracy. Before mounting beacons a plane is built. To do this, 2 cords are stretched vertically in the corners of the wall. Their verticality is checked by a plumb line. The cords are attached to the screws screwed into the dowels hammered into the wall. Profiles are attached to the surface by gypsum. Between them stretch horizontal threads, which will become a reference point for the other beacons. The distance between the profiles should be somewhat smaller than the length of the rule for equalizing the solution. Back to contents</a> How to prepare smooth walls Even if the walls are notneed a preliminary leveling and reinforcement, preparation for plastering is also carried out on them. Masonry made of porous elements (like slagblock) is better than other surfaces to adhere to the mortar, but even it requires some preparatory procedures.
 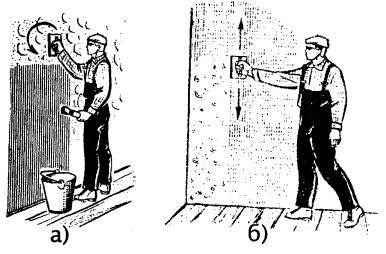 Scheme of grout plastering: a - round, b - anointing. First of all, seams are cut in it (with a scarp to a depth of 1 cm, the solution between the bricks is removed). Then remove the dirt, and apply a primer. It is more difficult to plaster the concrete surfaces and walls, laid out of smooth bricks or blocks. To prepare them for plastering, you need to make a number of incisions, directed in different directions. The grooves in the walls are made by a puncher, an ax, a chisel or a chisel. Short burrs are cut out on the bricks, and on the concrete the length of each notch should not be less than 5 cm, and the depth - less than 0.5 cm. Once again it is worth mentioning the need to remove the paint layer from the surfaces, which is either cut down or heated with a construction hair dryer and removed spatula. The worst contact with plaster is a plane covered with oil paint. And yet sometimes it is not possible to completely remove it from the wall. In this case, a maximum of notches is made on the painted area, and the surface itself is treated with concrete contact. Back to contents</a>
Preparation of wood and clay surfaces
Plastering is carried out not only on concrete orbrick walls. The solution covers clay and wooden surfaces. Preparation of wooden walls for plastering is carried out with the help of reinforcing mesh, and shingles. Of wooden slats, each of which is 1-2 m long, a 2-layer crate is made. The first layer is filled with prostitution. For it, slats with a thickness of at least 3 mm are used. They are nailed to the wall with thin studs up to 4 cm in length. The step of the rods is about 5 cm. The slats are located at an angle of 450. It is not necessary to drive the nails into the slats by the very head, after the next layer is pulled out they are pulled out. 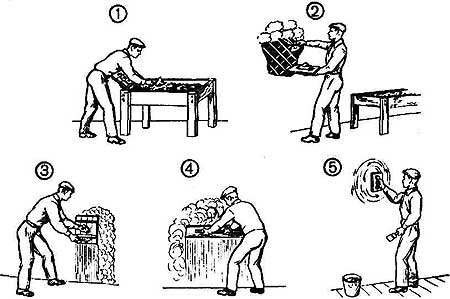 Wall plastering scheme: 1 - picking up the mortar on the falcon, 2 - applying to the wall, 3 - leveling the falcon, 4 - leveling with a half-hook, 5 - grouting the plaster. The upper (exit) shingles consist of smooth slats 1.5-2 cm wide. It is attached perpendicular to the elements of the previous layer. First, the slats are nailed at the edges. Nails are driven at an angle. Their point is directed to the ends. In this way, the proper tension of the rails is carried out. The remaining nails can be driven through 2 prosthetic bars and perpendicular to the wall. Before nailing, shingle should be soaked that it does not split during installation. You need to leave a gap between the ends of the slats, so that they, changing in size with a change in humidity, do not cause cracks in the plaster. Similarly, clay surfaces are prepared, but they must first be cleaned of whitewash or another coating. It should be noted that clay does not work well with sand and cement plaster, so the crate must be firmly attached to the base. Instead of grating from shingles it is better to attach a metal mesh to the wall. For its installation, it is necessary to use nails 8-10 cm long. They are not driven to the end: the rest is bent, so that the nail better presses the reinforcement against the wall. Instead of a reinforcing mesh, you can use a wire that stretches between hammered nails and wraps around their hats. In this case, the fastener is staggered in steps of 50 cm. Back to the table of contents</a>
How to prepare external corners
Particular attention in preparation for plasteringshould be given to the outer corners of the walls. These are the most problematic areas that need to be strengthened. They are sheathed by a profile or reinforcing grating. In order to decorate the corners evenly, before they are plastered, a wooden strip 10 cm in width must be nailed to the wall perpendicular to the surface to be treated. The rule will be based on it when the solution is leveled, therefore the projecting part of the strip must be in the same plane with the beacon profiles. After the plastering of the wall, the strip is removed and fixed on the treated plane. Now it serves as a guide for finishing the abutting surface.


