Glass is a fairly common material nowfor making various interior items. Shelves and decorative inserts in the floor, doors and tabletops are made of thick tempered material. Glass is suitable for making tabletops like no other material: it is easy to clean, is not subject to corrosion and does not deteriorate from moisture, and does not interact with the chemicals of modern detergents.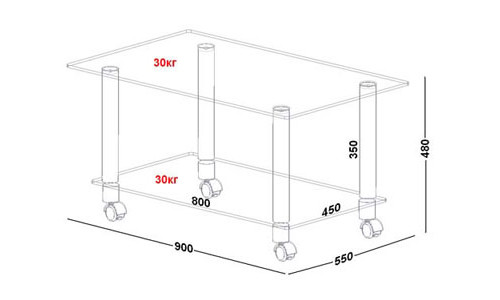 Glass coffee table diagram.Glass tabletops are often used for coffee tables. The disadvantage of these products is their rather high cost, which is why many people are interested in how to make a glass one.
What will it take to work with glass?
The complexity of the material means that the craftsman must have special tools for processing glass:
- diamond or roller glass cutter;
- pliers with special lining on the lips;
- drill or grinder, grinding wheels, felt wheel;
- emery stone (carborundum stone).
In addition to these essential tools for a glazier, other materials will be needed: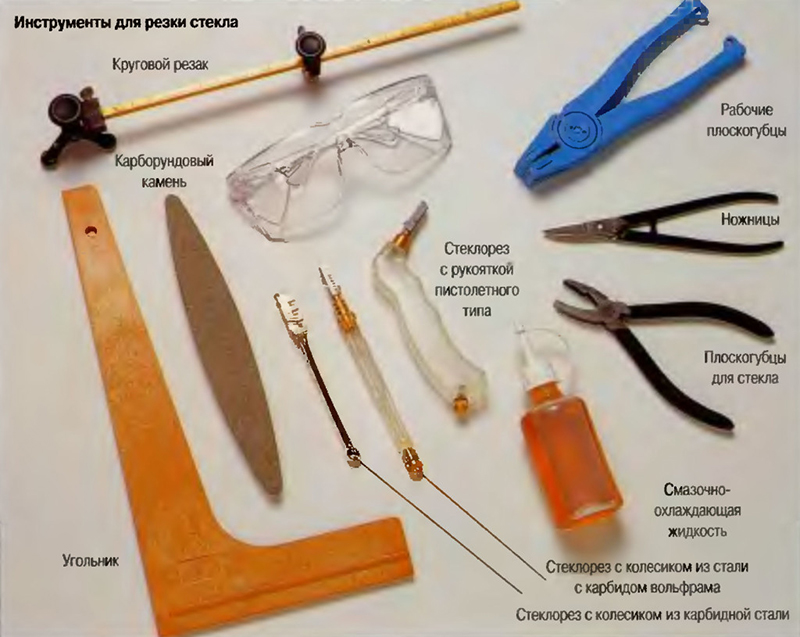 Tools for working with glass.
- sheet glass tempered about 1 cm thick;
- the plywood is thick;
- glue "glass-metal";
- GOI paste, grinding;
- mittens, eye protection glasses.
Before starting work, you will need to developsketch of the product, make a template from thick wire or fiberboard. For the first experience, it is better to prefer a simple tabletop shape (rectangle, triangle). Return to the table of contents</a>How to cut glass?For a beginner who wants to, there is a good tip for determining the force of pressure on a glass cutter: practice on household scales, pressing them several times to remember the force that will move the pointer to a value of about 2 kg. After that, you need to get your hand in a little on unnecessary pieces of glass, learning to draw a line with a cutter with constant pressure. To cut, place a piece of glass on a flat surface, laying a dense, non-textured fabric under the glass. Lubricate the wheel of the roller glass cutter with any liquid oil (vegetable, machine). Straight cutting is done along a metal ruler in the direction from the far point to yourself with constant, equal pressure on the tool. Glass cutting patterns.If the cutting line is not clear, the glass is lightly tapped from below along the line with a metal object or the head of a glass cutter. After this, the cut is aligned with one of the edges of the table or the straight edge of the surface on which the cutting was made and the part that you want to remove is pressed with one sharp movement. This may result in sections that go beyond the cutting line. To remove them, use pliers with rubber pads or a special notch on the head of the glass cutter. All cuts of the tabletop are processed in several stages:
During grinding workIt is necessary to take care of safety precautions: put on protective glasses and gloves. The surfaces to be treated are constantly wetted or ground under running water. Finally, the cuts are polished with a grinder with a felt wheel, having applied GOI paste to it. The treatment is carried out until a characteristic glass shine is achieved. Return to contents</a>
Glass table making
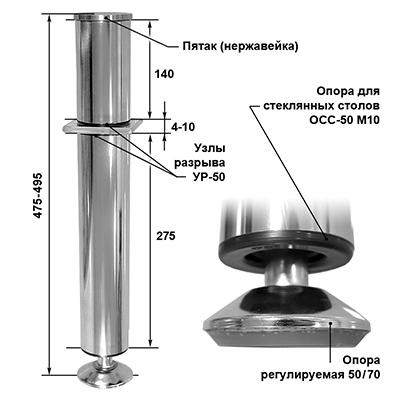 Figure 1.Scheme of a metal support for a glass table. The finished tabletop can be put aside for now and you can start constructing a support for it. The simplest options include purchasing and attaching a set of metal legs (universal supports for glass tables. Fig. 1) and a set of suction cups for glass. The places where the legs are attached are marked and degreased with acetone or another solvent. The legs are placed so that the distance from the cuts to the attachment is within 8-12 cm, and from the corners 15-16 cm. Drill the upper ends of the supports with a drill whose diameter corresponds to the diameter of the suction cups. Insert the suction cups, fixing them with universal glue. Place the tabletop on a flat surface, press the suction cups tightly to it at the marked places. To increase the reliability of the fastening, you can use glue, applying it to the places where the legs are attached. Turn the table over, lightly tap the attachment points with a rubber mallet and place a weight on the tabletop. After 48 hours, the glue will have completely set and the glass coffee table will be ready for use. Another option for the support could be a prefabricated structure made of plywood or laminated chipboard 20 mm thick. The support parts are shown in Fig. 2. You need to cut out 2 parts of each type and connect them like a children's construction set, placing the cuts on the rectangular parts into the cuts on the square parts. The dimensions of the parts can be arbitrarily changed depending on the desired dimensions of the table. Apply universal glue suitable for glass and wood to the upper ends of the support, lay the tabletop and press it with a weight for 24-48 hours. Return to the table of contents</a>More Glass Table Ideas
 Figure 2. Assembly diagram of a plywood support.To create a glass coffee table, you can use various materials at hand: old window frames, bottles, driftwood or stones, etc. Unusually shaped bottles can be used to make excellent legs for a glass tabletop. To bring this idea to life, you will need:
- 6-8 identical bottles;
- 3-4 foam balls or balls from ping-pong;
- 3-4 wooden sticks, coinciding with the inside diameter of the neck of the bottles;
- 6-8 squares of foam plastic with a side of 20 cm and the same with a side of 16 cm;
- newsprint, paint, varnish, universal glue.
For each leg you need 2 bottles.Using wooden sticks that fit tightly into the neck, they are connected, while simultaneously putting a ball with a hole of a suitable diameter on the connection. The foam squares are glued together 2 pieces at a time, larger with smaller, placing them on top of each other. The structures made of bottles and squares are pasted over with newspaper, dried for a day or two and the squares are glued to the bottoms of the bottles from above and below. This produces a leg, as shown in Fig. 3 (1). It can be painted with acrylic paints and varnished. For a triangular table, you need to make 3 legs, for a square table - 4 (Fig. 3 (2). The tabletop is glued with universal glue and left under a load for 48 hours. For another option, you will need: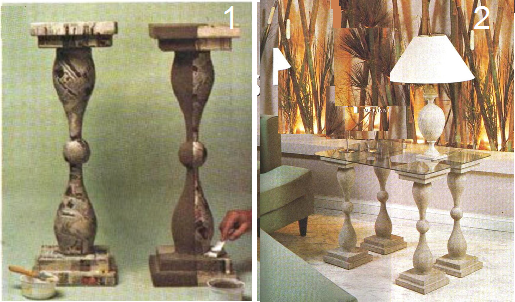 Figure 3. Making a coffee table: 1 - painting the legs, 2 - gluing the table top.
- old window frame;
- shanks for shovels;
- decorative elements (shells, pebbles, etc.);
- hemp cord;
- glue;
- Particleboard or board.
Clean and paint the frame.Cut the handles according to the height you need for the coffee table. Cut 8 cm long and frame-wide strips from chipboard or board. Drill 4 holes for screws at the corners of the strips and closer to one edge - for the screw that attaches the handle to the strip. Screw the screw through the hole into the end of the handle; you can strengthen the fastening with universal glue. Fasten the strips with the legs attached to the screws at the corners of the frame, taking into account that its deeper side should form a rim under the tabletop. Wrap each handle with hemp cord, fixing the turns with glue. Place the decor on the glass frame and glue it. Place the glass tabletop on top of the "box" with the decor and secure with glue or "liquid nails". On top of the tabletop you can make additional decor from a cord tied in a nautical knot, shells, etc. Tables with glass tabletops look elegant and weightless. Having the ability not to look bulky, they will be appropriate in the interior of a relatively small room.</ ul>
