Today, many home craftsmen create unusualceiling decor with your own hands, without involving expensive specialists in this process. Even 1.5-2 decades ago, the only way to finish ceilings in a living space was whitewashing, then ceiling wallpaper and tiles came into fashion, allowing you to create a simple ceiling design with little financial investment. Decorative plaster allows you to create patternsof various shapes. Nowadays, the methods of finishing ceilings of the past are rarely used during renovation. Whitewashing, tiles and wallpaper have been replaced by suspended and suspended ceiling structures of various colors and configurations. However, even the most expensive ones do not suit all owners of apartments and houses. There are many people who additionally decorate them using modern decor methods.
The application of stucco elements to the ceiling
 Photo 1.A ceiling with stucco elements looks extravagant and unique. One of the most popular methods of decorating a ceiling is stucco, that is, decorating it with special relief template elements (skirting boards, rosettes, moldings). Rosettes are elements installed at the base of a chandelier and creating a single stylistic ensemble with it. Moldings are used to zone a room, decorate the borders of arches, fireplaces, and mirror surfaces. The varied design of moldings allows you to create a complex and unusual ceiling decor. Skirting boards (baguettes) are a type of molding, but they look stricter and more laconic than the latter. Skirting boards clearly delimit the space between the walls and the ceiling, and also hide the upper edge of the wallpaper from prying eyes, which often has an imperfect appearance. Stucco elements allow you to add sophistication even to the most ordinary ceiling, making it an extravagant and unique detail of the room's interior. All relief templates can be purchased ready-made in finishing materials stores and used to decorate the work surface yourself. Most of these templates are made of lightweight materials (polystyrene or polyurethane) and are attached to the ceiling surface using liquid nails. They can be used both individually (for example, decorate the ceiling with only baseboards) and to create a complex ensemble with their help, carefully thinking through the design (photo 1).
 Tools for decorating the ceiling.People often ask how to decorate the ceiling correctly using relief elements. To carry out this process, a home craftsman will need to stock up on all the necessary tools and familiarize himself with the main stages of installing stucco. To decorate the ceiling, you will need the following tools and devices:
- elements of stucco molding;
- a simple pencil;
- sharp knife;
- liquid Nails;
- ladder.
The ceiling on which they will be mountedrelief decorative elements, should be perfectly smooth. It must first be cleaned of dust and cobwebs. Having prepared the work surface, proceed to the installation of the moldings.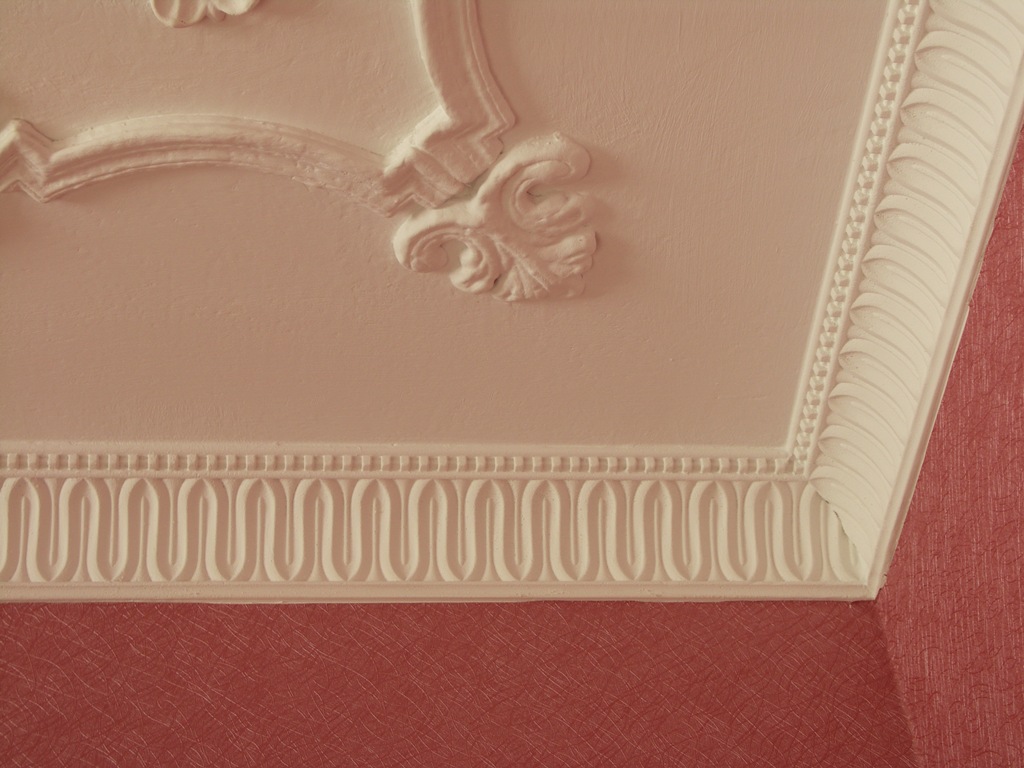 When the stucco on the ceiling is completely dry, it can be painted in any shade.
When the stucco on the ceiling is completely dry,if desired, it can be painted in any shade. Relief elements covered in gold or silver look especially good. When choosing paint, it should be taken into account that polyurethane structures can be covered with any paint, and for polystyrene parts, only water-based paint should be purchased. When cleaning, the stucco can be wiped with a damp cloth. Return to contents</a>
Decorating surfaces with stickers
You can use special ones for thisvinyl stickers with original patterns or drawings. This method of decoration has become fashionable relatively recently and immediately became popular with the population, because the stickers are inexpensive, and they can transform even the simplest interior beyond recognition. If you decorate an old ceiling with them, then they will reliably mask defects, cracks and streaks on its surface. Colorful stickers are designed for pasting surfaces of any type, except those covered with whitewash.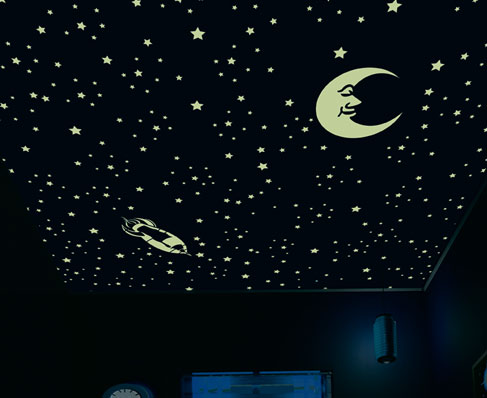 Photo 2.With the help of ceiling stickers, you can easily create a starry sky in the bedroom. Vinyl stickers come in different sizes: there are large applications designed to be applied to the entire ceiling, but there are also those that decorate only a small area. They do not fade under the influence of sunlight and can remain on the surface for up to several years. Ceiling stickers are designed for any room. With their help, you can easily create a starry sky in the bedroom (photo 2), intricate patterns or an incredibly beautiful flower arrangement. In a child's room, images of popular fairy tale and cartoon characters will look appropriate, and in the kitchen - compositions of fruits and vegetables. Well-chosen stickers will replace a socket under a chandelier or moldings, help to divide the room into separate zones. To decorate the ceiling, you will need the following devices:
- vinyl stickers;
- a simple pencil;
- plastic spatula;
- ladder.
Before starting to decorate, the ceiling is cleaned of dust, after which work begins.
Return to Contents</a>
Decoration with stencil patterns
 Photo 3.Using stencil painting, you can create ornaments, patterns and drawings of varying degrees of complexity on the ceiling surface. You can use stencil painting to design the ceiling, creating ornaments, patterns and drawings of varying degrees of complexity on its surface (photo 3). For this method of decoration, you will need:
- ready templates (they are sold in art stores);
- Painting tape;
- acrylic paints required shades;
- Stencil brush with short bristles;
- ladder.
If the design consists of repeatingelements, then there should be several identical stencil sheets, since during work they will quickly become dirty with paint and will have to be replaced with clean ones.
To decorate the ceiling of the room yourself,It is not necessary to have special creative abilities. Most modern decoration methods allow you to turn the ceiling into a real work of art, spending a minimum of effort and time.</ ul>


