Both residential and office space, renovationstarts from the ceiling. This is the hardest part of finishing work. There are various ways to decorate the ceiling, but none of them can do without putty. Before you putty the ceiling with your own hands, you need to decide on the materials and tools. The process is very labor intensive and requires great care. There are several methods for removing irregularities from ceilings and ceiling panels, but leveling with a putty is highly appreciated and relevant to this day. If the level difference in the ceiling is more than 5 cm, then the only possible way to level it is to putty the ceiling with your own hands. Only in this way is it possible with high quality. Plastering plasterboard ceilings cannot be done with the help of machines, it is exclusively manual work that requires great care.  If the ceiling drops are too high in the level, then before final finishing it must be puttied.
Ceiling of the ceiling with your own hands: tools and materials
The preparatory work for the putty is the same, regardless of whether the ceiling is pasted with wallpaper or painted afterwards. For putty it is necessary to prepare: 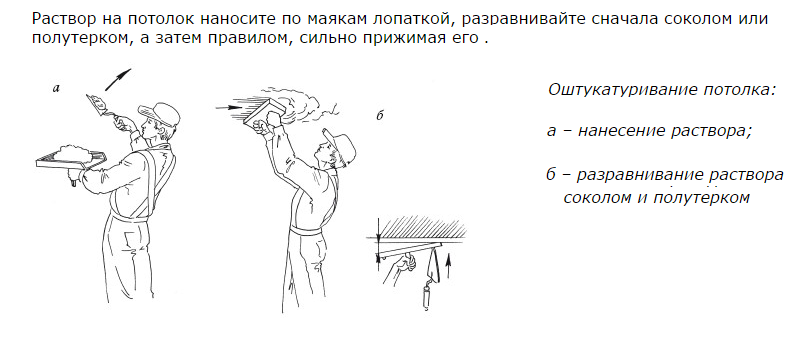 The plastering of the ceiling is done in several stages.
- spatula, preferably at least 3 species;
- container for putty;
- mixer;
- brush;
- roller;
- construction sandpaper;
- level;
- level;
- putty;
- working clothes and gloves;
- a bucket for clean water;
- respirator.
Putty put on any surface - onconcrete, wood, columns or beams, as well as plasterboard or steel. But before applying it, each surface must be specially prepared. Back to contents</a>
Ceiling Filler: Surface Preparation
 Methods for throwing a putty onceiling. Before the leveling and priming procedure, the surface must be cleaned of old paint, whitewash, other possible coatings. The finer the finish, the easier it will be to make further work. You can clean the ceiling with your own hands using a special scraper or spatula. It is possible to clean the old coating in dry form, but in many cases adding water simplifies the work. Having moistened the surface of the atomizer as carefully as possible, you should then open the windows and arrange a draft in the room. In most cases, putty from this is blown up by bubbles and itself departs from the surface, and it is not difficult to remove it by yourself. After removing the coating, the ceiling is well cleaned. Before plastering the ceiling with your own hands, you need to determine more and the way it is aligned, because depending on this the choice of material can be very different. A distinction is made for water-based paints, universal. If the ceiling is concrete, then first of all it is cleaned of contamination. Before plastering the ceiling, special attention should be paid to stains of mold, fungus and other harmful formations. These places must be treated with a special disinfectant solution before the puttying, since the mold can penetrate deep into the concrete surfaces along the pores. If the fungus affects most of the surface of the concrete slab, it can be fought with soldering lamps or plasma welding, since open fire is very effective. But at the same time, you need to remember the rules of fire safety. Back to contents</a>
Ceiling of ceilings: preliminary stage
 For plastering the plasterboard ceiling on the seama grid is applied. The puttying of the gypsum board ceiling differs from plaster with the size of the filler used. It is used in this case is very shallow and excellent for eliminating small defects, irregularities and cracks, to obtain a perfectly smooth surface. First, it is required to coat the cleaned concrete surface with a strengthening compound or a special primer. It is also acceptable to use both methods step-by-step, since they are often well-compatible. Primers at the exit form a glossy surface. For better adhesion to the concrete surface, sandblasting or incisions and notches are often used. If the puttying is carried out on a surface made of wood or steel, then a small metal net is stretched to the ceiling, the cells of which do not exceed 1 cm. It fastens to the surface, to all joints and seams, using special nails with wide hats or staples. Back to contents</a>
Ceiling of ceilings on beacons: technology
 When plastering ceilings from plasterboard, you needfill all holes from the screws. A very important part of the work is the setting up of so-called beacons, the length of which is then made with the puttying of the ceiling. If you install them according to all the rules, the probability of obtaining a very even and beautiful ceiling is greatly increased. That is why it is very important to observe all stages of work and accurate measurements. This stage of work begins with the leveling of the premises, on the walls with a paint string the zero mark is made. Determine the ceiling point, which is located below all, and set the first beacon. The layer of putty and plaster should not generally exceed 5 cm, therefore, this value should not exceed the height of the beacons. This is checked with the help of a level. When the difference in altitude is greater than this value, then before it is done puttying the ceiling from gypsum board, it is leveled using dry mixes.
 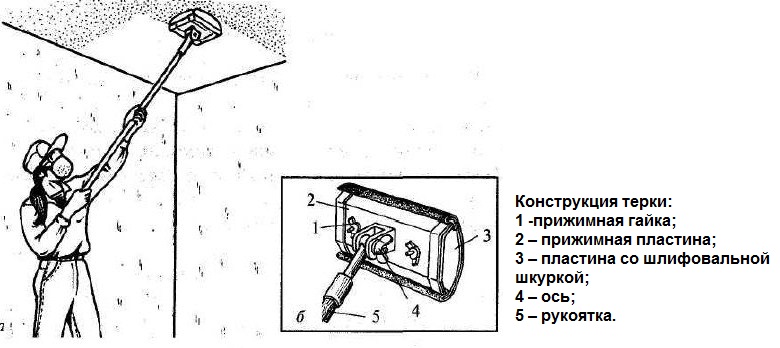 After the putty has dried, the ceiling is polishedspecial grater. Ceiling filler from gypsum board can have a different composition. In this regard, the rules for working with it are slightly different. If the solution has a gypsum base, then each next layer can be applied 20-30 minutes after the previous one, whereas for cement mortar this gap is at least 2 hours. Lime solutions are visually monitored and the next layer is applied whitening the previous one, without waiting for complete hardening. When the final layer of putty dries, marks with beacons are removed, and their places are filled with the used solution. Then check the smoothness of the layering, correcting the small differences in altitude with a half-wedge. Only after complete drying is applied a covering layer, carefully leveled and creating a smooth surface. Back to contents</a>
Ceiling filler from gypsum board: the final stage
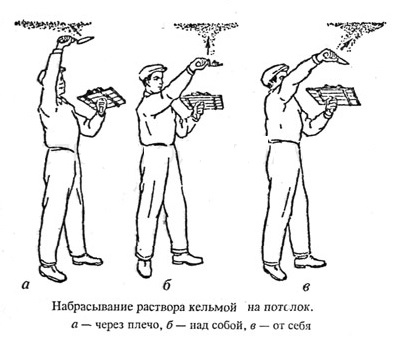
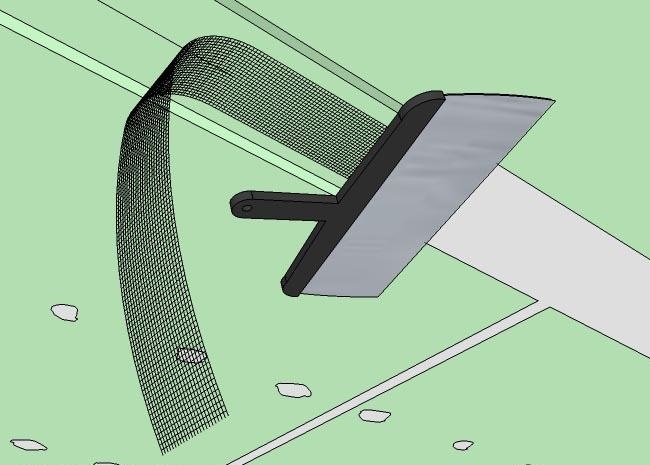
On the plasterboard surface of plasterboardIt is permissible to fix another grid for strength and better alignment by hand. The putty solution, when it is already diluted and thoroughly mixed, freezes very quickly, so you should work at a pace. With the help of a narrow spatula, the mass is transferred to a wide, then to the ceiling and pressed firmly to it. Divorces are easily removed with a special mesh for grouting. Grind the ceiling after all the layers applied to it dry completely. The mixture for putty at work is taken on the spatula accurately and gradually, it is distributed in the center of the blade. It is put on the ceiling so that the surface at the exit turns smooth and smooth, as it is impossible to return and redo the work. To avoid strips from the spatula on the ceiling, it is held at a small angle to the work surface. The quality of the work carried out and the convenience for the master in this case largely depends on the correctly chosen tool. The fabric should be chosen according to the hardness: it should be medium, as the soft spatula will bend in the work, leaving the sags. The respirator will be needed in the final grinding of the working surface, as this is very dusty work. There are special grinders, complete with a dust collector, but in this matter it is better to be safe.


