A writing desk is a necessary item ininterior of a modern home. It is quite easy to make it with your own hands. If you cannot sketch it yourself, you can ask for help from furniture makers. Experienced craftsmen advise using furniture boards to make this item, as they are easy to process, environmentally friendly, and inexpensive. It is not difficult to assemble a desk with your own hands after all its main elements have been cut out. DIY desk diagram. To make it, you will need the following materials and tools:
- furniture board (maple, walnut, oak);
- plywood;
- Keys;
- dowels;
- finishing nails, screws;
- joiner glue;
- varnish.
Manufacturing of countertops
The first step is to make the table top.It is better to stick to one generally accepted size of 1100x600. The front corners of the tabletop must be sawed off to avoid injury. The depth of the sawn corners usually does not exceed 2 cm, but this is quite enough to continue making the desk in more comfortable conditions. The sawn corners must be processed using sandpaper and then proceed to the following operations.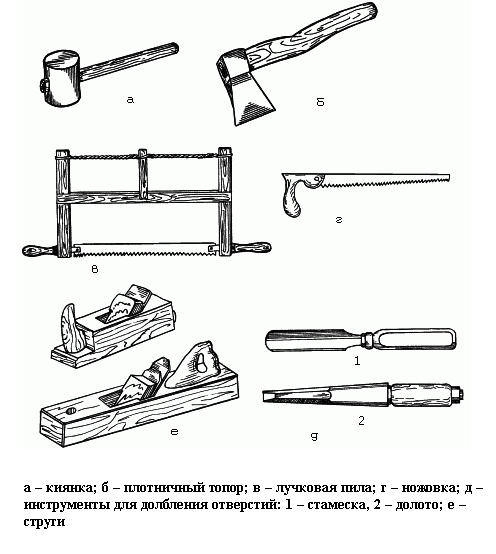 Tools for making a desk.If the tabletop is not level with the side of the table, but protrudes from the overall structure, it must be reinforced with a wooden block. Its size directly depends on the protrusion. If the protrusion is 20 cm, then a 20x45 cm block will do. It will allow the tabletop to last longer, withstanding significant loads. The next step is to attach the blocks to the tabletop. But first, they must be rounded and processed with sandpaper. The blocks are attached to the tabletop using self-tapping screws. After making the tabletop, you need to make pencil cases. Here it is important to consider how many drawers the desk will have, their planned depth. It is considered convenient if the right side of the table consists of an upper compartment with two shelves, a door and a niche between them, where you can place office supplies. In the left side of the table, you can also install the upper shelf. To make a pencil case, two 1600x400 sidewalls are enough. The upper front parts must be rounded, that is, the operation that was done with the corners of the table top is repeated. The lower part of the side panels is sawed under the 4.5x5.5 cm plinth. Return to the table of contents</a>
How to fix self-tapping screws?
Then shelves are cut out from the furniture boards.400x350 mm - these are their internal dimensions. 4 shelves are attached to the sides using screws. But first, holes must be drilled to attach the screws. A common mistake of beginners is to attach the screws too tightly.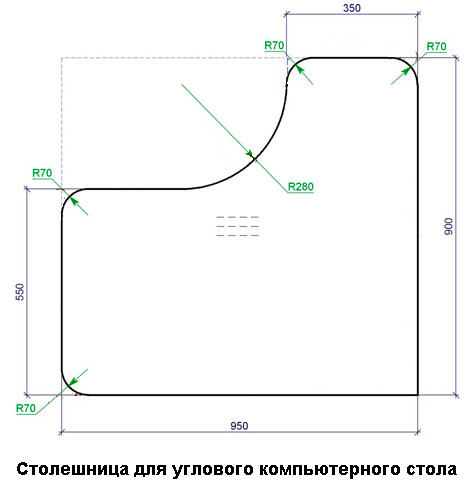 Tabletop diagram for a corner table.If you are making a desk from wooden panels, you cannot do this, otherwise the screws will quickly become unusable. It is better to choose special fasteners for the top shelf. The back strip for this shelf is cut out separately and fixed with screws. Next, the base panel is cut out of the wooden panel, but it does not need to be fixed right away. The main task at this stage is to assemble the case frame and make the corners. For the last elements, you will need plywood. Before you start making the corners, you need to mark it. This is very simple if you draw squares with a side of 7 cm on the plywood using an ordinary ruler and a simple pencil, and then draw a diagonal inside them. From 2 squares you will get 4 triangles, which you need to cut out. To properly attach them to the case, they are applied to its back side and work begins from the lower left and upper right corners. Before fixing the corners, the structure must be aligned. Only then tighten the shelves from the outer sides of the sidewalls. Then you need to fix 2 triangles: one in the lower right corner, the other in the upper left. The left frame of the pencil case is ready, and the right one is made in a similar way, but the following adjustments must be made to its design. For it, one small shelf and a door panel are cut out of the furniture board. It makes sense to provide a niche for a small bag or briefcase in the upper part of the right pencil case. The number of shelves hidden behind the door is a matter of practicality and taste, but professional craftsmen advise making no more than 2.
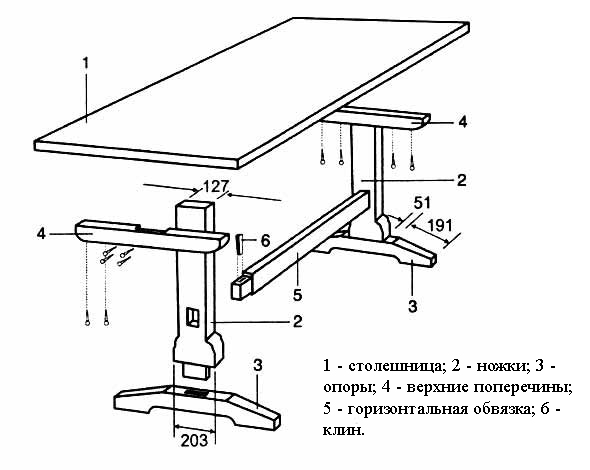 Scheme of fastening table parts with self-tapping screws.When both pencil case frames are ready, proceed to making the crossbar. If you need a durable desk, take a thicker sheet of wooden board for its manufacture than those from which the pencil cases are made. For the crossbar and the central shelf, you will need blanks of approximately the same length. Its basis is considered to be the parameters of the tabletop. The crossbar must be secured so that there is a distance of 30 cm between it and the floor. This is the best option not only for those cases when the table is made with your own hands. This crossbar fastening scheme is also used in mass production of desks. Return to contents</a>
The choice in favor of practicality
After the crossbar, a shelf is fixed for itIt is also necessary to cut out the back wall and partitions. They will divide the space below the shelf and at the same time support it. Partitions must be processed: round off and sand their corners. Partitions are attached to the back wall, like all elements of such a table, with self-tapping screws. At what distance is it best to attach a shelf from the tabletop? This question is important, as it will help to calculate the necessary parameters for the design of the desk. The optimal option would be a distance of 50 cm. The next nuance: the height of the tabletop in relation to the floor. Much depends on the height and age of the person who will use the desk. The optimal distance is considered to be 75 cm, but if necessary, adjustments can be made to it. The lower parts of the table can be left free and not install any doors or drawers in accordance with modern fashion trends. If such a solution seems impractical, it will take a little more time to tidy up the lower part of the desk. Return to the table of contents</a>
Councils of Masters
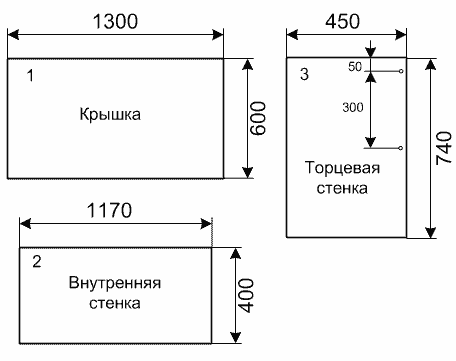 Drawing of the details of the desk.Experienced craftsmen usually recommend starting work with a pencil case, the internal structure of which is simpler. It is better to make the drawers from 6 mm plywood, having previously decided on the quantity, depth and other dimensions. It makes sense to immediately cut out the blanks for the drawers, assemble them, process them with a sander and varnish them, only it is better to install the handles at the last moment, when the table is already fully assembled. Guides are attached to the inner part of the pencil case, where the drawers will be located. Considering that everything is fastened with self-tapping screws, one must not forget to drill holes for them in this part of the pencil case. The simplest option for making doors for a desk will be the one where they are placed with an overlap. A door leaf, a drill and hinges - this is what is needed for installation. Some novice craftsmen often make a mistake in hanging the doors correctly. One simple rule applies here: they should open in the direction where the pencil case itself is located, that is, all the doors in the right pencil case open to the right. Return to the table of contents</a>
A little bit about tools
In order to correctly and quickly perform operations for sawing plywood and furniture panels, the following tools will be required:
- a jigsaw;
- gon;
- roulette;
- a hammer;
- hacksaw;
- disc or band saw;
- electric drill;
- milling machine;
- screwdrivers;
- chisel;
- sanding cloth.
A circular saw or band saw is one of thesetools, as a rule, are always in the house. It is better to choose medium- and fine-grained sandpaper for surface treatment. You need to know: the first is used for rough processing, the second - for finishing. To avoid pinching on the back of the plywood, use a lining sheet. It is best to use sanding raspberry for processing table surfaces. As for the varnish with which you need to open the finished structure, any varnish intended for internal treatment of wooden surfaces will do. When purchasing door hinges and roller guides, be sure to take into account the weight of the material from which the doors and drawers are made. An electric drill is also necessary for these jobs, the size of its nozzle is easy to determine, focusing on the size of the expected holes for fastening the screws. As for the latter, experienced craftsmen advise using sizes 3x20, while when choosing door handles (which are usually sold complete with screws) and drawers, it is best to be guided not only by their attractive appearance, but also by practicality.
