Backlighting is not only very beautiful anda spectacular design reception, but also the ability to mount additional lighting sources. They are indispensable at night, when full daylight is not needed, but I do not want to bump into furniture in the dark.  With the help of a backlight you can make a roomstylish, give it a unique design. But many masters do not know how to make the lighting themselves, so they refuse to realize such ideas with their own hands. In this work there is nothing complicated. A person with minimal knowledge of wiring will cope with it.
LED backlighting
With the help of LED tape, which can be purchased at any store selling goods for electrical installation and lighting equipment, usually solve the following tasks: 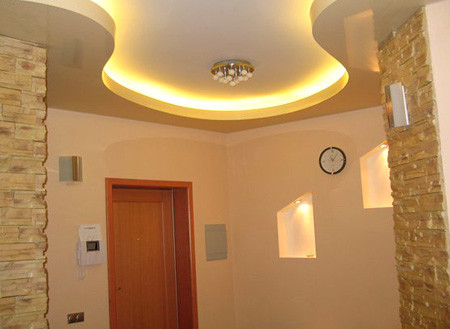 Backlighting with LED strip provides additional lighting sources.
- separation and zoning of space;
- interior decoration of furniture with the help of light of different shades;
- providing additional sources of lighting;
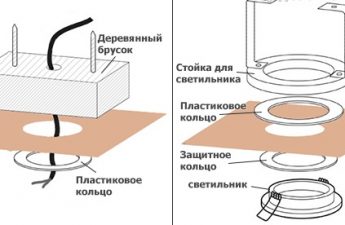
- installation of concealed or semi-hidden fixtures.
The LED ribbon operates according to the principlesemiconductor device. Optical radiation is formed due to direct current. When installing diodes, remember that the light they emit is in a narrow spectral range. And the technical characteristics of the tape and light sources depend, first of all, on the chemical composition of the conductors used in the production of illumination. Until quite recently, lighting with LEDs was a very costly affair. Now the tape is public. Its main advantage in easy installation. Such material can be cut into parts of any length and mounted on almost all existing surfaces. LED strip is not the only way to make the backlight. With your hands, you can install spotlights, halogen lamps and similar devices. But the diodes have a number of undeniable advantages:
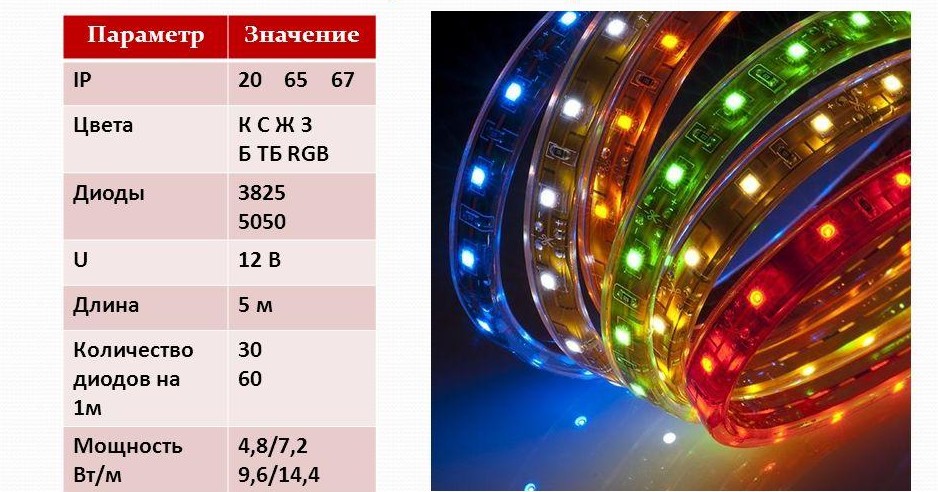 Basic parameters of diode tapes. In addition, you can purchase diodes equipped with an additional protective silicone layer. Such tapes can be installed in conditions of high humidity: on kitchen furniture, aquariums, indoor fountains and the like. Since the tape can be divided into parts, then with its help embody a variety of design ideas. For example, diodes have a dot, they form patterns, highlight the countertops or decorate cabinets. Their use depends only on your imagination. Back to contents</a>
Mounting the illumination with your own hands
In order to fix the tape, you need the following materials:
- finished tape with diodes;
- conductive cable;
- connectors designed to connect the tape;
- power supply unit (usually sold with a tape).
In addition, it is necessary to stock two-waybuilding scotch tape. It will not be necessary only if the tape is already provided with an adhesive layer. For installation you will need a sharp office or carpentry knife and a plastic profile. 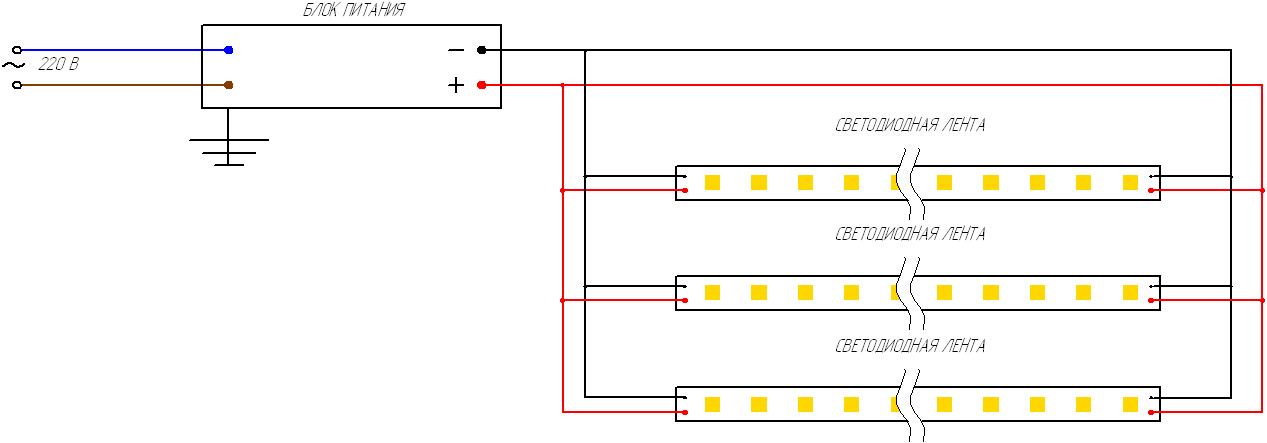 Picture 1. Diagram of LED tape mounting. Before you start making backlight, make sure that there are no external damage or defects on the tape. Check the marking of the unit and the material to be mounted. The voltage to which they are calculated must be identical (therefore it is recommended to purchase ready-made kits). If you know how to solder, then you can do without special connecting clips. But such locking devices will help to assemble a reliable and durable construction without additional efforts. And to install the clips do not require special skills. The installation scheme for the LED strip is shown in Figure 1. Following this drawing, you can easily make the lighting yourself. Back to contents</a> The order of works First of all to youit is necessary to determine the contact elements. On products of Chinese production, which in Russia are the most common, they are located through 3 diodes. But this nuance depends on the manufacturer and model of the design. In any case, it is necessary to hold a section of the tape in this place. Therefore, before buying, you need to make sure that the tape can be divided into lengths of the desired length. The ends of the supply cable are cleaned from the insulator for a length of 10-15 mm. This work should be done very carefully, since there is a risk of damaging the veins. For installation, it is necessary to use a knife with a sharp blade. After the ends are cleaned, you can collect the assembly chain. As a rule, the wires are marked with brown (red, yellow) and white color.
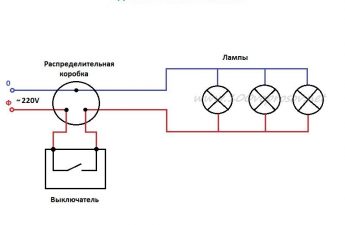
  The scheme of connecting the LED tape. The first type of wire is intended for connection with a plus, the second - with a minus. Connect the wires by soldering or mounting clips. Whichever way you use, make sure that the ends do not contact each other (do not touch). All connectors must be carefully insulated. To do this, you can use a conventional insulating tape or a special tape. The second type of insulator is sold in specialized stores. The advantage of this material is that it is practically invisible on the wire. Back to contents</a> Final tape mounting Every plug-incontact is first isolated separately, and only then the assembly unit is fixed entirely. Make sure that there are no uninsulated sections left. All connections must be reliable. It is much more reasonable to hide a cable that is not too aesthetically pleasing, than to get a "breakdown". The free end of the wire is connected to the connector. It is identical to the one used to connect mobile devices and computer equipment, so it is not necessary to use a dedicated connector. When connected, the wire marked with brown insulation is let in and the white is allowed to go over. After completing the installation, make sure that the connection is correct. To do this, just connect the power supply to the network. If the design is assembled correctly, the diodes will begin to glow. Before fixing the tape, degrease the surface, clean it of dust and dirt. Do not use solvents, they can damage the mounting surface. It is enough to treat furniture or a wall with a usual washing solution. After that, the protective paper is removed from the adhesive layer, and the tape is fixed to the place designated for it.