One of the most important points in the repair orconstruction is the selection of the right lighting. This moment applies to any room in the house, be it a living room, bedroom, bathroom or kitchen. Recently, the use of LED lighting has become very relevant, which will fully satisfy the needs of everyone. quite feasible and a simple amateur, there is no need to know any specific things. The main thing is to make the project and calculation correctly.  Scheme of connecting RGB-LED strip.
How do LEDs work?
The LED is a semiconductor,It emits light when electric energy passes through it. To find the necessary brightness, you need to know the chemical composition of the material itself. It should immediately be said that the LEDs do not directly connect to the power source, because in this case there will be overheating, which leads to breakage. In order to avoid this, a stabilizer is used, which is a current-stabilizing circuit. By colors, they can be absolutely any tone. But if you want, you can make infrared or ultraviolet lighting on the kitchen. LEDs are not the main lighting, they play the role of illumination. Therefore, they are used to enhance portable lights or headlights on the car. 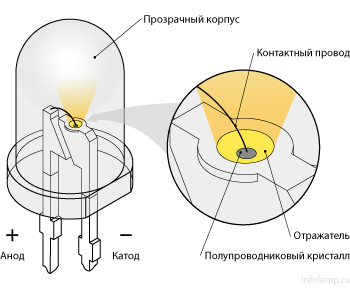 A common form of LED design. In order to decorate the kitchen with your own hands, you can use the LED ribbon. It will add a certain elegance and help to place accents. Such illumination has its advantages:
- in the kitchen there will always be enough light for cooking;
- is not afraid of mechanical damage;
- if in a day such lighting will work 16 hours, then it will last a little more than 15 years;
- there are no problems with the choice of the color of the lamps;
- immediately gives the brightness of light, since there is no need for reheating;
- if necessary, it is easy to select the desired radiation angle;
- fireproof, also for their installation there is no need to create certain temperature indicators in the environment in the kitchen;
- During operation, there is no secretion of toxic substances, which makes them safe for living.
To install on the kitchen with their own hands fitSMD tapes. They are one-two-three- and four-crystal. Depending on the section, monochrome and full-color are allocated. The size varies in a range from 1,6х0,8 mm to 5х5 mm. Back to contents</a>
What are the types of LED ribbons?
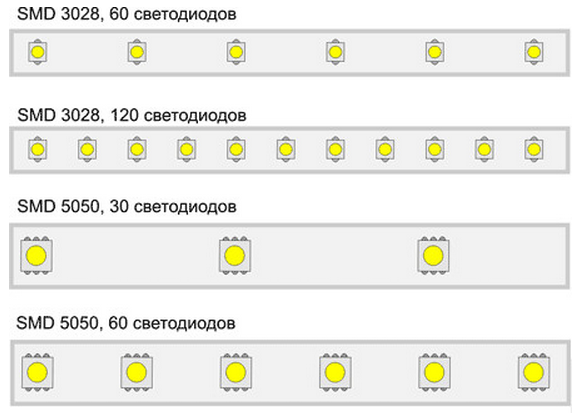 Popular series of LED ribbons. Many people saw on the signs of shops such a designation as LED-tape. So, this is the LED ribbon. On it in one order there are small light-emitting diodes. The shape of the tape is very convenient for self-assembly. There are several types of tapes, depending on the density of the lamps for 1 square meter: 60,120 and 240 pieces. Accordingly, the more of them, the brighter the lighting in the kitchen. Also it is necessary to allocate and kinds on protection against a moisture:
Before buying material, you should determine for yourself the place of lighting.  The variant of parallel connection. If this is a working surface, it is better to choose a brand more efficiently, and if it's cabinets, and the LEDs will perform a purely decorative function, then you can get by with low-power ribbons. The same LED lighting can also be used on the ceiling, for the purpose of zoning the kitchen into the working and dining areas. As mentioned above, the intensity of illumination depends on the number of crystals. In addition, this parameter also affects color changes. When choosing a tape, you should pay attention to its marking. There is a possibility of a combination of different tapes, which will create 15 million shades. Such material is sold in rolls, each length is 5 meters. But apart from the tape itself, you should separately purchase a power supply and fasteners. Back to contents</a>
How to decorate the kitchen with LED lighting?
To ensure that the kitchen lacks lighting for personal needs, LED lighting can be issued in several places: 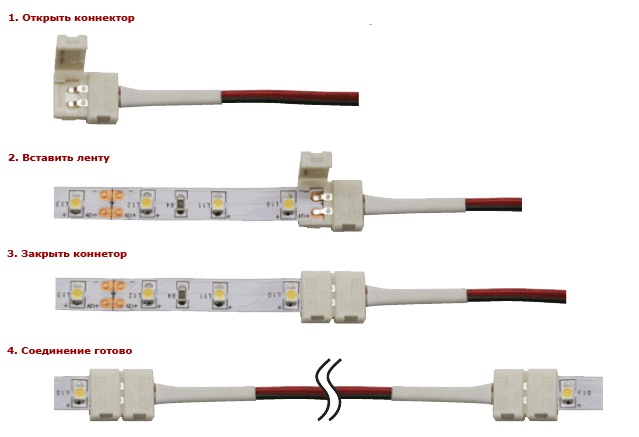 Connect LED strips using the Navigator connectors.
Designers recommend using warm colors to create classical lighting, respectively, if you want a modern style, then use cold colors. Back to contents</a>
How to mount the lighting in the kitchen with your own hands?
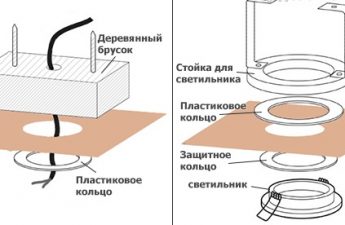
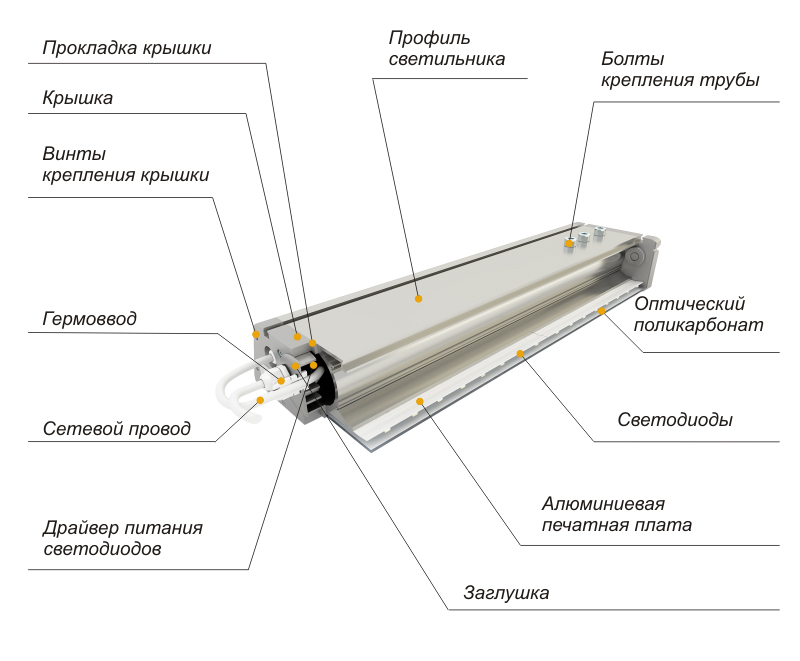 Scheme of the lamp body. Regardless of the chosen lighting option, the main thing is to remember that the LED backlight should provide the necessary amount of light for the chosen space. Before proceeding with the installation, it is necessary to stock up:
- LED strip with a power of 12 watts;
- electric cable (diameter 0.75 mm²);
- with forks;
- wiring brackets;
- soldering iron;
- transformers;
- double-sided tape;
- insulating tape;
- LED-profiles;
- scissors;
- power supply unit in 12 W;
- corners under the lights.
The installation of the LED strip is as follows:
Back to contents</a>
Practical recommendations
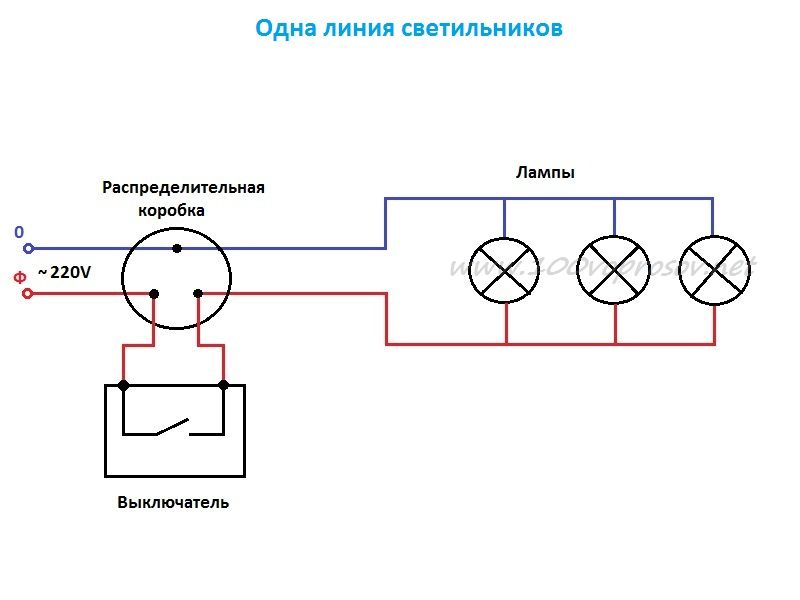 The electric diagram of connecting spotlights. There are a few tips that you need to know in order to properly set the lighting in the kitchen with your own hands:
In general, as is clear from all of the above, to install in the kitchen with their own hands, LED backlight will not make much effort.