Drywall is a very convenient material.It is widely used for decorating walls and partitions, doorways, ceilings and other tasks. An additional advantage of plasterboard is that structures made of it can be erected without the use of complex tools. A drill and a screwdriver are enough. Despite its ease of use, the material allows you to create almost any plasterboard ceiling that fully meets the owner's needs. If you really want, you can make a plasterboard ceiling with your own hands. The device of the system does not require special experience. You just need to follow the instructions in everything and perform the installation step by step. Scheme of a slatted plasterboard ceiling.
Installation rules for plasterboard ceilings
Construction of any type of plasterboard structuretype should be carried out in dry and warm conditions. This should be done before the finished floor is installed. Before you start installing the structure, it is better to prepare a sketch and think through in detail the options for arranging furniture and lighting so that electricity is spent as rationally as possible. Think about what kind of plasterboard the structure will be made of. So, you can use waterproof and regular plasterboard. If the neighbors from above flood you, the moisture-resistant material will only need to be restored a little. The regular one will have to be completely replaced. This point is relevant for people living in apartment buildings. If you are doing repairs in a private house where there is no threat of flooding the neighbors, you can use ordinary sheets to install the structure. They are noticeably cheaper than their moisture-resistant counterparts.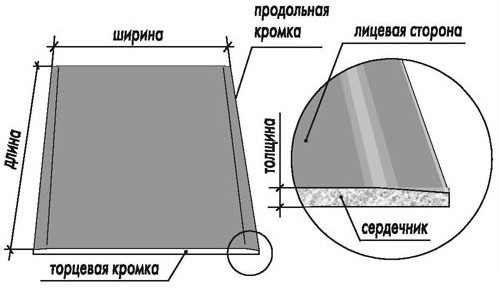 Diagram of the structure of a plasterboard sheet.Simple material allows you to hide even the most noticeable defects. In addition, it is inexpensive, which makes it an excellent option for both city apartments and private cottages, as well as for country houses. Thus, a plasterboard ceiling has many advantages:
Return to Contents</a>
Preparation of tools for work
To make work as comfortable as possible,fast and high-quality, prepare all the necessary tools in advance. At this stage, you need to take into account 2 main indicators: the volume of work to be done and the available budget. For simple home repairs that are done once every few years, it makes no sense to buy expensive professional-grade tools. So at this point, focus solely on your needs and requests. And you will need the following:
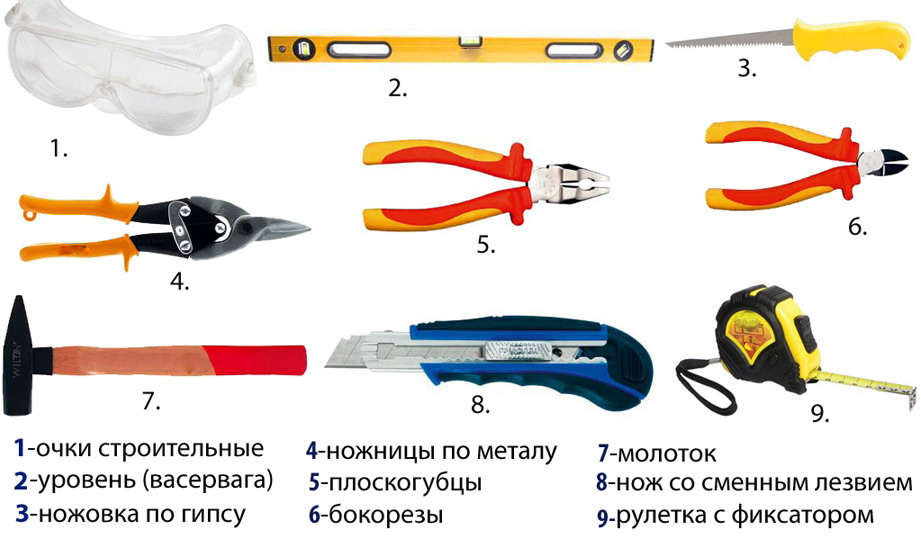 Tools for installing plasterboard ceilings. Cutting sheets of material and processing edges will be done using the following tools:
Direct installation of profiles and sheets will be carried out using the following tools:
In addition, you will need the following:
Return to Contents</a>
Guide to creating markup
 Plasterboard ceiling marking scheme.In order for the plasterboard ceiling to be perfectly flat, you should make the correct markings before starting work. It is better to first make a detailed plan on paper, and then transfer the finished scheme to . On the scheme, be sure to mark what distance there will be between the rough ceiling and the plasterboard ceiling. The main purpose of preliminary marking is to determine the horizontal and then apply the markings to the walls of the room along its entire perimeter. The rough ceiling is often uneven. In order for the finished plasterboard structure to not have any distortions, you need to make all the marks at the same level. Due to the unevenness of the rough ceiling, they will be at different distances from it. If the area of the room does not exceed 30 m², you can use a simple building level to mark the horizontal. You apply it to the wall at the height of the future structure and align it so that the bubble is located between the marks of the flask. After that, you only need to draw a marking line on the wall of the room along the level. Then the level moves along the wall, and the horizontal continues until all the walls are marked. The end point should coincide with the start point. For greater accuracy, use a hydraulic level. Its design is extremely simple: 2 connected vessels, each with a scale. You need to place these vessels at the required height in different corners of the room and ensure that the water level in the communicating vessels is the same. A mark is also made on the wall. The entire perimeter is marked according to this scheme.
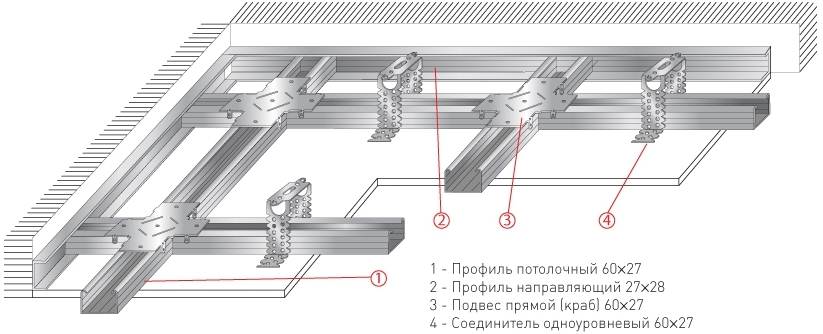 Profile diagram for plasterboard ceiling.To connect the marks, use a long ruler or suitable improvised devices (for example, a piece of profile). Another important task of this stage is to apply parallel marking lines along the length and width of the ceiling before installation. The lines will show the places of installation of the CD profile and hangers. Due to the fact that in most cases the plasterboard sheets are 120 cm wide, parallel lines should be made with a step of 40 cm or 60 cm. Thanks to this, the joints of the sheets will be on the profile, which will ensure their reliable fastening. Return to the table of contents</a>
Step-by-step instruction for assembling the frame
The frame is assembled using the following materials:
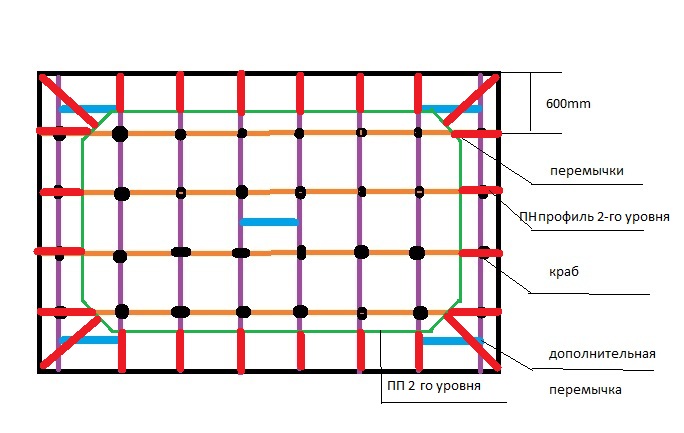
First you will need to install the guideUD profile. It is mounted according to the previously made markings. Use dowels for mounting. Maintain a step of 50-80 cm. Be sure to check the horizontality of the profiles with a level. In accordance with the markings, fix the hangers for CD profiles to the ceiling. They should be installed at a distance of 1 m. For fastening to a wooden floor, use self-tapping screws, to concrete - dowels. The installation of these devices on adjacent parallel lines is carried out in a checkerboard pattern.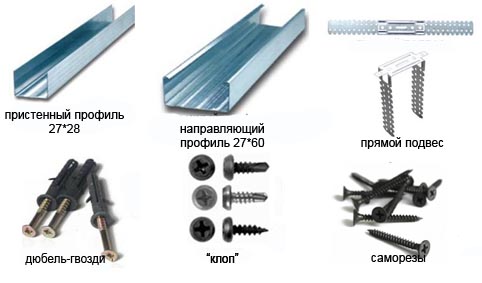 Materials for assembling the ceiling frame fromplasterboard. Stretch a thread along the marking lines. It is stretched at the level of the mounted UD profiles. Attach the main CD profiles to the UD profiles along the thread using screws. Carefully check the horizontal installation. At the walls, they should be inserted into the guide profiles. If the long wall of the room is longer than 1 main profile, use crabs or connectors for joining. Fastening of the transverse profiles is carried out to the longitudinal crabs and using self-tapping screws at a distance of 40-60 cm. After the frame is assembled, it is necessary to check the structure for rigidity, horizontality and evenness. If there is not enough rigidity, tighten the self-tapping screws. At this stage, electrical wires and mounts for chandeliers are mounted. Safety regulations require that all wiring be installed above the structure. Cables cannot be laid in profiles. Return to contents</a>
The order of carcass sewing
You will need the following:
At this stage you will need an assistant.The sheets of plasterboard are quite heavy, and it will be inconvenient to hold them yourself during the fastening process. Before you start sheathing, take a plane or a knife and remove a chamfer on the end edge of the sheet by about 2/3 of the thickness. You don’t have to try too hard, the joints don’t have to be perfect, because all the unevenness will be filled in anyway.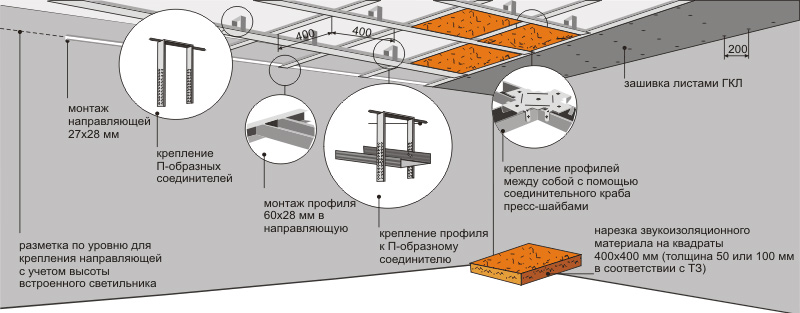 Installation diagram of a plasterboard ceiling.The sheets are attached to the CD profile using self-tapping screws. You need to slightly countersink the heads of the fastening screws. It is important that the long sides of the plasterboard are joined in the middle of the longitudinal profile. It is also impossible for the joint of the end sides of the sheets to hang in the air. A transverse piece of the profile is fixed under this joint. Lay the sheets of material so that they are slightly shifted along the long side in relation to each other. The distance of the shift is not particularly important, it is only important that the 4 corners do not coincide in one place. Return to the table of contents</a>
Installation of the 2nd and the following levels of construction
The 2nd level of the structure can have different appearances.Drywall is convenient because it allows you to create even the most complex curvilinear patterns and decorate the room to your taste. First, you need to draw a diagram of the desired pattern on paper, and then transfer it to the surface of the 1st level. Fasten the CD profiles along the contour. This must be done in such a way that the main part of the new structure is attached to the CD profiles of the first level. In places of bends, the profiles are cut along the side surfaces. After this, you need to bring out the electrical wiring to the places of installation of lighting fixtures, and then cut the sheets in accordance with the selected pattern and lay them according to the diagram. Use gypsum board screws to fasten to the profile.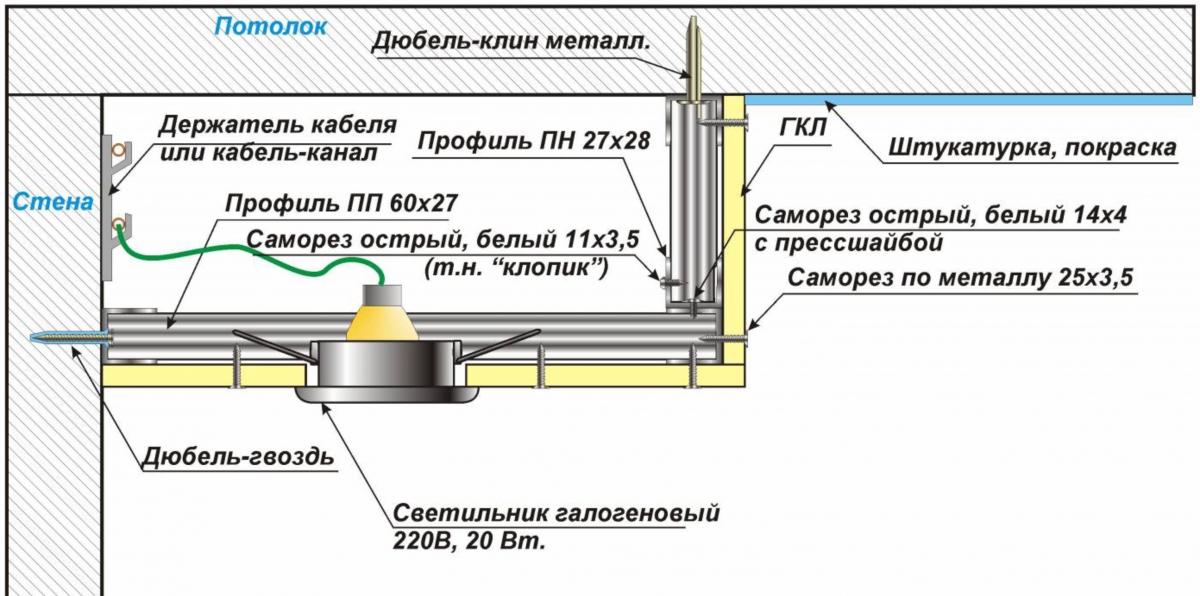 Scheme of a two-level ceiling with a lamp.The next step is to prepare openings for lighting fixtures. Cover the profile along the edge of the protruding surface with a strip of the appropriate width. Wet the material with water so that it softens and you can create a curvilinear pattern, then attach it to the profile. Treat the edges with a rasp, and fill the seams with reinforcing tape so that there are no cracks at the joints of the plasterboard in the future. The material is laid on all other levels according to the same principle, if they are provided for by the design. Return to the table of contents</a>
Features of installation of an oval-shaped ceiling
If you wish, you can make a designoval shape. It is mounted according to the principle discussed, but there are a number of important differences that you need to know about. First, prepare the markings. Keep in mind that the oval can have a regular or irregular shape. You can draw ovals in a variety of ways. To prepare a figure of the correct shape, it is better to make a template in advance and use it during the work. If you do not have a template, you can use the following simple method of drawing an oval. First, you need to draw 2 intersecting circles on the surface of the ceiling. The larger the intersection area, the smaller the finished oval will be. This is done extremely simply. First, you need to mark the center of the ceiling. In order for the oval to be exactly in the center, from this point, taking into account the desired size, you need to retreat the required distance on both sides. Choose the sides in accordance with how the arcs of this structure will be located. That is, as a result, you will get 3 points. The 2 extreme ones are the centers of the future circles. Now, based on these points, you can draw circles. However, you need to know how to do this correctly.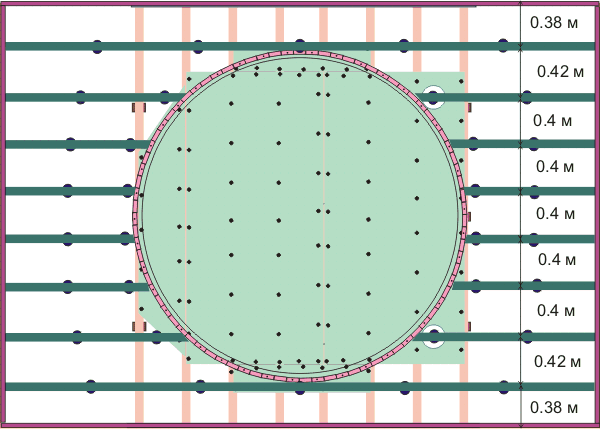 Scheme of a round plasterboard ceiling.The ceiling has a fairly large area and a regular compass will not help here. But you can easily assemble a homemade compass. Fix a screw in the center of the 1st circle and install a wire with a pencil pre-fixed to the end on it. The length of the wire should correspond to the radius of the circle. With such a simple design, you can draw a circle. Prepare the 2nd circle using the same scheme. After both figures are applied, connect the side parts of the circles with straight lines so that the oval gets a complete look. At this point, the marking is ready. You can safely proceed to arranging the frame. Remember that the depth of the 2nd level depends on the profile used, you can adjust these indicators yourself. For example, the UD profile usually has a width of 25 mm, and UD profiles are 50, 75 and 100 mm wide. Choose the most suitable option. First, you need to prepare 2 blanks for the straight sides of the figure. Cut them to size. Use screws for fastening. The fastening itself is carried out to the frame of the 1st level, directly through the plasterboard sheets. After this, as when arranging the 1st level, parallel lines are applied inside the oval, along which the CD profile will be fastened. The latter is inserted into the WD or UD. Use self-tapping screws for fastening. All CD profiles, the length of which exceeds 0.5 m, are additionally fixed with hangers. After this work, the frame will need to be sheathed with plasterboard. Trimming of rounded places is carried out after they are fully installed on the frame. Finally, the ceiling is puttied and its final finishing is performed. For this, you can use paint, wallpaper or another suitable material of your choice. Good luck with your work!


