Drywall is suitable for creating the mostvarious elements of decor: from the simplest designs to unusual and unique design ideas. And one of the most common uses of GCR is the creation of half-arches or arches. Correctly created poluarka is able to decorate absolutely any room.  One of the advantages of drywall isthe possibility of creating complex structures, such as an arch or semi-arch. The semi-arches of gypsum plasterboard are a beautiful curvilinear design, overlapping the doorway. This element of decor fits perfectly into any interiors, striking with its originality, ease and attractiveness. If you want, you can make a half-shrine of plasterboard with your own hands.
How to choose the design of the arch?
Before you make a half-ark, you needdetermine the type of construction. Drywall allows you to create any curvilinear system. It is thanks to its versatility that this material has found such wide application in the design of window and door openings. There are two basic types of designs that you can make from drywall yourself:  Schematic design of an arch of plasterboard with dimensions.
The first type is best suited for highdoorways (about 250-270 cm). Can be made in the classical version and in the Art Nouveau style. The classic solution is suitable for almost any room. Best of all, these half-arches fit into wide openings. Modernity is more compact, and it is best to use a similar system in interior partitions. The semi-arches of plasterboard are the most popular architectural solution with a variable radius of curvature. The arch is quite easy to do by yourself. It perfectly fits into any interior and emphasizes its individuality. Long-term experience of successful use is the best proof of the practicality of such designs. Back to contents</a>
Initial stages of work
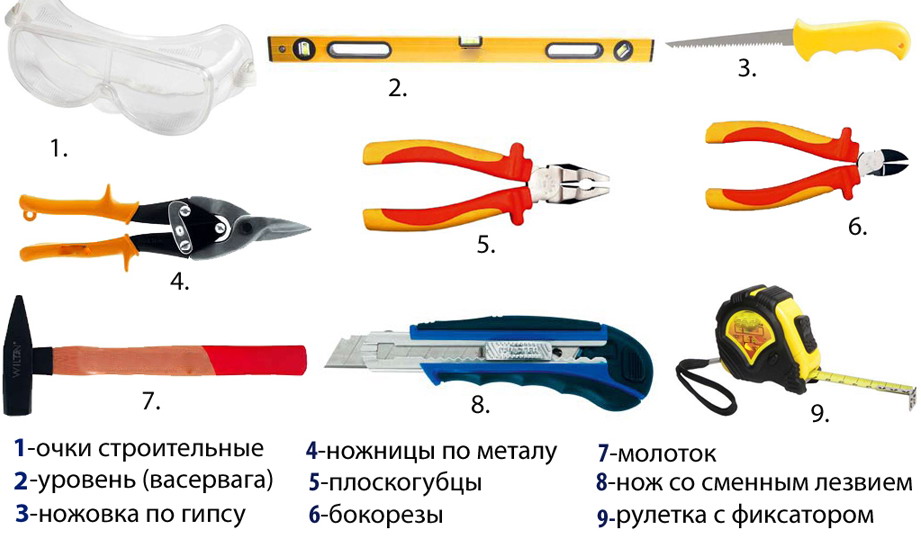 A set of tools for working with plasterboard. Preparation begins with the fact that the doorway, in which the semi-arches of plasterboard will be arranged, is freed from the old finish and thoroughly cleaned of various kinds of contaminants. After that, a marking on the surface of the doorway is made, along which the frame guides and other structural elements will be installed. Do this with the obligatory use of measuring instruments, in order to obtain the design of the highest possible quality. Prepare the following tools for work:
After that you will need to fix byBoth sides of the doorway have two guides. Keep such distance from the edge, which will correspond to the thickness of the purchased sheet drywall. Such a move will allow you to get an ideally smooth surface without any kind of protrusions and irregularities. 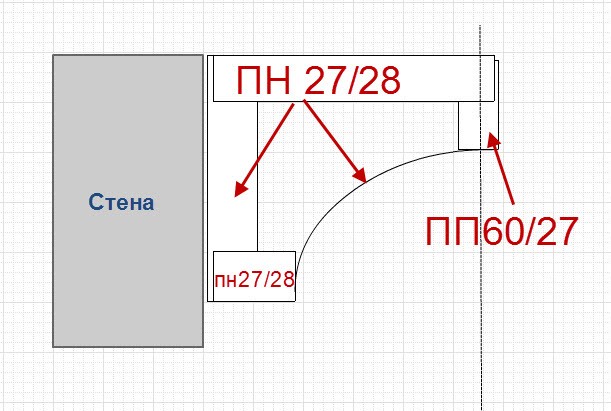 The scheme of fixing the profiles to the wall for installationdrywall. Further under the mounted directing the horizontal profile is fixed. Use an element with a slightly curved lower end. As a result, you will get a very beautiful and reliable sloping surface. After that, just attach the profiles from the opposite side of the doorway. On this the frame of the future half-arches of plasterboard will be ready. It is important to do everything so that the ready semi-arch is as stable, reliable and durable as possible. Try to properly fix all the elements of the system so that they can not leave their place in the future. For fixing the rails and profiles, use dowels. Between each other, the structural elements are fastened with special bolts. For fixing sheets of gypsum board you need to use specially designed for this purpose self-tapping screws. When installing profiles, use a sealing tape. It will make the construction more reliable and durable, and also will additionally increase the soundproofing properties of the system. Back to contents</a>
Step-by-step instruction on the skin of the structure
After you completely finish the deviceskeleton, proceed to its skin. Gypsum board, buy this size, which will match the size of your doorway. It is better that the sheet is slightly larger than the opening, because if necessary, it can be cut without any problems, and it will not be possible to simply enlarge the dimensions of a small sheet.  The scheme for preparing an arch template from a sheetdrywall. Draw an arc on the drywall sheet with the desired parameters, take the jigsaw and cut the design along the marked markings. After that, make one more exactly the same element. Attach the workpieces to a prefabricated frame fixed in the doorway. First you will need to create special guides. They are fixed at the bottom of the half-arches. You also need to make curved guides. Make them quite simple. Take an ordinary steel guide rail. Using metal scissors, prepare incisions from the side and back of the profile. Keep the distance between the incisions is about 60 cm. After this preparation, you can flex the profile as easily as required by the designed design. Back to contents</a>
Procedure for fixing drywall
At this stage you will have to fixdrywall. Prepare sheets of the desired shape and size. You can mount them in several ways. Most often, the method is used, according to which the details are fixed on the guides in the doorway, and then the bent part is mounted from below. In accordance with the second method, you first need to attach the curved guides to the sheets, and then insert and securely fix the structure in the opening. You can use the method that is more convenient for you. The result under any circumstances is equally good. 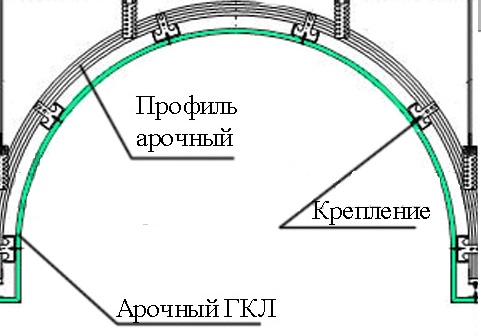 Scheme fixing gypsum cardboard to the frame of the arch. As a rule, the lower stripe of the structure is bent. To do this, you must first bend a straight piece. Can be done by different methods. Most often used the most convenient, fast and budget. In accordance with it, the strip must be installed on special supports and bent, applying mechanical forces to it. Do not act too rude and violent, under great pressure the material can simply break down. The problem is that gypsum board is a rather fragile material and requires the most accurate attitude. Another way involves pre-creating an incision on the inside of the sheet. Such incisions make the bending process even simpler. You can use another way. In accordance with it, the material must be moistened with some water, using a brush for its application. Having absorbed water, the leaf will begin to bend under its own weight. Another method involves the use of a needle roller. It allows you to create elements with almost any shape, parameters and bend. Back to contents</a>
Guide for installing lights and finishing
If you want, you can equip your semi-ark fromgypsum cardboard beautiful and original backlight. To do this, before the fixing of the sheets, put the wiring in the structure to be created. The sheets make holes for the size of the selected fixtures. Further, the structure is finally assembled and fastened to the frame by self-tapping screws. At the final stage of creating semi-arches, you have to properly process the design. First of all, seal joints and seams using reinforcing mesh and special sealants. Above all the surface shpaklyuetsya. If desired, you can paste with the help of liquid nails protective corners. After that, look into the semi-arch facing. To do this, you can use any existing decorative materials. Choose them in accordance with their individual preferences and be sure to ensure that they fit into the overall interior of the room. Successful work!