Today, modern designers offerinstall ceiling lighting when finishing. It looks aesthetically pleasing, beautiful and presentable. can visually expand the space and give the room a unique look. Looking at such elegance, you can decide that it is quite difficult to create such a thing, but experts assure that even an inexperienced beginner can do it. It is enough to follow certain instructions and your ceiling will be done quickly and efficiently. A ceiling with lighting will look beautiful in any room.
How to make a highlight
To make a modern ceiling,LED strip is used for lighting, which is now sold in stores in a huge assortment, and it is not that expensive. Among other things, it can be a pendant lighting fixture or spotlights built into the ceiling. Therefore, purchasing it will not be difficult. But before starting work, you need to stock up on tools, materials and think over the design of the ceiling. It is better to choose a more powerful and multi-colored LED strip, although here everything depends on your personal preferences.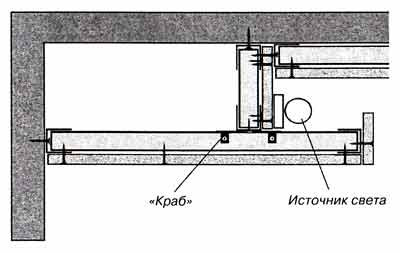 Plasterboard ceiling with lighting.For a better idea, you need to draw the configuration of the future ceiling with lighting. You can use several variations. If you have problems doing this, you can always ask a designer for help, and do the rest of the work yourself. The tools you need:
- Screwdriver;
- building level;
- Fasteners (self-tapping screws, screws);
- A special hacksaw for cutting plasterboard;
- yardstick;
- cord for punching;
- hangers and crabs;
- profiles;
- possible, bulgarian.
Initially, it is necessary to cover the ceiling with sheets of plasterboard, attaching it to the profiles. Return to the table of contents</a>Mounting the profile structure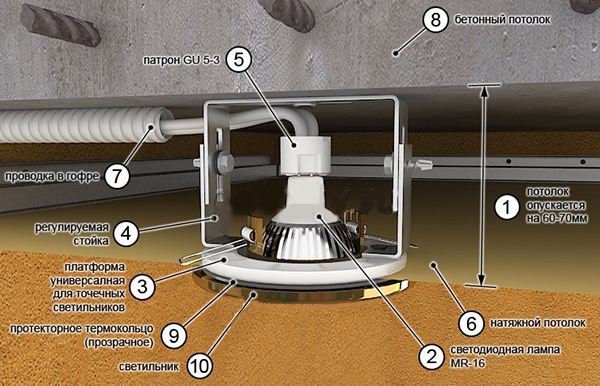 Installation diagram for built-in tensionceiling lamp First of all, it is worth noting that such ceilings must be made over communications, that is, first you need to conduct all the wiring. Now we move on to marking. To do this, you need to attach a long level to the wall horizontally in the corner and make a mark with a pencil. You can hammer in a small nail in this place. Do the same with all the corners. Now the upholstery cord must be tied to the nails on one wall and on the other so that they are opposite. The next step will be to install two guides along this lacing. They are fastened with self-tapping screws, while the heads should go 1-1.5 mm deep. Next, the cord is pulled along those walls where the guides are not installed. Then the hangers are mounted in increments of 40-60 cm. Keep in mind that the step distance depends on the heaviness of the ceiling. Backlighting can be done on both a single-level and a multi-level structure. In the second case, the hangers are strengthened with greater frequency. Each hanger has special holes for fastening. Having strengthened these elements, their ends must be bent at a right angle, without cutting anything off. Metal profiles are attached to the hangers. Due to the fact that the lacing is stretched, the profiles will be installed perfectly evenly. The screws securing the profile strips must be completely sunk. At this stage, the cord is removed and all excess is cut off with a grinder. It also happens that one profile is not enough for the entire distance, then it can be joined with another. But the joints must be secured with crabs, otherwise it is impossible to achieve stability. Return to the table of contents</a>How to properly install wiring A ceiling with lighting involves installing wires inside, to which an LED strip or other device will be connected.
 Scheme of installation of LED backlight onsuspended ceiling. Initially, it is necessary to create a certain scheme for the placement of devices on the ceiling. It is necessary to mark the places where they will be installed. This is necessary so that it will be easier to connect the wires later. The wiring is installed in two ways. To make the placement neat and the connection convenient in the future, you can install a cable channel. If you want to save on length, then the wires are laid in a corrugated pipe and pulled through the frame structure. In the first case, the cable channel is located between the structure and the ceiling part and is fixed to the walls. This is what concerns the backlight, and for the chandelier, the cable channel is fixed to the ceiling. Holes for fasteners must be drilled along the entire perimeter. You need to start from the area where the switch will be located. Dowels must be driven into these holes and the cable must be screwed. After this, the wiring is connected to each lighting device.
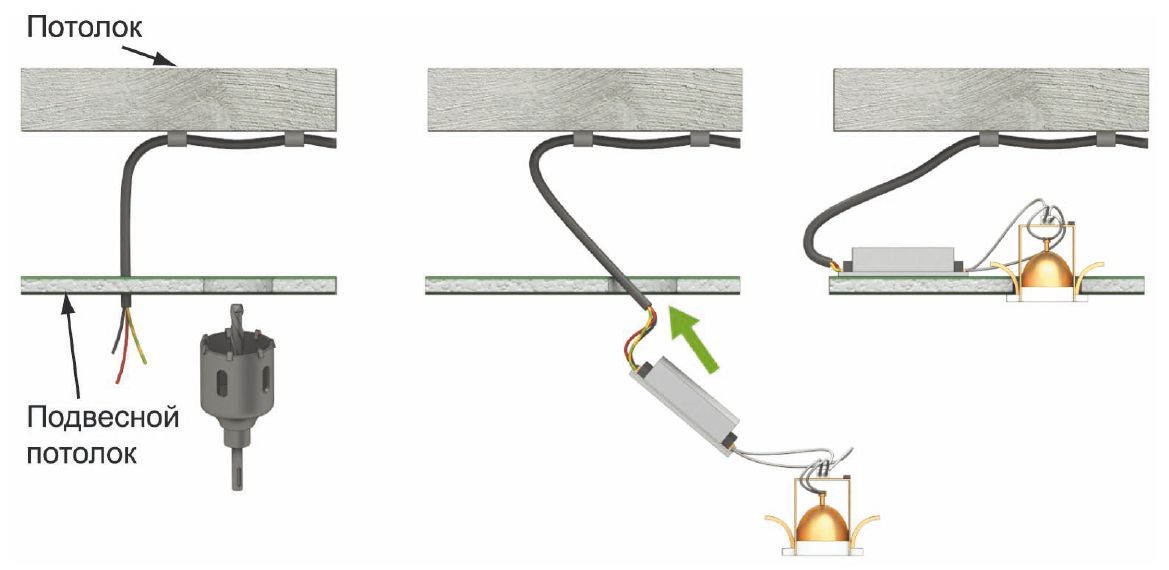 Installation of halogen lamps withtransformer in a suspended ceiling. In the second case, it is necessary to drill holes in the ceiling for the corrugation and insert clips. They are used to strengthen the corrugation. For each lighting group, you need to take a separate corrugation and put the wires inside. Thus, the entire bundle is located in one corrugation. Sometimes specialists use a combined method, that is, different methods of laying are used for certain devices. Next, marks for the location of the profile and lighting devices are applied to the cut sheets of drywall. Now you need to install the drywall on the ceiling. The sheets are lifted up and secured with self-tapping screws to the profiles that are on the ceiling part. If you plan to lay heat-insulating material, then this should be done now, laying it under the drywall. Return to the table of contents</a>
How to make the backlight properly
After the sheathing is done, it is donecheck with the project regarding the accuracy of the placement of the devices. After this, holes are drilled for the backlight. This is done using a hole saw mounted on a drill. You need to work carefully, otherwise the drywall may crack. Do not forget about safety glasses, as dust will fly. Now you need to pull the wires out of these holes and be sure to strip the ends. As a rule, this is done with special nippers. Then a terminal for connection is put on them, and the wires located on the lighting devices are connected. This must be secured with a screwdriver and inserted into the hole, pressing tightly to the surface. If you decide to install an LED strip, then you do not need to make any holes, because there is an adhesive base on the back of the tape. You just need to remove the protective film and stick the tape. It is connected to the network using a connector. Keep in mind that such a tape is intended to create dim lighting, so it is installed along with other lighting systems. The tape will look best if it is decorated with special borders, which are sold in any hardware store. At this point, the work is considered complete. But that is not all, because it is necessary, or rather, to bring it into proper form. In order to make a decorative finish to a plasterboard ceiling, it is necessary to putty all the joints. After that, the final coating is applied. For these purposes, it is necessary to use a primer and finishing putty, which covers the entire surface, after which the ceiling can be painted or wallpapered. The type of paint in this case does not matter at all, because plasterboard can be painted with water-based paint, acrylic mixture, and latex paint.


