Everyone wants their home to be cozy andbeautiful. When you take on home renovation, you will find that one of the most difficult jobs will be bringing the ceiling into proper shape. With a responsible and thorough approach and even with minimal experience in renovation work, you will definitely be able to figure out how to make a suspended ceiling with your own hands. Thanks to this design, you will be able to realize any of your design ideas and fantasies. General diagram of installation of a suspended ceiling.Also, suspended ceilings can give you many advantages over conventional ones, which in many houses darken over time, become covered with cracks or other defects. And if you also consider that you may encounter mismatched angles, uneven tiled floors or different levels of ceiling floors, then the issue of not too expensive but high-quality repairs becomes especially relevant.
Suspended ceilings: device, types, pluses and minuses
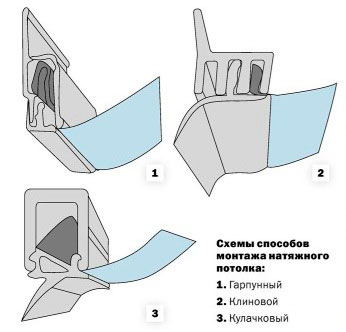 Schemes of methods for installing stretch ceilings.One of the most popular finishing materials is plasterboard. Using it, you can undertake the production of any architectural elements, cornices, profile parts, ornaments and beautiful original suspended ceiling systems. In addition, you can hide the shortcomings and flaws of your ceiling: defects, cracks, unevenness, etc. Even under an ordinary single-level plasterboard suspended ceiling, you can easily hide wires or other communications. You will have a huge choice, since the design, structure and color range of these structures amazes with their diversity. By its design, a suspended ceiling is a metal frame (it can be multi-level or single-level). It is attached to the walls and ceiling of the room. Then it is sheathed with plasterboard sheets. You can also use this design to improve the lighting in your apartment or house, giving your home a unique elegance and style. On the suspended ceiling, you can place lamps according to your design plans and ideas. Return to contents</a>Advantages and disadvantages
 Harpoon mount diagram:1 – harpoon; 2 – profile; 3 – stretch ceiling sheet; 4 – base ceiling; 5 – decorative overlay; 6 – wall. Suspended ceilings are not just a more advantageous option than traditional plaster. They have many significant advantages:
 Clip fastening scheme: 1 – baguette; 2 – fabric ceiling sheet; 3 – wall; 4 – base ceiling. Although there are some disadvantages:
It is worth noting that stretch ceilings are consideredmore advantageous in many respects, but their installation is even more difficult. Before any work, it is always worth evaluating all the advantages and disadvantages in order to make the right choice. However, plasterboard structures are not the only way to make a suspended system. The most common are the following types:
- the already mentioned ceiling of gypsum board;
- suspended rack system;
- Armstrong suspension system.
Return to Contents</a>
Suspended ceiling: installation process
As with any other work, beforedirectly install the ceiling with your own hands, you will have to do some preparatory work: think over and create the design of your future project, draw a diagram, calculate and purchase all the necessary tools and materials, prepare the room and the ceiling itself. Return to contents</a>Preparatory work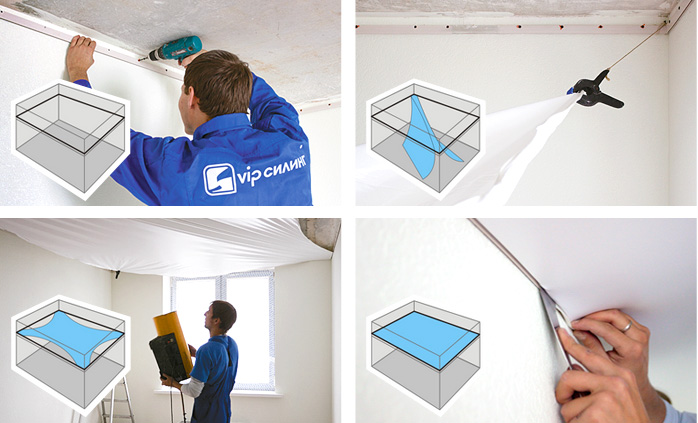 Installation diagram for suspended ceilings.Even though you will hide an imperfect surface with the help of the structure, you still need to prepare it. This can significantly save time, making it easier to install the ceiling and ensuring that the entire structure is securely fastened. First, remove all the old finish, putty, plaster, reaching the ceiling. Carefully check the surface for cracks and remnants of previous materials. You can prime and putty if everything is in order. Otherwise, more thorough work will be required. You should strive for a smooth and durable surface to which you will then attach the metal frame. If the walls need any adjustments or repairs (leveling, insulation, etc.), this should also be done. On your drawing or diagram, you need to write down how many levels you want, how many light sources there will be and where they will be located. Start with some simple design option if you are taking on a suspended ceiling for the first time. Next, you need to carefully measure the room to calculate how much of what you will need. Be sure to take into account the reserve for waste. Here is an approximate list of the necessary tools and materials that you should prepare:
- plasterboard sheets (according to the standard, their width is 1.20 m, and the length is from 2 to 4 m);
- metal profiles with a standard length of 3m, you will need guides that are installed around the perimeter of the room (size 27 × 28 mm), and rack-mounts that will form a grate (size 60 × 27 mm);
- Suspension brackets for fixing the racks to the ceiling;
- stock of different connectors for profiles (cross and butt joints);
- many screws with dowels;
- ruler and level;
- hydro level;
- screwdriver or screwdriver;
- a hammer;
- a regular hacksaw or a stationery knife (to saw the sheets);
- Scissors or hacksaw for metal to cut profiles;
- a drill or a puncher to drill the grooves under the dowels and cut holes in the plasterboard under the fixtures;
- putty, primer, a set of spatulas;
- heat and sound insulation, if you plan to install;
- sealing self-adhesive tape.
The list may vary depending on what kind of ceiling you want to make. Return to Contents</a>We can start working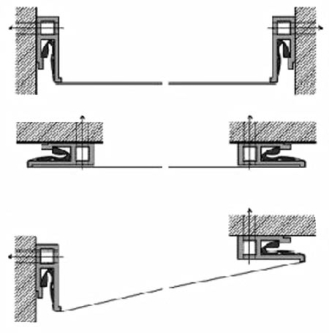 Mounting profile installation diagram.First of all, you need to determine the lowest angle in the room. To do this, you need to measure all the corners and the center of the room with a tape measure. Where the minimum height will be, make a mark 5 cm from the ceiling if you are not going to install built-in lighting, or 8 cm if you plan to. Now, using a water level, make marks at the same level as the first point in each corner. After beating off, you need to evenly connect all the points with a horizontal line along the perimeter of the room. Then you can fasten the guide profiles to the walls. One guide is applied to the line (make sure that the lower edge of the profile goes strictly along the line). Mark the corresponding marks on the wall using the finished holes in the profile. You will also need holes along the edges of the profile. Even if they are not there, just step back 10 cm and do it yourself, and you can drill holes using the marks you get. Next, glue the sealing tape to the profile and fix it to the wall with dowels. Mark the surface for the main ceiling profiles as well. Given the width of the plasterboard sheet (120 cm), the profiles need to be positioned so that there is a distance of 40 cm between them. This will allow you to fasten the sheet along the edges and in the middle. You will also need jumpers at the transverse joints of the sheets - that is, every 2.5 meters (the standard length of plasterboard sheets).
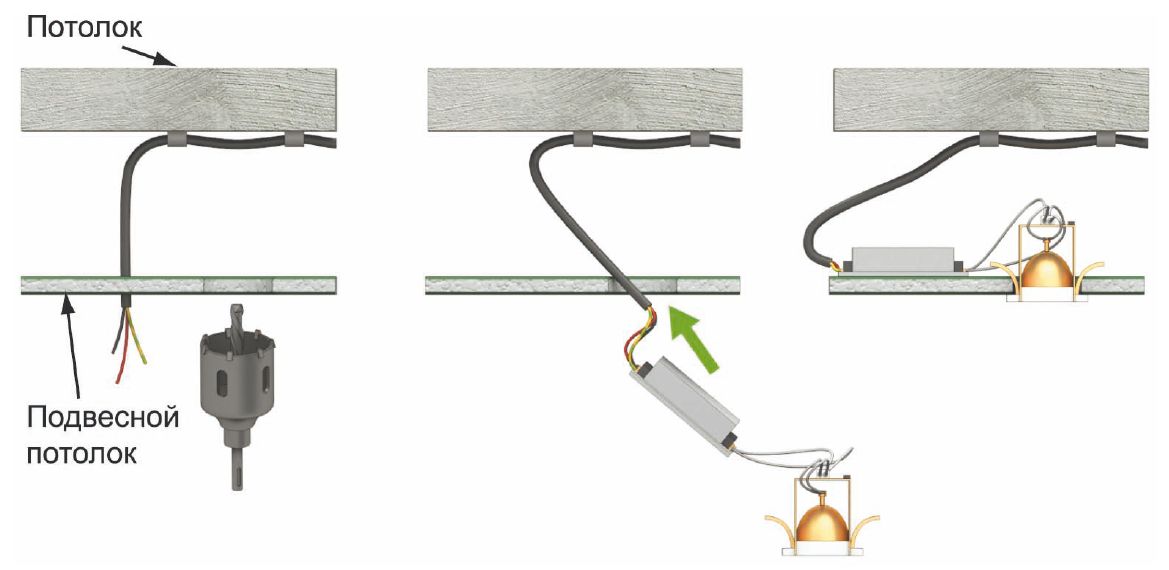 Wiring diagram for suspended ceilings andinstallation of a spotlight. It is time to install the frame. Secure the hangers, and then cover them with sealing tape. When you finish securing, try to bend the ends of the hanger. They should bend as much as possible. But during subsequent fastening, there can be no more deflections, because then the profiles will be secured unevenly. Now you can install the ceiling profiles. Start attaching them to the hangers from the corners of the room, and then move to the center. The lintels should be fastened in those places where the drywall will be joints (every 2.5 meters). Remove the chamfer before you start attaching the drywall to the ceiling. Cut the edges with a knife at an angle so that the putty penetrates well into the gap later. Fix the plate first from the corner. When screwing in the screws, make sure that their heads are recessed and do not protrude. This can be checked by touch. The sheets need to be secured together to create a brick or checkerboard pattern. To do this, shift them lengthwise by one slab. Do not join the material tightly, leave a 2 mm gap around the perimeter. The final step is to fill the ceiling and seal the seams. To do this, prime the seams and wait until it dries. After the filler has dried, stick self-adhesive tape to the seams. At the intersections, stick it overlapping. Fill the ceiling again, hiding all seams, protrusions and other traces of work. When everything is completely dry, you can apply the final layer of finishing materials and install lighting fixtures.


