The most common method of levelingfloors today is the arrangement of screed. This is due to the fact that the vast majority of finish coatings, among which, for example, parquet, laminate or tile, require an even and solid foundation.  Scheme of reinforced floor screed. Tightening is decided to equip in one of some cases, such as: the need to obtain a monolithic surface, the use of soil as a basis for screed, the requirement to bring the floor to the desired level or the need to arrange a certain slope. Among other things, the concrete screed allows you to save, since this technology is the most budget option among the rest. Fill the screed with the use of claydite, as well as foam concrete or perlite concrete, a mixture with such compounds can reduce the weight of the floor and make it thermally insulated.
Tools and materials
 Tools for floor screed: beacons, pelvis, spatula, level, tape measure, roller, cutter.
- Master OK;
- profiles;
- armature;
- Scotch;
- cement;
- sand;
- concrete mixer;
- capacity;
- level;
- rule;
- putty knife;
- roulette;
- Master OK;
- the trowel;
- rope;
- pliers;
- wire;
- self-tapping screws;
- metal grid;
- film;
- profiles.
Back to contents</a>
Preparation of a mixture for pouring screed
 The ratio between the components of the concrete mix for floor screeding. In order to prepare a mixture for floor pouring, it is necessary to use materials in the following proportions:
- 3 parts of sand;
- 1 part of cement;
- 1/10 pieces of calcareous dough.
As an alternative, the following proportions of materials can be used:
- 2 parts of sand;
- 1 part of cement;
- 3 pieces of rubble, replace the last one with gravel.
To prepare a light mixture,use cement grade M-400 and expanded clay. The mixture with any recipe should be homogeneous and have a thick consistency. It is not recommended to add excess water to the composition, as this will result in a reduction in the strength of the screed. Within 2 hours after preparation the solution will need to be used. Back to contents</a>
The preparatory work process
Before starting work, it is necessary to determine whichthick will have a floor screed. If there are differences in heights that exceed 5 cm on the base, then you should begin leveling using the concrete, prepared from concrete of M-150 brand, and you can replace it with concrete of M-200 grade. If the concrete is supposed to be poured on compacted soil, it will be necessary to equip the floor screed with a thickness of 150 mm. If the work will be done on the existing concrete base, it will take about 80 mm of the screed thickness. 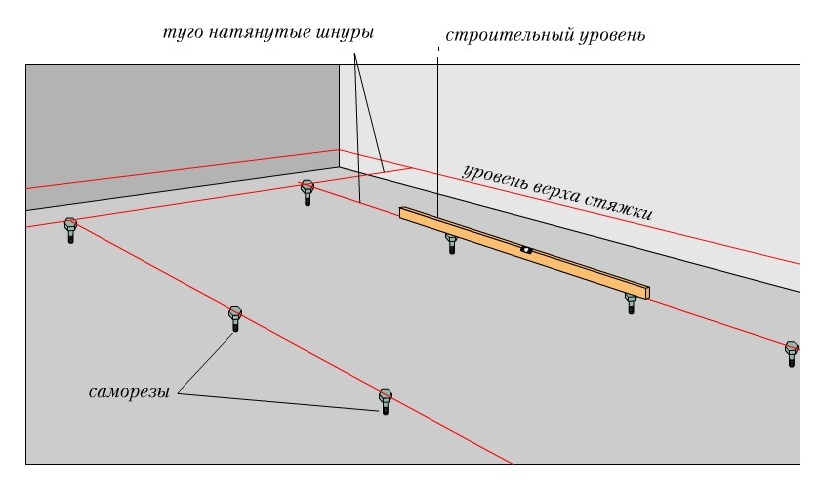 The scheme of installation of beacons. In order to get an even concrete floor, it is necessary to mark the corners and walls of the room in advance using the level. The lower the markings are, the more comfortable it will be to designate the level of the screed. Tags after the separation must be connected around the perimeter of the room. Simplify the process will allow self-tapping screws to be screwed into the walls and pull the cord between them. This will allow us to designate a zero level. The surface of the floors, before pouring the screed, should be waterproofed to prevent the humidification of slabs and the flow of water from the concrete composition down. Polyethylene can act as a waterproofing agent, its thickness can vary from 100 to 300 microns, it is possible to use ruberoid, as well as bitumen paper, and polymeric membranes. Laying the material to be made overlapping, connecting the adhesive tape joints. The film should be laid so that its edges go above the zero level. It is possible to produce waterproofing floors and waterglass. Apply it in 2 layers, and the total thickness of the waterproofing in this case should be equal to 5 mm. This additionally will also insulate the floor. Strength characteristics of the floors will increase the packing of the reinforcement. It can be either a grid or a three-dimensional frame. It is acceptable to apply steel fiber, but it should be added to the mixture during the mixing of concrete. The best option is the use of combined reinforcement.
 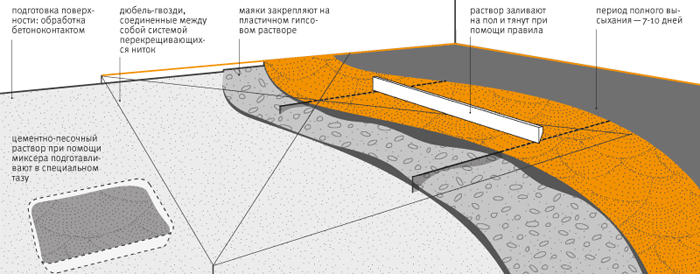 Scheme filling screed. The reinforcing mesh must be overlapped, and then connected by wire. Use for this can be a steel welded mesh, the size of the cells which can be equal to 100x100 or 150x150 mm. If it is intended to equip a thin layer of screed, the grid must be laid on the mounting supports. If you mount it directly on the surface of the rough floor, this can lead to cracking of the concrete. Next, you can install beacons that will allow you to level the poured concrete. To do this, apply profiles that must be set to zero level. This stage assumes the initial arrangement of the support bases, on which the profiles will be mounted. For a strong fixing of profiles, you can use gypsum. It is necessary to produce these works one day before the flooring is supposed to be tied up. You can also use one more option of fixing the guides, which involves the use of self-tapping screws. Correction of their position will allow to regulate the height of lighthouses. The pitch between the beacons will be determined by the length of the rule. Back to contents</a>
Pour concrete tie
Lay the concrete on the floor followed by a shovel, afterwhich you can start to level it with a rule. Then the base can be leveled with a trowel and get rid of the beacons. Scheme laying screed can assume the following of different technologies. One of them provides for the beginning of work from the far corner of the room, the resulting strips are to be connected among themselves, and then fill with the solution of the space left by the lighthouses. It is permissible to stack and several strips that are remote from each other, after the distance between them, too, must be filled with a mixture. The screed will freeze for half a day, after which the surface will need to be sprayed with water for several days. This is necessary for a slower drying process of the solution, which will allow a greater strength of the substrate. If you are wondering about how to properly fill the screed, you should also know that the technology assumes the need for a final leveling of the floor, which has already frozen. This stage is called grinding, and it is carried out using a trowel. In the process of hardening the screed, it can acquire cracks. Even during operation, the floor can crack, which can lead to deformation of the house. Avoid this will eliminate the rigid adhesion of the floor and walls. Therefore, it will be necessary to make seams, which will be placed along the perimeter of the room and around the columns. You can cut the seams with the help of a shaving rake, which should be used in a non-hardened base, the cutting can also be done after the concrete has hardened. Do this 12 hours after grouting the surface. The seams should be straight, their width should be 1.3 cm, and the depth - 1/3 of the thickness of the concrete. In the arranged seams it is necessary to lay cords like Vilotherm, and then pour them with polyurethane sealant. To harden the screed will be within 25 days, you can extend this process with a polyethylene film. If you follow all of the above rules for installing a concrete floor screed, you can get a sufficiently strong surface, which will act as a reliable basis for any finish coating offered by the market. It should be remembered that the quality of the work and the durability of the final finishing of the floor will depend on how well the concrete screed is properly equipped, and whether it retains its quality and strength characteristics.


