In modern apartments floors are often formed fromlaminate flooring. The technology of laying the elements for the construction of such a floor is very well thought out, that is why the installation of the laminate can be done by any owner of the dwelling even without preparation. Cutting out the material and combining it is not at all difficult, so laying the floor covering can be done quickly, even with a complex layout of the room. Observance of some simple rules when laying out the material will help make it uncomplicated, and the installation itself does not take much time.  Layout of the laminate.
How to ensure a long life of the laminate
Before you carry out the installation, you need to be sure,that the material can be used in the conditions of the room where the repair is carried out. Installation of the laminate should be carried out in a well-heated room, where the humidity and temperature are normal. In order for the operation to be more durable, it is desirable to maintain a temperature of about 15-30 ° in a room. The optimum humidity is 40-70%. As a basis for this material, a wooden floor or a well-leveled concrete base is suitable. If there are differences in height, they should not exceed 2 mm per 1 m. With significant unevenness, the floor must be leveled - this can be done by forming a concrete screed under the laminate. You can also arrange a bulk floor. Laying the laminate on an uneven floor is unacceptable - the material will deteriorate very quickly.  Laminate varieties. The installation of a laminate over the heated floor system is also unacceptable. Heating the panels from the bottom will cause the elements to deform. In this case, unless hydraulic systems are allowed, with which heat is distributed more evenly and the laminate does not overheat. Between the lower edge of the coating and the elements of the system, the warm floor must be observed at least 3 cm. When the base is prepared for work, proceed to collect materials and equipment. Back to contents</a>
What will be needed to install the laminate?
The technology of laying the material on a flat base is notpresents challenges. Foamed polyethylene is spread on the finished cleaned base. From above it is possible to lay a laminate. For wooden floors there will be enough and a polyethylene substrate, but for the basis of concrete under polyethylene, a waterproofing device is required. For this, a membrane material or a conventional polyethylene with a thickness of 200 μm is used. Materials for the device of a floor from a laminate:
- laminate in sufficient quantity;
- priming composition;
- polyethylene film;
- expanded polyethylene;
- glue;
- wedges for creating technological gaps;
- a plinth and fastenings for it.
As for the wedges, it is better to buy those,that are intended just for laying the laminate. This solution is no less convenient and affordable than the crosses used for tiling the surfaces. In the absence of wedges, you can use wooden pegs, pieces of plasterboard instead. The main thing when using self-made wedges is to keep one size for them. Wedges should be about 10-15 mm. 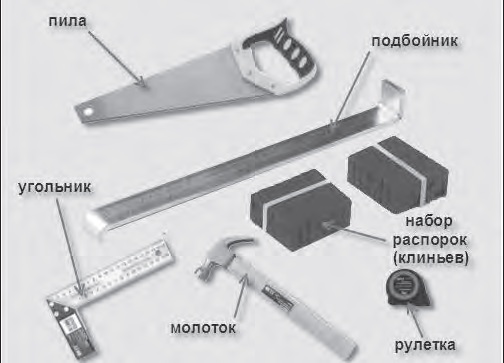 Tools for laying laminate. With the adhesive, the laminate is not attached to the base. It is used only to ensure that the material and the base are adhered to the edges of the edges. Laminate should be bought with a margin. It is not difficult to work with it, but even an experienced master sometimes makes mistakes, and it often happens that some of the elements are spoiled, turns out to be unusable. Most often it happens when you need to cut slats in those places where the walls are bent or there are exits for communication. Tools will need these:
- pencil;
- sharp knife;
- corner and tape measure;
- electric jig saw;
- hacksaw finely chiseled;
- a hammer;
- wooden bar.
Prepared for work materials neededplace in the room where the stowing is to be carried out. There they must lie down before starting work for 2 days. This should be done so that the materials can get used to the humidity and temperature conditions of the room. Neglect this process is not worth it. To properly lay the laminate on the floor, taking into account certain installation conditions, it is necessary to understand the process well. Back to contents</a>
How the laminate is laid
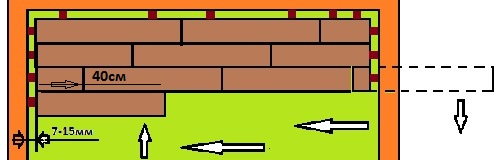 Layout of laminate flooring. The rough floor must be well cleaned from dust and debris. If possible, it is better to use a building vacuum cleaner. The surface of the rough floor is primed, whether it is a concrete screed or a wooden floor. The cleaned concrete surface is covered with a layer of waterproofing. Strips arrange with an overlap of 20 cm, all joints must be glued with adhesive tape. Now we need to lay foam polyethylene. Lay the laminate start from the window. The lining under the floor covering is only done on the floor where the flooring is being performed. As the laying of the material progresses, the laminate will need to be reported. Performing the work independently, without the involvement of specialists, you can better ensure the safety and purity of the material. The material for the laminate should be arranged in such a way that its edge for 2-3 cm rises on the walls - this is how the depreciation stripe is formed. Each of the subsequent strips of foamed polyethylene is overlapped with the previous one, the adhesive tape is pasted on top. Manufacturers also produce laminate, pre-equipped with an insulating lining. Under it, foamed polyethylene should not be built. The insulation layer must be provided only when installing the laminate on a concrete base. Laying the laminate should begin with the arrangement of the first lamella from the window, in the corner of the room. Between it and the wall put the pegs, after which in a row to the very end of the whole strip is added. It is important at the same time to correctly connect the elements: at their ends there are grooves for this. Lamella must be brought to the already laid out element evenly, at a slight angle, trying not to warp. Efforts at the same time do not need to apply, do not use a hammer.
 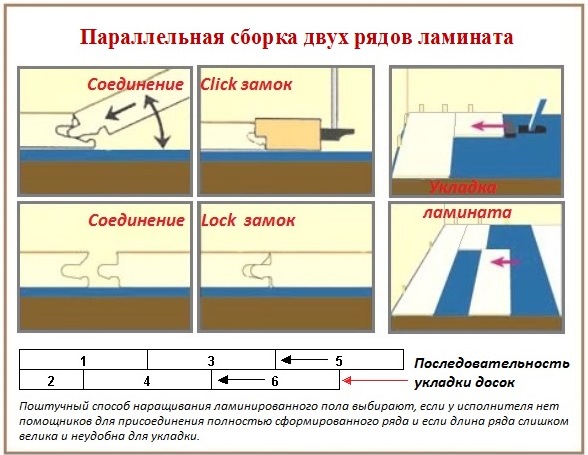 Scheme of assembling two rows of laminate. In the distance left to the wall, the whole element may not enter - fill it with a piece. To do so, lamellas are turned over the short end and put it on the already placed elements so that it rests against the wall. The flip side of the panel is turned upwards - a cutting line is outlined on it. When marking it is necessary to remember the need to leave a gap of 10-15 mm to the wall. Next, the lamellae is cut so that it is the right length, using a hacksaw or electric jigsaw. The prepared element is inserted into the common row. The second row starts with the rest of the stacked piece, if it is not less than 30 cm. If the piece is shorter, you will have to cut the new panel. Elements in this row fit so as not to snap locks - they should touch the first row only by the edges of the ends. The row is joined in the same way as the first, then the elements are slightly raised, until they lock into the lock and snap along the entire length. The hammer should not be used. If you need to eliminate stresses where the panels do not completely go into the locks, put a bar of wood at the outer end of the strip at this point and tap it lightly with a hammer. The ranks must completely converge. So continue to work and continue until the entire space is full. Particular attention should be given to areas with protrusions or bends of walls, places where communications are output. Back to contents</a>
How the laminate is laid diagonally
If desired, laying can also be done bydiagonals. Due to this, it is easy to create the effect of visual expansion of the room, which is often used in the implementation of a variety of design fantasies. The disadvantage of this method is that the amount of laminate is much larger. To calculate it, you need to add 8% to the floor area. Preparation is carried out in the same way as with simple laying. First choose the angle next to the window. From it at an angle of 45 ° stretch to the walls twine or line, on which you can perform laying. At the first strip, the edges are cut at an angle of 45 °. Stacking is performed with the necessary installation of wedges to create a thermal gap. After that, two bands are selected - they are measured so that the junction falls in the middle of the first of the rows, and the cut edges come to the wall with a gap. Gradually the whole floor is filled with laminate. If you focus on the joints of already laid rows and a stretched line, you can lay out first large solid areas. Then you can deal with places that require trimming elements, or fill areas near the walls. This will help avoid improper installation, which is often due to the fact that the walls of the room are uneven - focusing on them, you can get a run in the joints of adjacent rows. When all the space is full, the wedges along the perimeter are removed and the protruding lining is cut. To finish the work it remains to hang the plinth. This gives the floor of the laminate a beautiful appearance.


