Laying the floor on the logs is done by yourself. Simplicity of installation and a number of advantages make this material indispensable for flooring on the floor surface. What determines the popularity of the lag?  The device of plywood floor on logs. First, the load on the floor (structure or overlap) is distributed evenly around the perimeter. Secondly, to lay the floor with lags means to provide the inside of the apartment with heat and sound insulation properties.
Some advantages
 Layout of the lag. Laying the floor on logs has the following technical features:
What is the lag? These are bars of wood or polymer, which are laid on the finish. The universality of such a bar is due to the fact that it can be mounted on a wooden, reinforced concrete and earth foundation. What are the lags made of? Log is a bar, which is made of metal, wood, plastic, reinforced concrete. However, wooden houses are very popular. Back to contents</a>
Construction and installation of logs
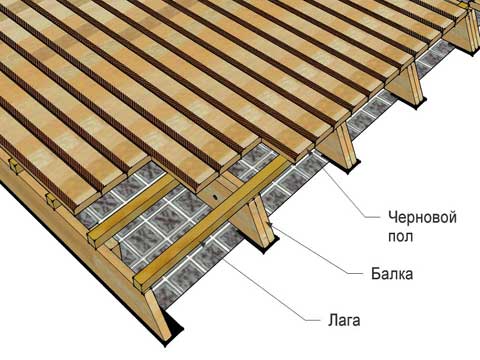 The device of a floor on logs. If the surface is made of wood, it means that it will be difficult to achieve an even surface. To get the most smooth floor, you should attach the beams on the floor to the side beams. The use of this method does not require a special lining, which regulates the height of the bars. Mount the lag is necessary on the screws, which must be longer than the width of the beam in 2,5 times with a diameter of not less than 6 mm. To avoid the formation of cracks in the wood, experts recommend making a hole in the beam and log with a diameter of 2.5 mm smaller than the diameter of the screw. If the distance between the beams is large, a re-laying is required, which is perpendicular to the first clutch. However, the distance should be less. Another option is to use thicker boards designed for finishing. If you have concrete floors, then the design of the floor on the logs looks quite different:
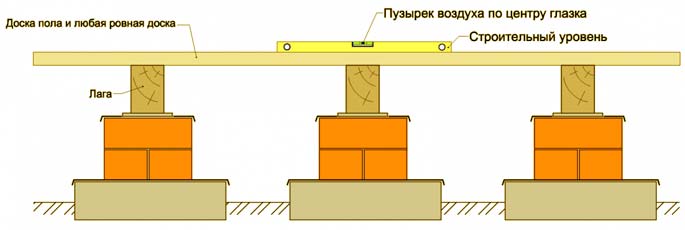 Installing the log and checking the horizontal position beforelaying the floor. For such work, boards of at least 2 m in length are needed. If this length is not enough, then it is possible to join the parts with their butt ends. When the lags are connected, you should take into account one important circumstance: the joints of neighboring planks should be displaced relative to each other by half a meter. The bars can be laid either on the screed or on the waterproofing. Otherwise, the log will absorb the dampness from it, which shortens its service life. It is not recommended to lay the lag on the soft insulation. Gradually, you will notice how the floor will collapse, ruining the finish. When installing insulation, you can use boards of a certain width, but the bars should be located strictly between them. In any other case, the work will be in vain and will not bring the desired result. If the insulation is longer than the beams, then choose the location of the lags so that the distance between them can be filled with trimming. This is a very economical solution, since you do not have to buy additional lags. If you want to lay the bar on an earthen base, you should prepare the surface. First remove the turf, then sprinkle 5 cm of gravel on the surface. The final stage will be pouring the floor with 5 cm of concrete. After that, put waterproofing, screed, insulation. In addition, if you work with an earthen base, then the screed and insulation can be replaced with polystyrene concrete.
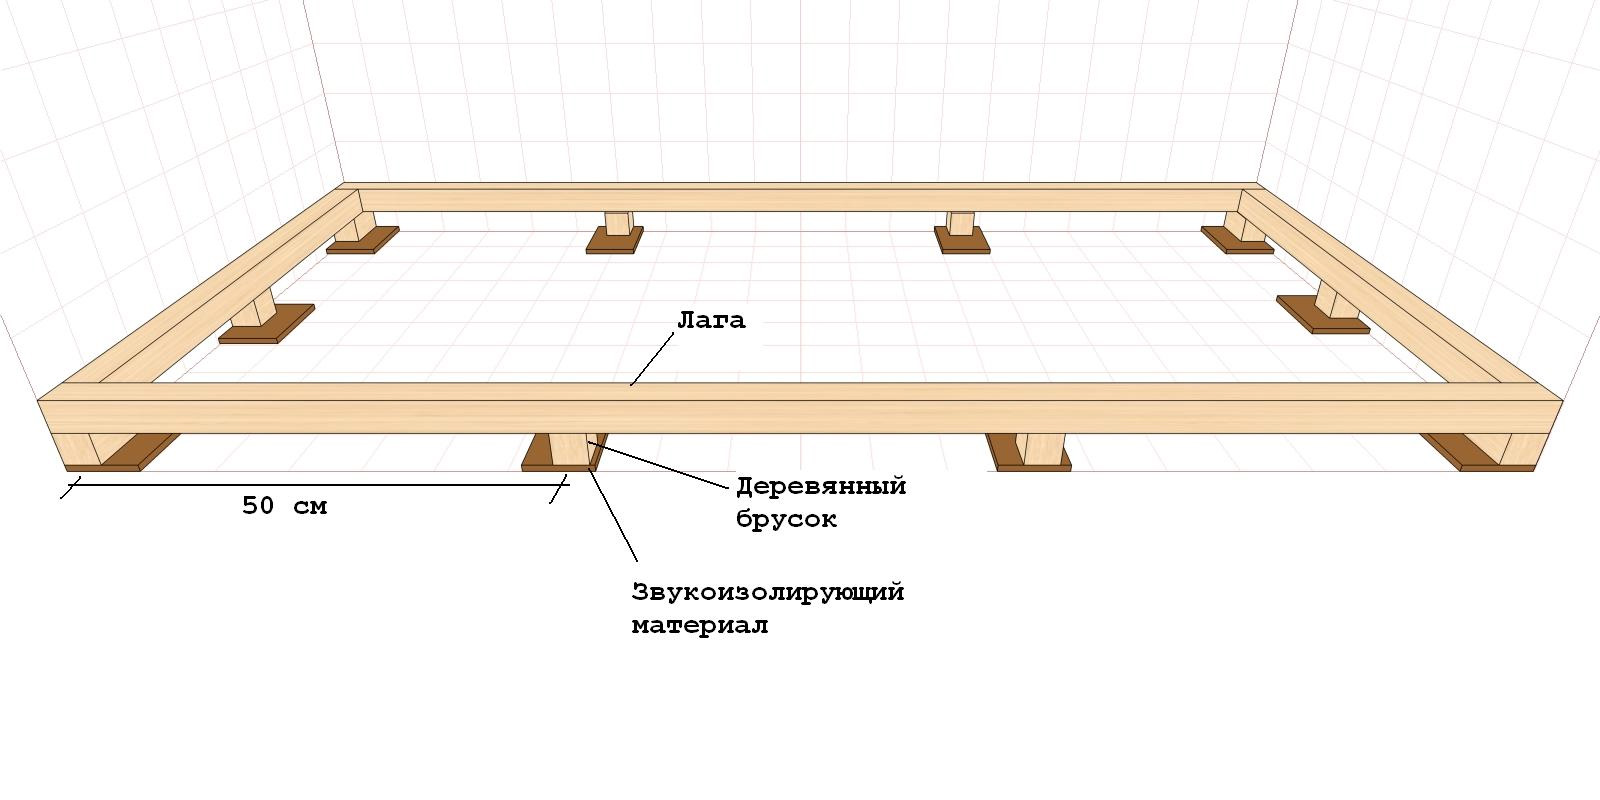
 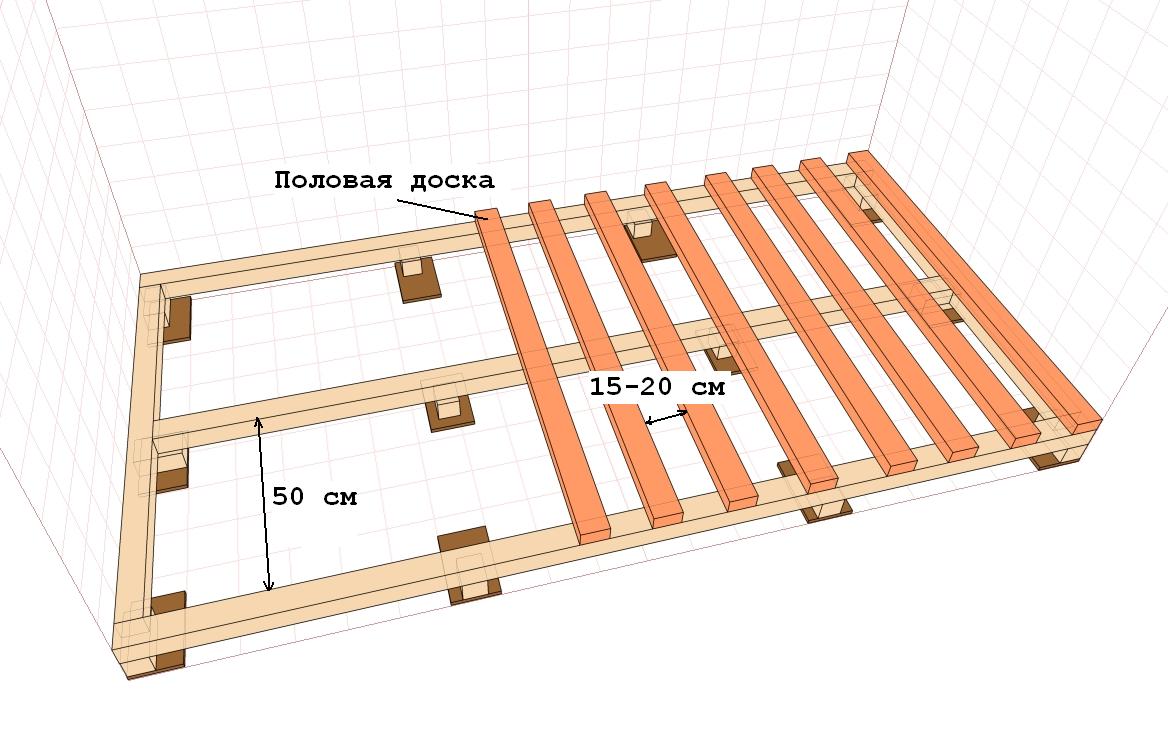 Distance between the floor lags. Now about the distance between the lags. It should be no more than 40 cm, so that the load is evenly distributed to the floors. Tips for proper lagging:
Back to contents</a>
How to lay the floor: step by step instructions
To make the floors themselves lags,it is necessary to develop a plan. In terms of you can specify the parameters of the beams, all kinds of preparatory work and adaptations that will be useful during the installation.  Tools necessary for work: a perforator, a drill, a wrench, a hammer, an electric jigsaw, an ax. You will need:
Bars fit into a pre-calculatedthe gap between them for soundproofing. Apply the level to achieve the most flat surface. If the surface is concrete, bolts of the anchor type for fixing the lag are used. If the base is made of some other material, then dowels are used. What are the advantages of a wooden log? The technical properties of the bars are determined by strength, reliability, and ecology. Log does not require any additional care. In addition, the floors on the logs are distinguished by a presentable appearance. The advantages of lag are:
- It is not necessary to exert efforts to make the floor even;
- bars have thermal insulation properties;
- installation is done quickly, in several stages;
- excellent sound insulation;
- the possibility of the location of communications.
Back to contents</a> Laying the thermal insulation As already described,lags are mounted with a certain step. In the remaining gaps, the insulation is laid (fiber superthin basalt or expanded polystyrene). You can use for this purpose a roll insulation. In addition, for the insulating layer you can use expanded clay. Back to contents</a> Clear flooring  Laying boards on logs. The laying of the wooden lag begins at the corner of the room. The first row is placed with a tongue against the wall, and the gap between the wall and the lag should not be more than 1 cm, since it is possible to deform the wood under the influence of the environment. Next, a number of logs are stacked offset from the first row by approximately several bars. To ensure that the boards are firmly attached to the base, it is necessary to tap the wood lightly with a construction hammer that adjoins the end of the bar. The boards are attached along the wall, fastened with screws. They can be on the surface, but no one will see these details - plinths will hide all the shortcomings. Thus, all deformed boards are covered with this decor element. Irregularities also will not be visible. However, this does not mean that you do not need to follow the instructions, in time, with improper installation, the structure is destroyed. Back to contents</a> Leveling the floor with your own hands
 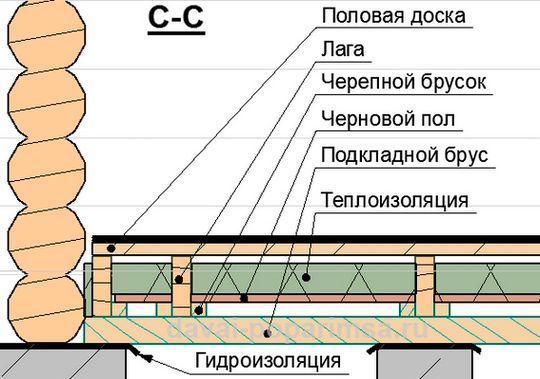 The floor is made of particle board on logs. Surely you have encountered a similar problem. Especially often it is observed in old houses, where the height can go beyond the level of smoothness to 20 cm. Concrete screed is not always an option: the structure can not withstand such a load. Here it is reasonable to use adjustable lags. The process of installing them is performed as follows:
Back to contents</a> Finishing work 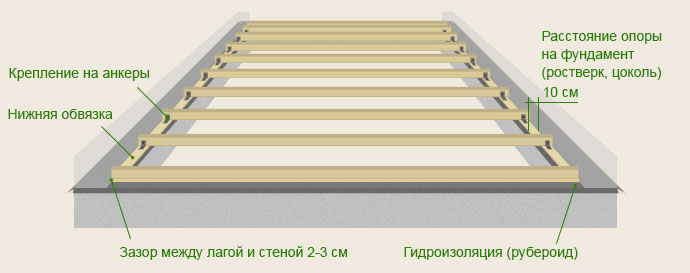 The rough floor on the logs with their own hands. Now, when the main work is done, proceed to the completion of laying lags. Your task is to get rid of unevenness on the surface, and also to remove roughness. A boring or grinding machine is an ideal option for such work. The process begins with sandpaper, which effectively and quickly removes all unnecessary. Then you should take a skin that will polish the surface of the base. To increase the service life and wear resistance of such a floor, you need to cover it with one of 3 types of impregnations:
You have read the material on lagging,It remains only to get down to work. Such floors will please you with heat-insulating properties, durability and long service life. You can achieve a good result if you follow the installation scheme exactly. Despite the simplicity of the work, the styling has its own peculiarities and nuances. Today, the masters prefer to lay the floors with lags, and not for nothing - they will create an impeccable appearance in your home.


