Garland, which is most often decorated with the New Yeartree, can be used as a component for the manufacture of the lighting fixture. The lamp from the garland with their own hands is made simple.  To make a fixture you needa garland, a plastic lampshade and a stand. In this case, the lighting in the room will be soft. Such a lamp can be used as a night lamp. The designs of such self-made fixtures can be varied depending on the imagination and the raw materials.
Luminaire from discs and garlands: making
The following materials will be required:
- CDs or DVDs with both sides without a picture;
- a garland for 15-20 light bulbs;
- adhesive and gun for its application.
To begin assembling such a lighting devicefollows from the manufacture of a geometric figure, for example, a cube or a three-dimensional pentagon, which will be the basis. To do this, glue is applied to the disc and another is applied immediately. Sequentially glue the disks until the desired shape is obtained. But, in order to be more convenient to place inside the cube, one of its sides should not be glued.  To mount the discs you need a glue gunor wire. After all the discs are glued together, a garland is placed inside. It is positioned in such a way that the plug and the control box are in the window, which is formed by the joint. Several bulbs are led out into the holes. The number of placed inside the windows can be from 3 to 5 depending on the size of the light bulb. The luminous elements must completely fill the hole, thereby creating the desired effect. The rest of the garland, which does not fit in the holes, is placed inside the cube evenly. It is necessary to leave a few more bulbs, in order to pass them through the last stropa, which is formed after pasting the last disc. For ease of installation inside the holes, they can be fastened together by a tape or an insulating tape. In addition, the formed group can additionally be fixed with the help of glue or sealant already in the process of their placement in the discs of the luminaire. After all the holes are filled with light bulbs, you should stick the last part of the cube of the lamp. The last disk is passed through the bulbs left for this purpose. As a stand, you can use one more disk. On it with the help of glue glue the received cube, setting it on the edge. This arrangement will allow the light fixture to stand stable in the future. It should be noted that the socket and the control box were placed below, but were not glued at the same time. After the design is mounted on the stand and the glue is finally solidified, the luminaire is ready for operation. Back to contents</a>
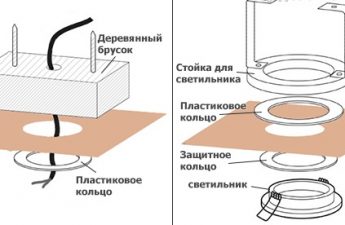
Lamp from plastic packing and garlands
 Scheme of supply of a garland in a lamp. In order to produce this model, the following materials and tools are needed:
Before making slits, it is necessary to makemarkup. They can be placed symmetrically and on 1 piece in an aperture (or in the form of any drawing on some pieces inside). On the bottom, you need to make a slot through which the wire with the socket and the control box will subsequently be passed. If the material from which the base is made allows to make holes with a soldering iron, without damaging it, it is better to use it. In the event of a structural integrity violation, when exposed to a heated soldering iron for work, it is necessary to apply a drill and a drill. By marking holes are made using the tool that is suitable for the selected substrate. If as a result of the holes are formed sharp edges or part of the plastic remains outside or inside, then these remains must be carefully cut with a construction knife. It must be done carefully and in such a way as not to damage the rest of the base. After the grooving is completed, you can start painting. The base is to be stained several times so that a uniform white color is formed over the entire surface. After the paint has dried, you can place the bulbs in the holes. For convenience, the work should begin from the top. After all the light bulbs are placed, and the wire with the socket and the control box are placed in the slot, the base should be closed with a cover. This will allow you to move the lamp around the room. The luminaire is ready for operation.