People who are flowing with creative ideas, alwayscause admiration. It would seem that out of unnecessary trash they make piece, exclusive things. Why do I need an empty juice bag? Or a sleeve from a roll of paper? For ordinary people who do not have a creative beginning, the answer is obvious - they can only be disposed of. But do not hurry. Of such unnecessary everyday things, you can try making luminaires from clay with your own hands, while receiving an absolutely incredible thing.  For the manufacture of lamps from clay, you canuse both ordinary clay and polymer. The material for the model is polymer clay, or, as it is also called, plastic. It is a mass that looks like plasticine. Some types are required to "harden" at home by baking in the oven. But there are also clays that dry naturally. They can be painted in different colors or have a natural basis. Lamps made of clay can be used in rooms of high humidity, which allows you to beautifully decorate the bathroom, sauna and other rooms. For the first time the spread of plastic clay was in the 30's, in Germany. At first, puppet heads made of it, which were of the same quality as the porcelain. Then the use of clay spread throughout the world. Products from it amaze imagination: dolls, fur-tree toys, fairy-tale houses, lamps. Clay is made entirely unlike things, streaming production is rarely delivered. The mass is produced in packages in a separate piece or in tubes similar to toothpaste. Such material is convenient to apply with imaginary strokes, and the lamp of clay will be piece. In order to create an unusual interior in your house, add romance and coziness to it, as well as handmade clay lamps. A beautiful chandelier can be successfully replaced. Examples can be seen on the net, but it's better to create your own.
What will it take to make it?
 Lamps made of clay can be used in rooms of high humidity, which allows you to decorate the bathroom or sauna.
- clay;
- Paper knives for cutting, film to protect against table contamination, stencils patterned, they can be made by yourself, which completely excludes the similarity of copies;
- shape under the future lamp of clay, just fit boxes and sleeves, also good bottles and cans of beverages;
- sandpaper of small size, grinding a lamp from clay is necessary to mirror shine;
- needle, the shoe is perfect.
Back to contents</a>
Stages of the workflow
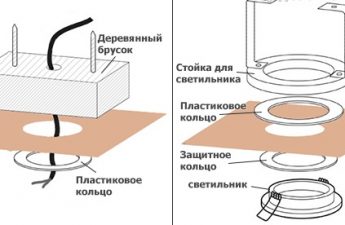
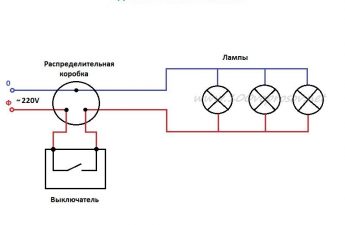
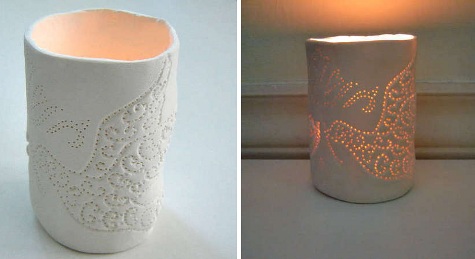
You need to start the work by warming the clay with your hands. This is done exactly as with plasticine. The amount of clay depends on the size of the mold. It should be enough to completely wrap the desired caliber. Hands during work need to be moistened with cold water, then the clay will not stick to them, and its particles will not remain on the table or oilcloth.  Plastic clay is available in packsa separate piece or in tubes similar to toothpaste. Further, the clay dough is rolled out with an ordinary rolling pin, specially purchased for this purpose. If you use your own kitchen, the clay particles will be in pies for sure. Clay is rolled up to a thickness of not more than 5 mm. The edges can be made thinner, so that the wrap turns out without a thick seam. Then the workpiece is tried on a template and the excess is cut off, in the future they can also be used. Then the clay leaf is laid out on the oilcloth and proceeds to the creation. Stencil is superimposed and slightly pressed so that the pattern is not imprinted from the wrong side. Templates of stencils can be purchased in shops for creativity, but can be made from the cloth of plastic bottles with curved edges. After that, points are punctured along the contours in steps of 5-10 mm. What is it for? When the lamp of clay is ready, the light from the lamp inserted inside will pass through the holes, drawing a contour of the ornament. For an interesting combination of lamp colors, the holes are made with a needle, at the end of which there is a drop of paint. Then mixing colors gives an interesting result. You can endlessly experiment.
  Clay begins to harden after 20 minutes afterheating. After all manipulations with the pattern, the workpiece is wrapped around the mold and fastens the edges. It is done this way: you need to moisten your fingers with water and gently cover the seam. The bottom is cut from the clay layer of the same thickness using a mold, it is simply outlined and then fixed in the same way to the workpiece. Now the clay should be allowed to dry. At once it is necessary to make a reservation that the clay quickly hardens, it will begin approximately in 20 minutes after the beginning of work, therefore it is necessary to hurry. Finally, the product can be dried with a hairdryer. Check for hardness and only then get the form. After that, almost ready luminaire from clay can be ground. Lamp from clay can be varnished. It looks especially beautiful in combination with a lamp light. Also for the required form, the papier-mache technique is used, then the lamps made of clay can be made in the form of anything: flowers, patterns, animals, fairy-tale heroes and other fantasies. Very popular lace lamps made of clay. The work on their manufacture is more laborious, than if you make something that does not require complications. For this use cardboard patterns of ornaments or even knitted napkins. The difference between the manufacture of lace lamps and simple ones is that the sharp ornament is cut out in the right places, that is, a kind of napkin is made of clay, then wrapped around the desired shape and left to dry. Back to contents</a>
Some nuances and tricks of work
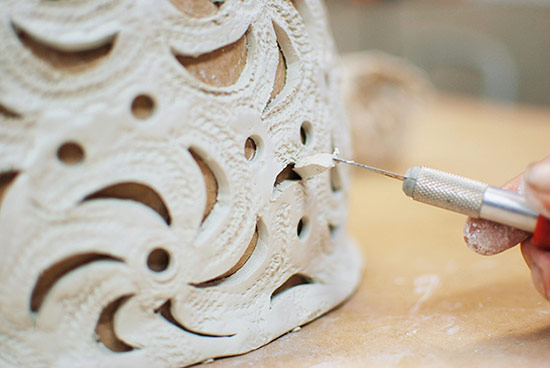 If there is no special tool, then you can cut out the ornaments with a scalpel.
Shopping trips in search of "raisings" forits interior can be postponed if you try to apply your own hands and imagination. Exclusive handmade items are expensive, so you can cut costs by using materials that are freely available from the manufacturer, their cost is low. Let luminaries from clay become the first creative discovery. </ ul>