New flooring technologies have failedto displace logs from construction, which are used as a base for wooden floors. The only drawback of logs is that after their installation, the height of the room is significantly reduced, so it is more expedient to lay logs in houses and apartments with high ceilings. Scheme of laying support joists on a concrete base.How to attach the joists to the concrete floor will be described below, but for now it is worth talking about the advantages of such a floor covering device over others. In the space underneath it, you can place electrical and other cables, as well as pipelines, for the installation of which you will not have to cut grooves in the walls. In addition, floors on joists are much warmer not only because they are made of wood, but also because of the ability to lay insulation between the beams of the base. In addition, additional sound insulation of the room is provided. It is worth adding that the concrete base will be the most reliable support for the lathing of a wooden floor.
Preparation of the base before laying the log
Most residential buildings have concretefloors. To lay the joists, you just need to prepare them properly. Of course, such work is quite labor-intensive, but for the sake of a long service life of a wooden floor, it is certainly worth the effort. Return to contents</a>Pouring the foundation for the joists in a country house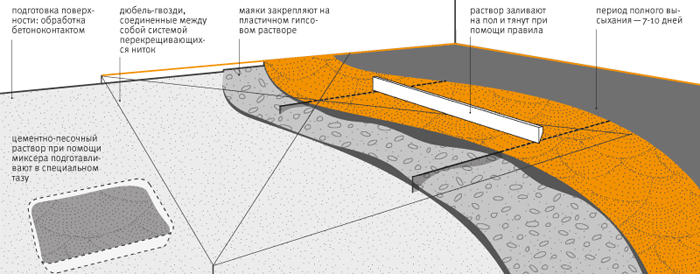 Scheme of pouring the foundation under the logs.Those who build houses on suburban areas can be advised not to lay logs on the ground, but to arrange them on concrete, because even compacted soil does not have the same strength as a concrete floor. The easiest way to pour a concrete base is within the perimeter of a strip foundation. Concrete is poured onto a compacted and horizontally leveled backfill of sand, crushed stone or sand-gravel mixture, the surface of which must be carefully smoothed to prevent breaks in the waterproofing film laid on it. The floor must be reinforced. To do this, reinforcement or rods are placed on top of the waterproofing. There must be a gap between the reinforcing grid and the backfill so that after pouring the concrete, the reinforcement is thicker. After the concrete has completely hardened, which lasts about a month, a leveling screed is poured. Return to contents</a>Repair of the ceiling in the apartment For those whois going to lay joists in apartments where concrete floors were installed during the construction of the houses, you should not "relax" either. Most often, it turns out that repairing the foundation is inevitable. True, in some cases you can lay joists on a concrete floor without precisely leveling it (one of the sections will be devoted to this method), but it is imperative to bring the floor into a proper appearance. The first task in the preparatory activities is to remove the old floor covering. After this, the old screed is removed. Often it turns out to be in a dilapidated state. To remove it, you will need:
 Tools for repairing screeds.
- perforator;
- scrap;
- construction hammer;
- shovel.
The old screed is removed using a hammer drill or crowbar.to the capital foundation. Noticeable protrusions are also chipped off. After the construction waste has been removed, cracks and depressions in the ceiling are sealed with mortar. After this, the foundation must be thoroughly dried. In the future, all operations are performed in the same way both in apartments and in buildings under construction. Return to contents</a>Preparing the base for levelingthe dried base is treated with an antiseptic composition and primer. After this, the ceiling is treated with bitumen mastic in 2 layers. The mastic is also applied to the walls, to a height equal to the thickness of the future screed. Keep in mind that the smoother you make the screed, the easier it will be for you to install the logs, which will only remain to be laid on an ideal horizontal surface. Therefore, create a plane before pouring it. This operation is simple, but requires patience and precision in marking. To perform it, you need:
- a painting line;
- a piece of chalk;
- hydro level;
- dowel-nails;
- roulette;
- synthetic thread;
- gypsum;
- beacon profiles.
 Scheme of beacon placement.Make a mark with chalk on one of the walls (near the corner). Apply it at any height. Using a level, put a point at the opposite end of the wall. Stretch a chalked cord between the marks and, pulling it back, beat off a horizontal line on the wall. Make lines on the other walls in the same way. Using a tape measure, determine the point on the floor that is the least distant from the chalk line. Make a mark opposite this point on the wall, step back 2-3 cm from it and put another mark. This will be the level of the future screed. Measure the distance between it and the chalk line and use it to make marks near the corners of the walls. Stretch a cord between them and beat off horizontal lines. Hammer 3-4 dowel nails into each wall along them. Stretch threads between the opposite surfaces. The plane of the screed is ready. Now you can lay beacons under it. They are directed from the far wall towards the entrance. The outer profiles are located 15 cm from the walls. The distance between the beacons should be 20 cm less than the length of the rule. The profiles are attached to the base with gypsum cones, the pitch of which is 30 cm. After the gypsum has hardened, the solution is poured and leveled with a rule. Return to the table of contents</a>
How to prepare the bars?
 While the screed is drying, prepare the joists. It is best to use coniferous wood for them. When buying, choose the straightest beams. When calculating their quantity, you need to consider:
- the distance between the walls of the room (it is better to abandon the laying of composite lags);
- the thickness of the floor covering, on which the distance between the beams depends.
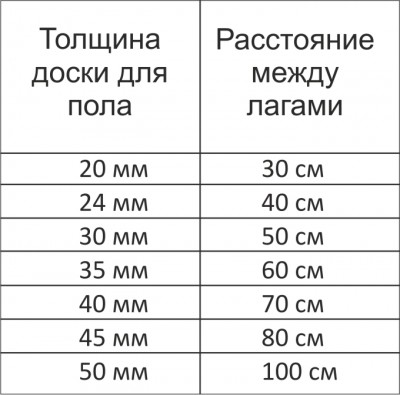
The table shows the dependence of the floor joist pitch onits thickness. Board thickness (cm) Step of support beams (cm) 2 30 2.5 40 3 50 3.5 60 4 70 4.5 80 5 100 The following table shows the relationship between the distance between the joists and the thickness of the plywood or OSB floor. Sheet thickness (cm) Step of support beams (cm) 1.5 40 1.8 45 2 50 2.2 60 It should be noted that plywood and OSB are stronger than solid wood materials. After purchasing floor joists, they must be thoroughly dried. The joists are dried in a room closed from direct sunlight.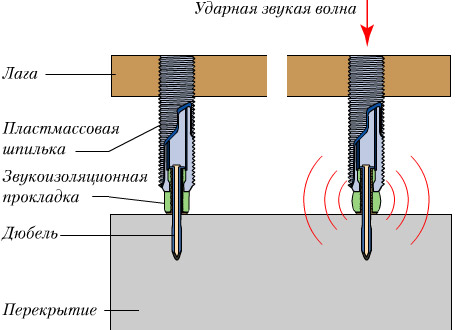 Figure 1.Adjustable rack with sound insulation scheme. Drying time is 10-12 days. The logs are laid at some distance from each other, between their rows (every 0.7-1 m) transverse bars are laid. Gradual drying of wood does not guarantee that all the logs will retain their original shape, so they should be purchased with some reserve. The screed has hardened, and the logs have dried. You can start installing them. In front of it, waterproofing made of polyethylene or bitumen is laid on the floor. The beams are treated with antiseptics and fire retardants. After that, their installation begins. Return to the table of contents</a>
Laying of support bars
There is a way in which the beams are attachedto each other, but not attached to the base. A flat horizontal plane is ideal for this technology. First, the beams are laid out along the perimeter of the room, but not close to the walls, but at a distance of 2-3 cm from them. They are pulled together with self-tapping screws into a box. After that, the remaining beams of the sheathing are laid. They are directed along the short walls of the room. Self-tapping screws are also used to tighten the sheathing. The correct installation of the logs, even on a flat base, must be checked with a building level. There is another method for installing logs. It eliminates the possibility of displacement of the supporting sheathing during the operation of the floor. The beams are attached to the base with self-tapping screws screwed into dowels, or anchors. Fastening with anchor bolts (screws) with a cross section of 10 mm seems more reliable. Its step can be 1 m. Fastening with screws with a diameter of 6 mm is carried out every 0.5 m. Anchors can be screwed into concrete through holes drilled in the beams. The depth of their immersion in the screed should be 5-7 cm. The depth of screwing in the screws should not be less than 5 cm. When fastening the logs with screws, metal corners are used. It should be added that between the beams and the screed, it is necessary to put spacers of the same thickness from pieces of roofing felt or linoleum (they need to be placed in places where the beams are attached). Return to the table of contents</a>
Adjustable lag setting
Now we can talk about the structure of the logsconcrete on adjustable posts. Fig. 1 shows one of the varieties of such devices. They are used on uneven bases, and the correct installation of the beams horizontally is achieved by adjusting the height of the supports in the range from 10 to 25 cm. This technology is becoming more and more widespread. It is believed that it will soon replace the laying of logs on a leveling screed, but the price of components for the device of adjustable logs is still high. When laying beams using this method, you should avoid using logs in the lathing made up of 2 or more elements. If such beams are still used, then there must be support points under their ends. In addition, the spread of the joints of composite beams in adjacent rows should not be less than 0.5 m. It is permissible when the joints are located opposite each other through a row. To facilitate the installation of adjustable logs, it is best to build a horizontal plane, the same as before pouring the leveling screed.</ ul>


