One of the main stages of any capitalrepair in an apartment or a private house is the leveling of the sexes. This work is quite complicated and requires the performer of maximum responsibility and attention. Among modern methods of designing floor coverings, self-leveling liquid mixtures with which the process of pouring floors is greatly simplified is very popular.  Floor Screed Scheme. Self-leveling floor, spreading, forms an even, firm and smooth surface, which is excellent for further finishing with laminate, linoleum, tile, etc. Therefore, further on, we will consider how to make a self-leveling floor.
Preparatory work
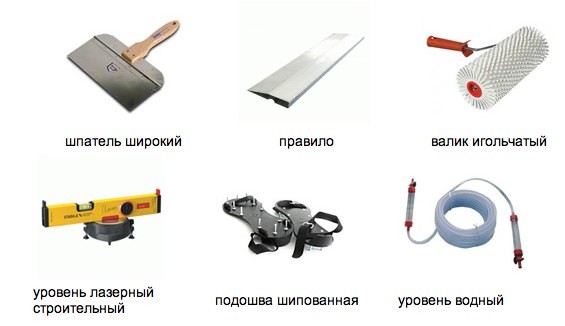 Necessary tools for self-leveling floors. For installation work you will need the following tools and materials:
- Electric drill or perforator with a special nozzle for mixing the solution;
- wide spatula;
- needle and cloth roller;
- kraskostupy;
- brush;
- solution tank;
- self-leveling mixture;
- a deep penetration primer.
On 1 m² of a floor in the thickness in 1 mm you need about 1,8 kg of a dry mix. Therefore, for example, to fill the base with an area of 15 m² with a thickness of 5 mm, you will need: 1.8 * 5 * 15 = 135 kg of dry mixture. 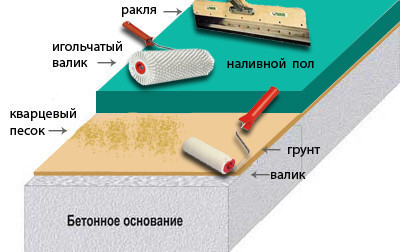 Self-leveling bulk floor scheme. After removing the old floor covering, you need to check the strength of the base, the presence of chips, cracks and other visible defects. If such places are found, they should be sealed with a usual cement-sand mortar. Pay special attention to the difference in heights in the entire finishing area. The difference between the smallest and largest height should not be more than 3 cm. Further, the floor is cleaned of all sorts of debris and dust, as their presence significantly reduces the adhesion of the self-leveling mixture. The whole substrate must be thoroughly treated with a deep penetration primer. In this case, it is recommended to apply the primer with a brush or a cloth roller in 2 layers. To prevent leakage of liquid solution through the doorway, a special barrier is installed, which can be made from improvised means (for example, from planks). After the preparation of the substrate for pouring is completed, you can proceed to kneading the solution. To do this, the purchased dry mixture must be poured into a container of water in certain proportions indicated on the package. This solution should be thoroughly mixed, for which you can use an electric drill or a perforator with a special nozzle. The floor can be poured while the mixture is liquid. Over time, it begins to thicken, so after preparing it, you must immediately go to the installation work. Back to contents</a>
Pouring a self-leveling compound
Perform work on pouring the floor should be at an ambient temperature of +10 to +30 ° C and a relative humidity of not more than 65%. 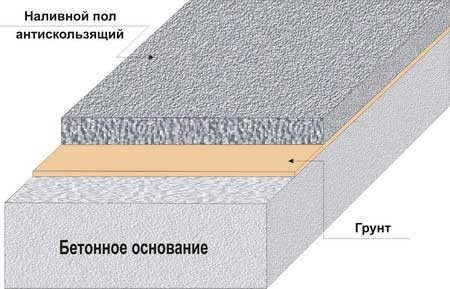 Scheme of liquid anti-slip floor. Also, in the room where the pouring is done, there should be no drafts, so all windows and doors must be closed. The prepared solution is poured on the base with strips about 25-45 cm wide, after which they are evenly spread with a wide spatula. After that, the distributed mixture is rolled out with a needle roller. This procedure removes all air bubbles from the solution layer, which significantly increases the strength of the future coating. At the same time, all work is done in paintballs. After coating the entire substrate, it must be allowed to dry and gain strength. Depending on the thickness of the filling floor, this can take from 2 days to 2 weeks.


