Advantages of laminate flooring have long been widespreadknown and descriptions do not require, but the advertising move, attributing to him the glory of the material, the laying of which is made easier than the child's designer, can be discussed separately. The simplicity of installing this floor covering does not cause doubts, but without getting acquainted with the requirements for preparation of the roughing base and the basic rules for assembling the finished floor, its performance properties may be in jeopardy. Having become acquainted with the recommendations on how to correctly lay the laminate, it will be possible to significantly reduce the time and physical costs of its construction and to obtain in the final result the most famous durable, durable and wear-resistant floor for your home. 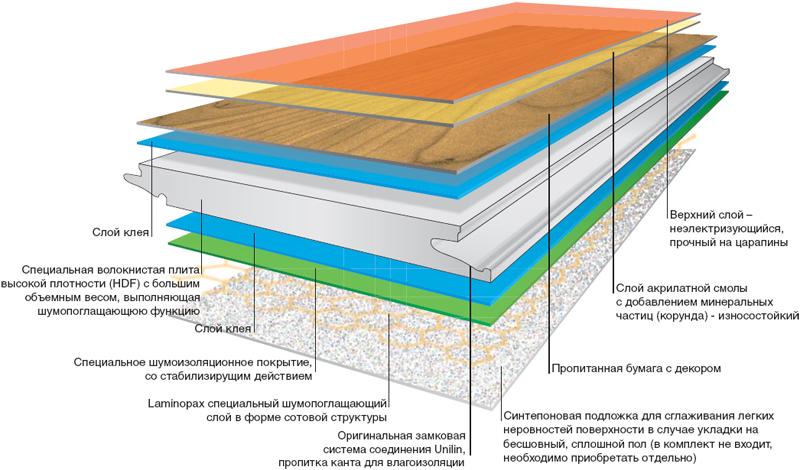 Layout of the laminate.
Requirements for the basis for laying the laminate cover
Start preparation for work from the inspection andcareful examination of the base of the rough floor. If it is a question of a new building, it will most likely be concrete. First of all, check the condition of the horizontal plane in order to reveal its deviations from the norm. This will help the use of laser or conventional building level. Measurements are made in the longitudinal and transverse direction, after every 1.5-2 m of the area. Ideal is the indicator, in which the values do not exceed 2-3 mm. Significant changes in altitude will require the alignment of the base with the cement screed. This is a rather troublesome process, but only these actions will create conditions for the normal stability of the self-laid floor.  Scheme of waterproof laminate. If the measurements of the horizontal plane satisfy the requirements, it remains only to eliminate the visible defects: seal the grout, cracks and slits with a cement-sand mortar, paying special attention to damages at the joints of the walls and the base caused by the natural shrinkage of the building. The bulges are removed with a grinder and the room is cleaned of debris and dust, if necessary using a vacuum cleaner. You can lay the laminate on an old floor covering, and all its types are suitable for this, except soft carpet. But for each type of rough floor there are separate requirements for the condition and training measures:
Back to contents</a>
Substrate and a set of necessary tools
 Scheme of transverse laying of the laminate. Recommendations on how to lay a laminate, can not bypass the important point of using a substrate when laying. This material simultaneously solves several problems, and an attempt to do without it usually leads to disastrous consequences. The insulating layer between the base and the laminate floor serves to eliminate unevenness, provides cushioning at physical pressure, and also acts as a heat insulator, absorbs excess moisture and protects the housing from most of the noise when walking. The substrate can be of different types, from cheap and popular products made of expanded polystyrene to expensive, but with excellent cork characteristics. The choice of it depends on the budget and features of the premises, and consulting a seller in a specialized store will help determine the most appropriate type of material. On sale there is a special set for laying laminate, but most of its contents are usually in the home tools of any master, so it is better to buy the missing separately or take on time from friends:
- electric jigsaw or saw with a small tooth;
- a hammer;
- clamp;
- chisel;
- roulette;
- marker;
- Rubber hammer;
- wooden wedges.
In addition to the desired tool and substrate at the same timewith the acquisition of laminate should not forget about the additional elements - padding, skirting and corners for them. Still need to take into account that before the work starts laminated boards should be held in the prepared room for several days. This is necessary for their adaptation to the climatic conditions of future exploitation. Back to contents</a>
The ways of laying laminated panels
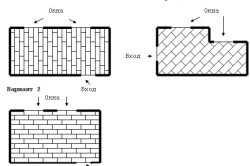
 Laying underlayment under the laminate.You can lay it in different ways and according to different schemes. The adhesive installation method is rarely used, and this happens for two reasons. Firstly, this deprives the laminate of one of the main advantages - easy dismantling if it is necessary to transfer it to another room, and secondly, the appearance of locking joints at the ends of the boards makes it easy to assemble them into a single plane, without long fiddling with glue. Do-it-yourself laminate flooring can be laid in three different patterns: classic, checkerboard and diagonal order of the boards. The latter method is not recommended for the first experiment on the installation of a laminate floor, as it is quite laborious, and when using it, a lot of waste is generated. It is better to dwell on a simple and practically waste-free classical scheme or lay the laminate in a checkerboard pattern, reminiscent of the principle of brickwork. In this case, each new row is shifted exactly half the panel of the previous one. The floor laid in this way is strong and stable, and the resulting waste (about 15%) can be used in places closed from the eyes of the furniture. Back to the table of contents</a>
Laying of laminate flooring
 </a> Options for installing a laminate floor. How to lay a laminate in terms of the location of the boards, usually decide on the basis of the direction of sunlight. It is believed that the joints between the panels become less noticeable if the rays fall parallel to the length of the boards. But much depends also on interior features, furniture placement or simply on personal preferences. Before the commencement of work, the number of rows of material should be calculated. If he shows that the last strip is too narrow, then the first one will need to be cut in width to achieve their proportional correspondence. The substrate is laid on the prepared floor surface, while overlapping of the sheets on each other should be at least 10 cm. This is to ensure that they do not get lost when laying the lamellas. In addition, you can fix the edges of the strips of tape. Laying starts from the far corner and necessarily leave a small distance to the wall, which is necessary to compensate for the size of the boards, changing temperature and humidity. The assembly of laminate panels equipped with a Click-lock at the ends is done as follows: the first board should be turned to the stacker with the groove, and the second one should be brought to it at an angle, and the crest at its end is inserted into the groove. A typical click will show that the connection was successful. Installation is done until the first row is fully installed, and the last panel is brought to the desired size by cutting off the excess part with an electric jigsaw. In the classical arrangement, this residue will become the beginning of the second row. This is achieved by the lack of joints between the boards and the minimum amount of waste when stacking. With this technology, the whole plane is assembled, and to achieve a greater density of joints, light tapping with a rubber hammer and wooden wedges are used. Near the heating pipes saw holes a little larger diameter, to allow the laminate to expand freely. To install the last row you need a clamp, it will protect the edge of the panels from damage and ensure a uniform load when pummeling. Back to contents</a>
Installation of skirting boards and flaps
The installation of additionalelements - plinths and skirts. The skirting boards can be fixed using self-tapping screws or dowel-nails. It is especially important to make precise places for their connection, so that the formed slots are no more than 1 mm. Laying the cover in the doorway may not be easy. From the very beginning, you need to make sure that under the door there is a space of at least 1 cm, allowing it to move freely. Carefully arrange the layout of the laminate in the opening can be in two ways: to saw in the right places the door frame or to adjust the material, having drunk it to the exact size. Avoiding the error will help a paper-made template that is applied to the test before the sawing. The installation of the door not only secures the panels near the door, but also helps to create a complete design of the floor covering.


