Laminate is taking up more and more space on the marketfloor coverings. This material is used for laying floors in both residential and office spaces. Laying laminate is an operation that even an inexperienced craftsman can handle, although in order to gain experience for independent work, you need to get more information about the technology of installing laminate flooring. Structure of laminate board.Most often, laminate flooring is laid on plywood, since multilayer veneer is an excellent base with high leveling characteristics, environmental indicators, and heat and sound insulation properties. However, plywood will become a reliable base for laminate flooring if the floor is laid correctly. Plywood should be laid under laminate only on a prepared surface. It can be a leveling screed, joists, or a wooden floor.
How to lay veneer on logs
 Direct laminate installation diagram.When laying plywood on joists, you need to take into account the distance between the beams. The thickness of the building material that can be mounted on it depends on the step of the sheathing. In addition, both the joists and the veneer must be treated with antiseptics, and reliable hydro- and thermal insulation must be arranged under them. Plywood sheets must be cut so that the joints lie on the beams. Plywood should be laid with a 2-millimeter gap between the sheets. The same gap should be maintained between them and the walls. The gap will allow you to compensate for the expansion of the material with changes in temperature and humidity without consequences for the coating. Plywood is attached to the joists with self-tapping screws through pre-drilled and countersunk holes, the step of which is 15-20 cm. Self-tapping screws are screwed not only into the beams along the edges of the sheet, but also into the joists lying under the center of the plywood. The transverse joints in adjacent rows of plywood flooring should not coincide with each other, but be laid out in a checkerboard pattern. Return to contents</a>
Plywood flooring on leveling screed and wood floor
 Schemes for laying laminate panels with offset.The plywood is laid on the screed after the solution has completely hardened. Before this, the base is treated with a primer, then elastic glue is applied to it. It is advisable not to use large sheets of veneer so that they do not deform during use. The optimal panel size is ¼ of a standard sheet. They are laid with gaps of 3-5 mm and attached to the screed with dowel nails, the pitch of which is no more than 30 cm. Fasteners are installed along the perimeter and diagonals of the panels. The joints of the sheets in adjacent rows should also not coincide with each other. On a wooden floor, plywood laying begins from the center. Whole panels are laid there, and then fragments are laid. As in the previous cases, gaps must be maintained between the sheets, as well as between the plywood and the wall. The main thing when laying plywood under a laminate on a wooden floor is to make sure that the base is even and suitable for further use. Return to Contents</a>
Tools and materials for work
 Laminate flooring installation diagram with fastening system"Lock". After the base is ready, which will enhance the heat and sound insulation of the floor, the installation of laminate on plywood begins. As already mentioned, it can be done independently. For work, you need to prepare:
- electric jigsaw;
- measuring tools and square;
- podbivochny brusok;
- Impact drill for mounting skirting boards;
- a hammer;
- dowel-nails;
- Screwdriver;
- laminate and substrate under it.
Return to Contents</a>
How the coating is stacked
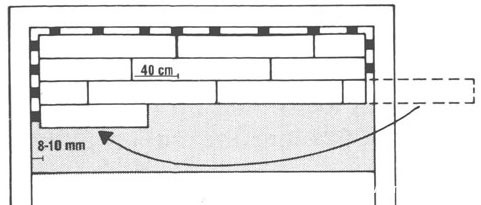
First, you should check how ready the plywood base is for laying the flooring. If it lies tightly and forms a flat surface, you can proceed to the next stage. Scheme of laying laminate using adhesive method.Otherwise, you will have to correct the defects. For example, unevenness occurs at the joints of the sheets, since their actual thickness may differ. Unevenness is eliminated by additional grinding and trimming the edges. Now you can lay the underlay. It should not have any folds. The joints are sealed with construction tape. Laying the laminate begins from the left corner of the room, located closer to the window. But before laying, it must lie in the room for 2 days. The panels are mounted along the wall in the direction from the window to the doors. A compensation gap of 1 cm must be maintained between the wall and the panels. To do this, bars or a slat are laid between it and the laminate. The gap is also maintained on the end sides of the row. Taking this into account, the panels should be cut. The panels are assembled in a row using a hammer and a tamping block. When sawing the laminate, chips may form on its front edge. To prevent them from appearing, stick tape over the cutting line and use special saws or blades with the smallest teeth. Cutting should be done at maximum speed and with the pendulum turned off. It is better if the laminate is securely fastened to the table with clamps when sawing. The tips of most jigsaw blades are directed upwards. When the saw moves back, they tear out the fragments of the facing located on top. Apply markings to the back surface of the material, and place the facing surface on the side opposite the jigsaw base when cutting. After laying the first row, you can proceed to the next one. The end joints of the second row cannot be located on the same line with the joints of the previous one. The gap between them should be 40 cm. The boards are installed one by one and hammered into place with a block. A 1 cm thick block should be installed at the end of the far wall. The remaining rows are assembled in the same way. To ensure that the laminate is laid in a staggered pattern, either the first or the last board in the row is cut. Before installing the final row, measure the remaining distance to the wall. It may be necessary to cut the laminate so that after installation the gap between it and the wall is about 1 cm. When the laminate flooring is assembled over the entire area, you can remove the stop bars and slats. The installation of the laminate is completed by installing the baseboards. They are attached with dowel nails along the perimeter of the room or to the wall, or in the corner between the wall and the floor. You should not screw the baseboards to the base, since the laminate floor is floating.</ ul>


