Walls in apartments are never perfecteven, so when renovating a room, they need to be leveled. To reduce financial costs, many people try to do this work themselves. How to plaster walls and what tools are needed? To properly carry out this event, you can use the instructions below. Using plaster, the walls are leveled and all the depressions are smoothed out.
Plastering the walls themselves: recommendations
First, you need to figure out the methods for leveling the vertical surfaces of the room. There are two:
If they are sufficiently level, then they are plastered in the plane without using lighthouses. You can use rules to do this.
With large deviations from the vertical and the presence of various irregularities, the walls are backed up with the help of lighthouses.
 Tools needed for plastering.Plaster for work can be of normal quality, improved or high-quality (it all depends on financial capabilities). It is necessary to know that in the first case, the deviation in the vertical plane should be no more than 2.5-3 mm per meter, but no more than 14 mm over the entire height of the room. In the second case, the tolerance should be observed more strictly: vertically it should not exceed 2 mm per meter and not be more than 9 mm in height. The third option has even greater rigidity in tolerances: in the vertical section - no more than 1 mm per 1 m. In addition, the tolerance should not exceed 4.5 mm over the entire height of the room. For work, it is necessary to use solutions based on cement or gypsum. The latter are preferable for the following reasons:
- they can be applied to a layer up to 4-5 cm thick, and no cracks appear;
- gypsum is not subject to shrinkage, which affects the quality of work when using mixtures based on cement;
- gypsum has a high plasticity, high adhesion properties and relatively low weight;
- this material passes air and has good heat and sound insulation;
- gypsum plaster can cover smooth walls of concrete without using a metal mesh.
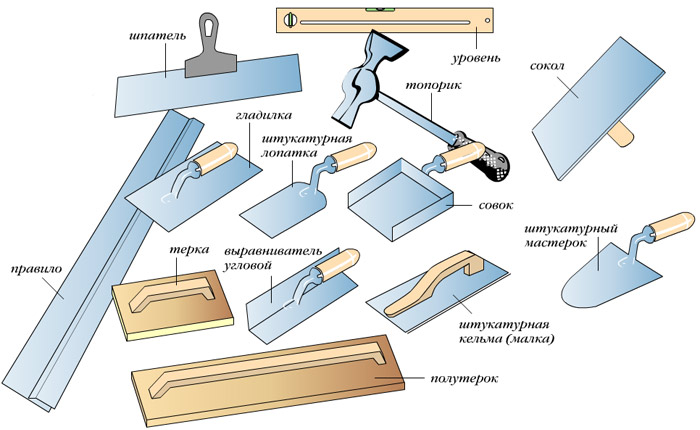
Beacons are metal profiles withwith numerous holes. They are used as limiters during plastering work. The rule is moved along them to get rid of excess mortar. They are up to 3 m long and 5-6 or 9-10 mm high. A wooden or metal lath is used for the work. It is used to level the mixture applied to the surface when laying a screed or plastering work. It is used to check the evenness of the applied layer of mortar and remove its excess. All this can be bought at the construction market. For the work, you will need a hammer drill with attachments, a mixer and other tools (the list is below). The funds spent will pay off a hundredfold: the larger the surface that needs to be processed, the greater the savings will be when doing such work yourself. Return to the table of contents</a>
Preparing for the installation of beacons
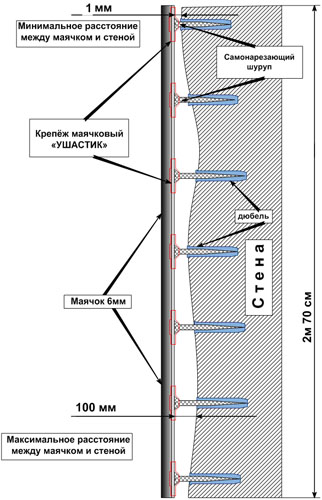 Figure 1. Scheme for installing plaster beacons.This method is most often used when leveling surfaces in a room. First, you need to buy tools, a profile for beacons and the plaster mixture itself at a construction market. When you have all this, you can start leveling the walls with your own hands. The main thing is to correctly mark the walls with beacons. If you can use a laser level, the work process will be much easier. The technology of marking work is as follows:
Carefully inspect the entire surface of the walls andCheck with the help of the building level and the plumb bend from the vertical. Apply a long rail (rule) to the wall at different angles and determine the presence of hillocks and troughs. The marker should be noted irregularities.
Begin marking under the lighthouses. The two extreme ones must be installed on both sides of the wall, retreating from its corners 25-30 cm. Vertical lines are drawn in these places (Fig. 1). For the convenience of using the long rule (1.9-2 m), the distance between the beacons should be selected at least 150 cm. With this step, draw as many lines as fit between the corners of the wall. If there is a door on this surface, then the step should be reduced, for example, to 110 cm.
The length of the beacons is chosen less than the length of the rule.
The lines are retracted 10-15 cm and drilled holes in these places. In them it is necessary to hammer plastic dowels with screws. Horizontally pull the cord between the marked corners of the room.
Then from the hammered dowels retreat upwards onthe distance equal to the length of the rule, and drill at these points the holes, insert plastic with screws and pull the cord. Where he crosses the vertical line markings, you need to make a marker mark. They drill holes and drive dowels without screws.
Began to install beacons. To do this, first apply a primer. For smooth walls, you can use its usual version, but for porous ones you need a mixture of deep penetration. The primer is applied with a paint brush (Figure 2).
It is necessary to wait for the drying of the walls (12-24 hours) and only after that go to the next stage of the work.
Screw in the dowels 4 screws on the angular lines and2 more on a horizontal line at the top. Attach the rule with a sharp edge to their hats and make a correction, screwing (or, conversely, twisting) the lower screw. The verticality of the installation is verified by a plumb line.
The same operation must be carried out in the other corner of the room.
After this, it is necessary to check that the beacons do notwent beyond the required level, when they are installed. To do this, pull the cord diagonally and connect the screws of the screws. Put a piece of lighthouse under the rope. He must freely climb under the lace. String food one diagonal and repeat the check. All screws are set at one level, equal to the length of the corner screws.
On top hats you need to pull the cord. Profile for beacons must move freely under it. The center screws must be adjusted so that they lightly touch the cord.
The same operations must be repeated for the lower row of screws.
Return to Contents</a>
How to set up beacons?
 Figure 2. Wall priming scheme. To do this, you need to follow the recommendations below. The technology for such work looks like this:
Beacons must be cut to a length somewhat smaller than the lengths between the dowels.
Prepare a small amount of plaster(pour water into a bucket, add the mixture and mix thoroughly with a hammer drill with a nozzle or a spatula) to strengthen the beacons. The solution should have the density of cottage cheese or sour cream - the finished plaster should not fall off the spatula.
The mixture is applied along the line so that it extends slightly beyond the hats of the screws.
Push the lighthouse into the plaster on the wall, using the rule for this. Verify the smoothness of its installation, and if necessary, adjust the location. Screws are removed from the wall.
Repeat these operations for the other lighthouses.
Return to Contents</a>
How do you plaster the walls?
Now you can start the main work: Scheme of finishing walls with lime plaster.
Pour water into the bucket (it should fill 1/3 of the vessel) and add the right amount of the plaster mixture. The solution is thoroughly mixed with a mixer.
The density of the resulting mixture depends on the required thickness of the applied layer, but it should not fall off the spatula.
If the surface of the walls is porous, then it must be humidified before starting work. Wetted on the site, which is applied at this time, plaster. This is done by a spray gun.
If there is no experience of such work, then the mixture must first be applied to ironing and then immediately aligned over the wall surface.
The alignment working process must be done in the direction from floor to ceiling. The layer of plaster should go beyond the lighthouses and be dense, without any allowances.
After this, we must take the rule and start driving themby lighthouses. Its sharp edge must be perpendicular to the marking elements. When tilting the slats, you can remove excess plaster. The rule is made by zigzag motions and slowly lifted upwards, and the excess of the mixture is removed with a spatula, overturning them over the rack.
In the formation of bubbles or irregularities, the work needs to be remodeled, since in these places the solution does not have a support and can fall.
In this case, it is necessary to remove the plaster with a spatula and apply it again, and then correct it with the rule.
To finally smooth the surface, throughout theits height is carried out by the rail, but without pressure and zigzags. The excess mixture must again be thrown over the rule. These actions must be performed several times, and then again go from top to bottom rack to remove the remaining excess solution.
Then a new portion of the plaster mixture is bred and the working process is repeated. This must be done until the upper beacons are reached.
Smoothen the top of their ends and move to another strip. When all parts of the wall are covered with plaster, there will be two strips (near the floor and ceiling). They are closed after the bulk of the plaster has dried.
If there is a door in the room, then it must be closedslopes. To do this, apply the solution overlap and fill the voids along the edges. Align the mixture without beacons, along the plane of the finished wall. The rule in this case is better to hold vertically.
After the end of the work, you should check the result. To the wall, the rod is applied at different angles, and if there are hillocks with a height of more than 1 mm, they are scraped off. If cracks appeared, they should be covered with liquid plaster and smoothened with the application of the rule.
The next step is to remove the metal beacons. They are pried up with a screwdriver and removed from the wall, and the remaining holes are sealed with mortar using crisscross movements and the surface is leveled with a lath.
If the differences on the walls are more than 5 cm, it is necessary to applymixture in 2 layers. The first is applied without leveling and on wet plaster with a notched spatula. After a few days, the wall is primed and covered with a second layer. In case of large irregularities, plasterboard should be used. Return to contents</a>
Grout as the final stage of work
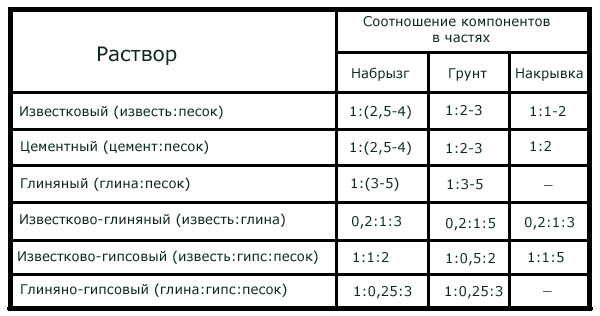 Proportions of plastering solutions.To simplify the execution of this operation, it is done before the mixture applied to the wall surface dries. For this, liquid plaster is used, and the wall is moistened before work on an area of up to 1 m². The solution is applied to the trowel and spread in a thin layer in the form of a square. This is done with a trowel, with strong pressure, at an angle of 45 °. This operation is continued until there is no more excess. You should get an even, smooth surface. All these actions must be repeated until the entire wall is covered (Fig. 3). If it is necessary to plaster external walls using beacons, then the technological process of work is identical to the one described above. It is only necessary to correctly observe the temperature regime: it should be 5-10 ° C outside. For such work, you need to use a mixture of cement and sand, and for durability and stability, a steel mesh must be fixed to the facade and the plaster mixture must be applied to it. This is a necessary condition if the house is built from sand-lime brick. Return to contents</a>
Materials and tools used in finishing works
To work you will need: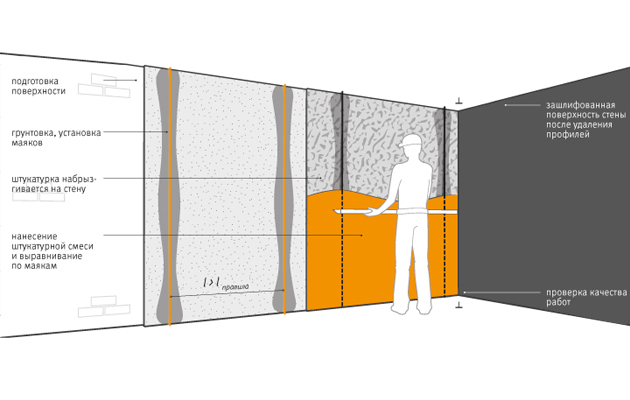 Figure 3. Scheme of leveling walls with plaster.
- plaster;
- a primer (acrylic);
- metal beacons (5-6 mm high);
- rule (rake made of wood or metal) 1.9-2 m long;
- a perforator with a nozzle for mixing the solution, a set of drills;
- mixer;
- steel mesh (if necessary, work on the facade);
- cord (rope or synthetic);
- Bulgarian with a disc for cutting metal (for cutting beacons of the required length);
- scissors for metal;
- plastic dowels and screws (the size depends on the thickness of the walls);
- screwdrivers (straight and cross);
- building bubble level up to 2-2.5 m in length (if there is a laser option, this is even better);
- plumb and hammer;
- a set of spatulas of different widths (it is usually possible to use them with dimensions of 10-15 cm);
- wooden or steel ironing;
- paint brush (roller) for primer application;
- roulette and metal ruler;
- marker (preferably red);
- gloves for protection of hands during work;
- bucket (galvanized or made of plastic).
You don't need it to plaster the walls yourselfspecial skills, just desire, money and precise adherence to the above-described technology. If you have the opportunity and do not want to get your hands dirty, you can invite construction workers who are professionals in this matter.
Comments
comments


